Getting Prepared for Online Workshops?
Since our time together will be all too short, you are encouraged to review Botanical Drawing 101 and Fundamentals of Watercolor.
Follow the GREEN TEXT for workshop specific information and just scroll down and you will find what you need!
For this Saturday, June 8, 2024
look under Fundamentals of Watercolor for the Black-Eyed Susan section.
Are you a complete beginner to the practices of drawing and painting? Welcome! and begin here...
This page is designed as a support and reference for my in person and online workshops. Visit as often as you like and feel free to share this resource with others. Questions? Write me!
If you are new to the practice of drawing and painting, taking one of your first workshops, or just feeling a bit rusty, I highly recommend that you begin here with Botanical Drawing 101. Let's get started with simple flowers and explore the fundamentals of drawing, how to use watercolor and finally colored pencil.
If you are new to the practice of drawing and painting, taking one of your first workshops, or just feeling a bit rusty, I highly recommend that you begin here with Botanical Drawing 101. Let's get started with simple flowers and explore the fundamentals of drawing, how to use watercolor and finally colored pencil.
Botanical Drawing 101
Referenced Videos to Help You Understand Your Materials Better
|
|
|
Reference and Step by Step Image Gallery for Drawing


|
March 2024 Basic Botanical DrawingClass sample and subjects.
Please scroll down for examples and guidance on creating background watercolor techniques and the Progressive Bulb Project. |
Fundamentals of Botanical Watercolor

Summer Peonies on hot press 90 lbs. watercolor paper Example of "tighter" layered wash technique with dry brush details.
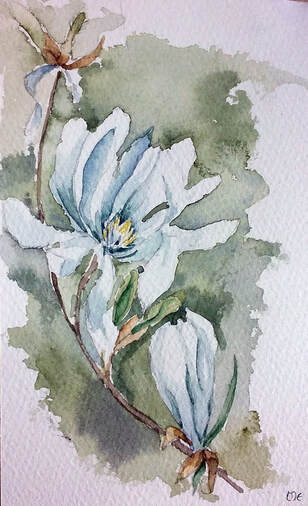
Star Magnolia buds and blossoms on cold press 90 lbs. watercolor paper. Example of a looser "wet into wet" technique
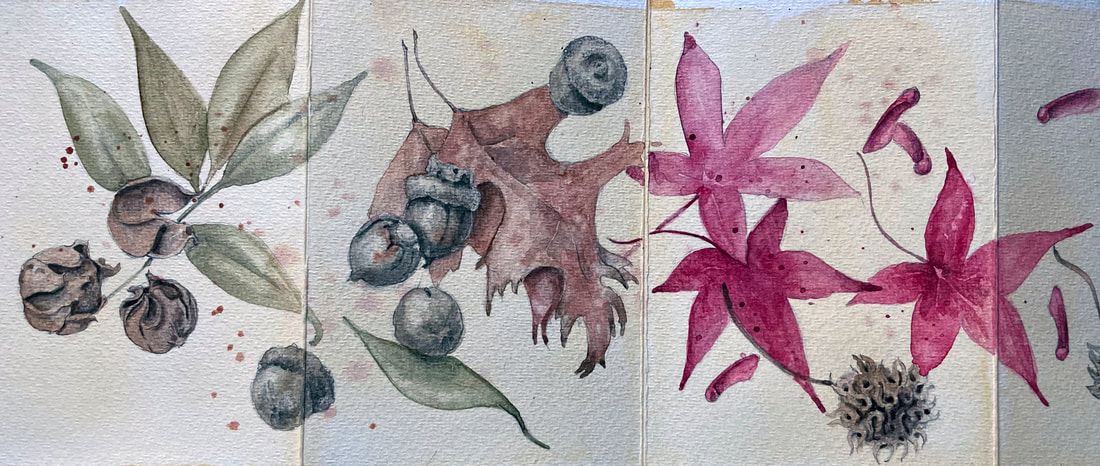
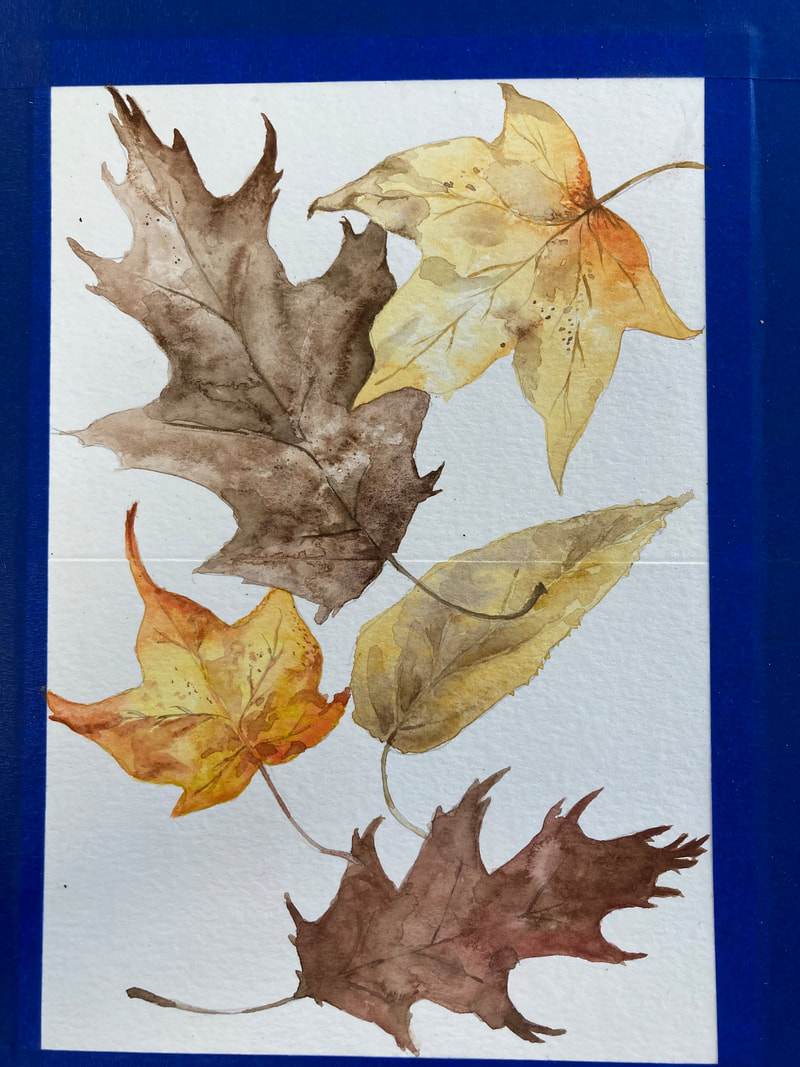
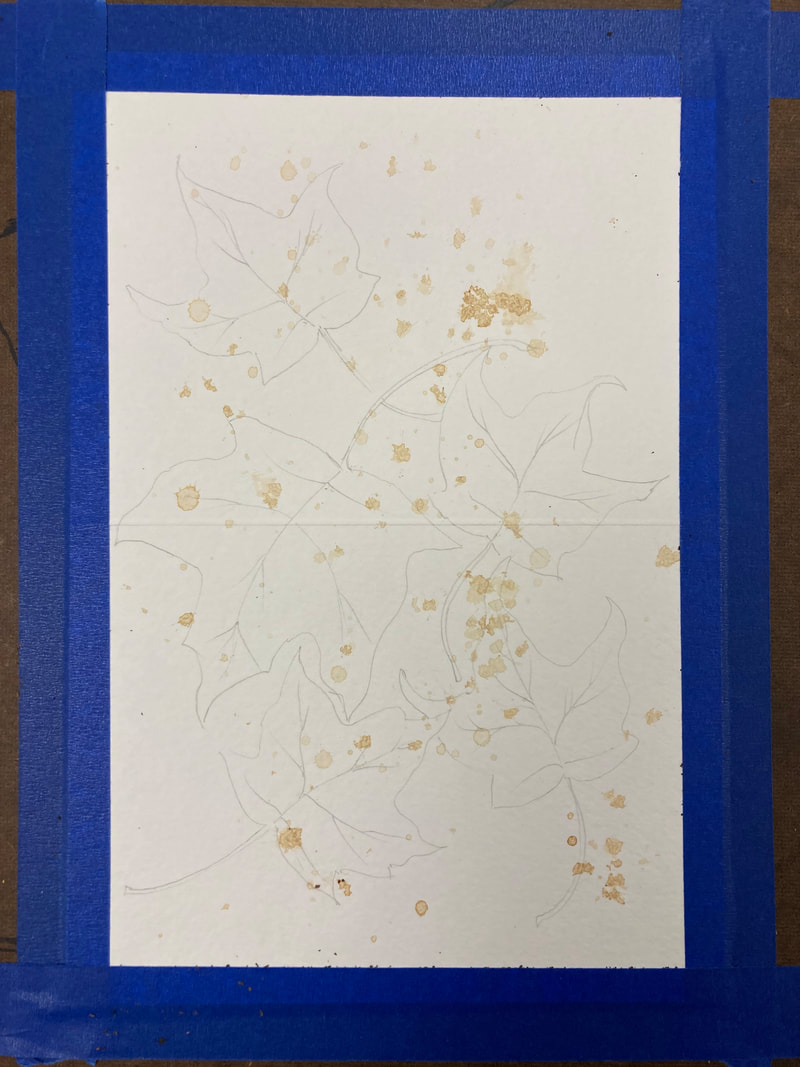
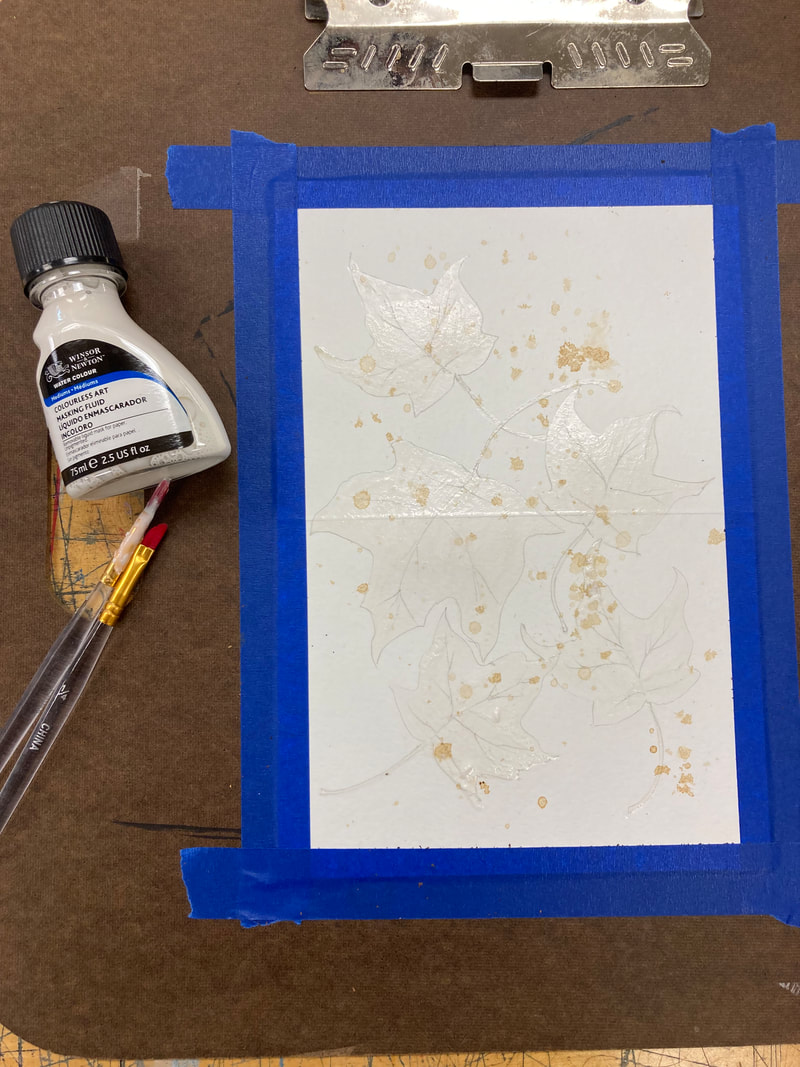
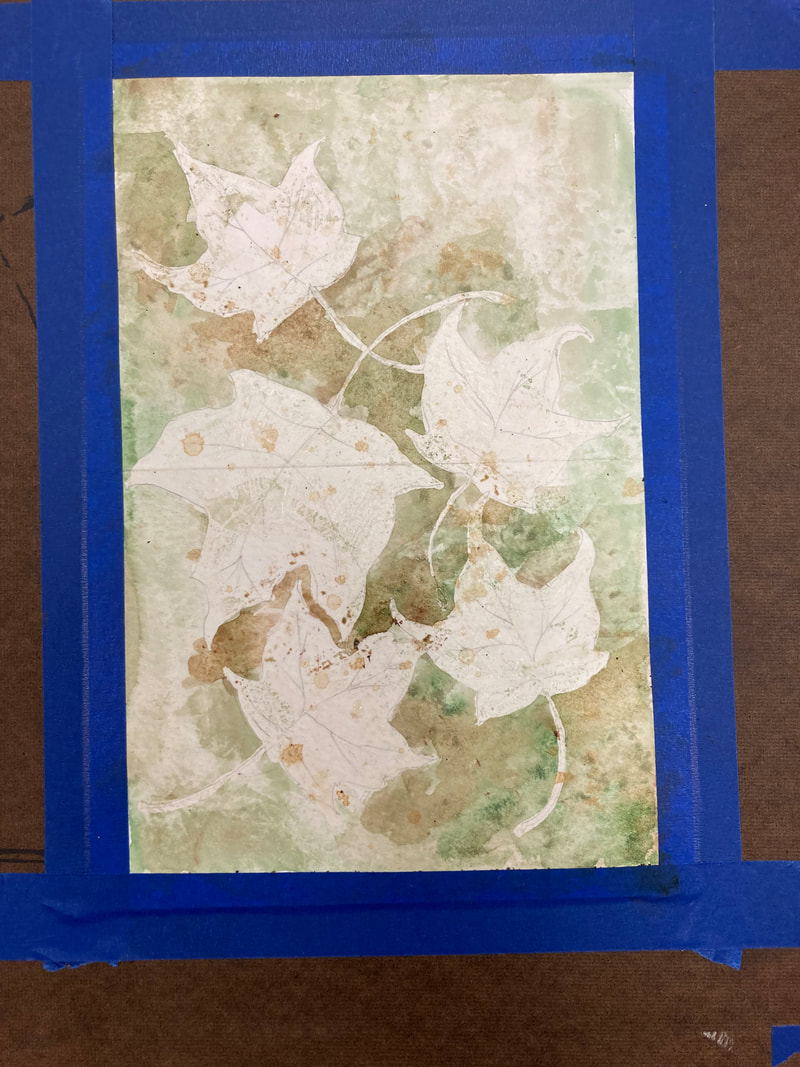
Autumn Leaves and Seeds in Watercolor and Graphite
|
Welcome to Fundamentals of Botanical Watercolor
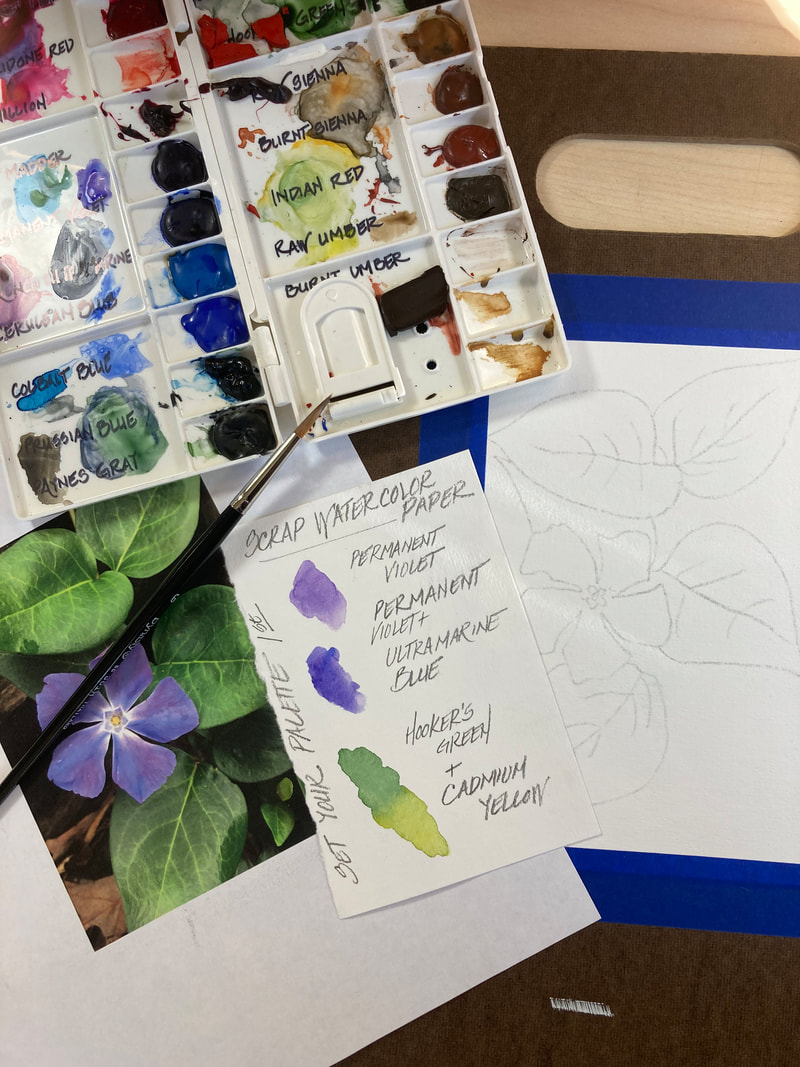
Beginner and experienced artists can celebrate the beauty and color of all the seasons of the year using this reference to my online workshops. Painting botanical subjects is one of the best ways I know to develop your eye for color and value as they work together to define form. Suggested Materials List: Watercolor Sketch Pad 90 lb. Paper 9”x 12” 2H pencil water soluble wash pencils (optional) 1 small pocket pencil sharpener 1 “pink pearl” or similar type eraser Watercolor brushes Basic Watercolor Set 1-2 small ceramic or glass jars for water (repurposed jam jars are excellent for this) Don't know what makes a good watercolor kit and what brushes to buy? Here are some tips: 1. If you are just getting started working with watercolor I recommend a basic artist's grade watercolor kit that is a lightweight plastic box that has space for mixing colors and contains an assortment of 12-14 half pan colors (they will look like little square cakes). Good colors to have are Alizarin Crimson, Burnt Sienna, Burnt Umber, Cadmium Red, Cadmium Yellow, Cobalt Blue, Sap Green, Ultramarine, Viridian, and Yellow Ochre. 2. For brushes, look for short handle, sable bristles that are rounds sizes 1, 3, 5, and a 6 flat (or shader) Not Experienced buying art supplies? No worries, I recommend ordering these from Jerry's Artarama: https://www.jerrysartarama.com/ These two kits will have everything you need and more. (pictured below) 1 set Koi Watercolor Travel Value Set -079483B000000 $49.99 (this includes a small sketchbook that will be perfect for getting started as well as brushes!) 1 set Prismacolor Tin Graphite Set Of 18-0073804000000 $18.99 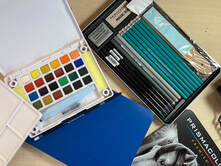
Please note my product recommendations are not a paid endorsement, simply what I have found works well for my students and myself for the most reasonable cost.
Want to make your own palette with tube colors?
I recommend a John Pike Palette or Masters International Folding Palette. Be sure to lightly sand the pigment wells before loading! Also, do not close the palette till pigments are dry (usually leave out over night to be sure). Make sure you make a note or label with permanent marker which colors are in which pan, trust me, you won't remember! |
Georgia O'Keeffe On flowers:
“When you take a flower in your hand and really look at it, it's your world for the moment. I want to give that world to someone else. Most people in the city rush around so, they have no time to look at a flower. I want them to see it whether they want to or not.”
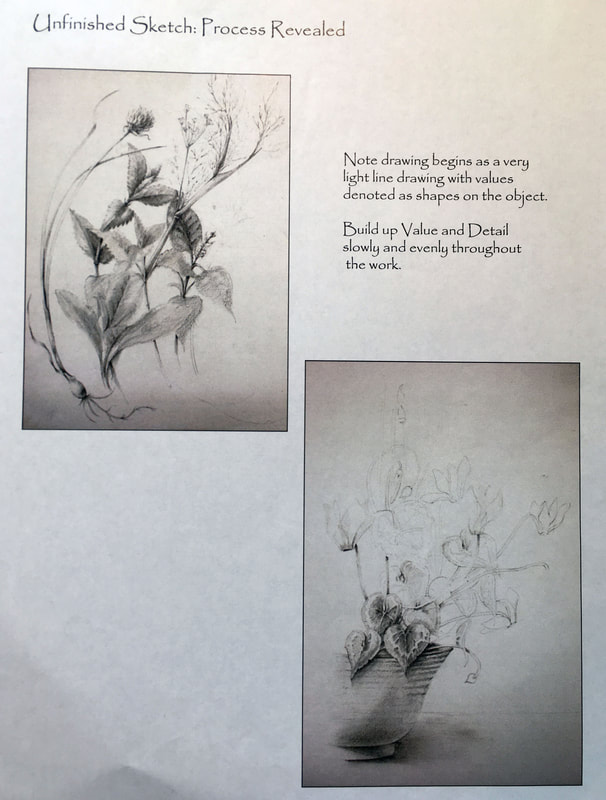
All of the references and examples from the workshop I have prepared for you here for your future review and use. This will allow you to listen and enjoy painting along during the workshop without having to worry about taking notes.
A few pointers before we get started:
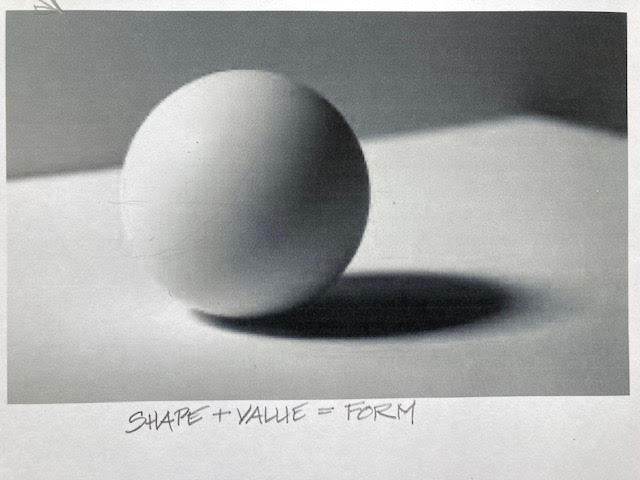
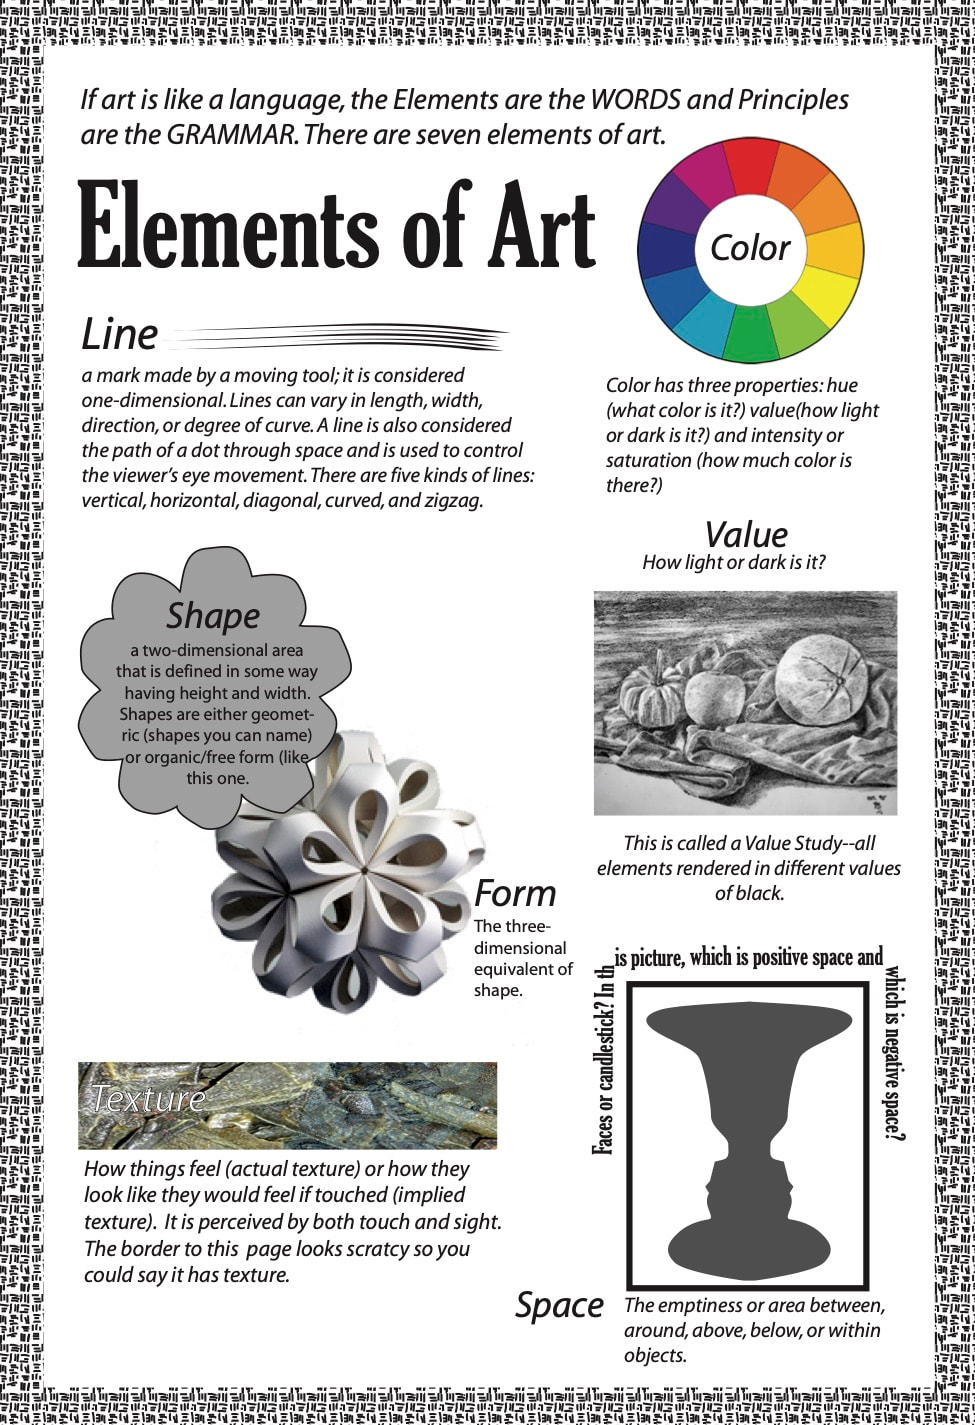
1. Think specifically about the artistic elements of color, value, form, and space when painting flowers.
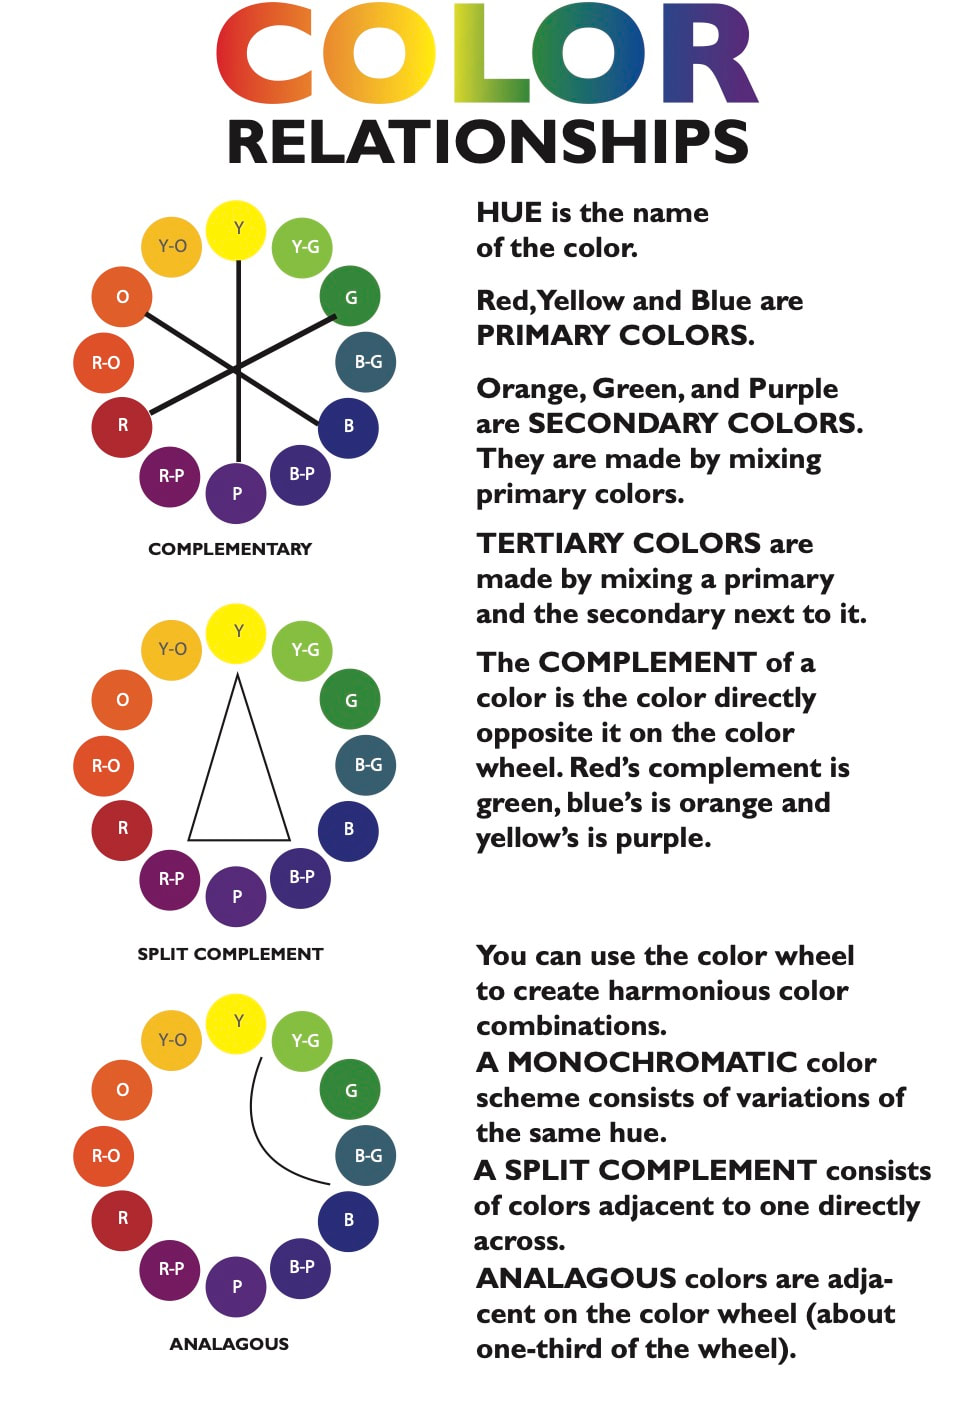
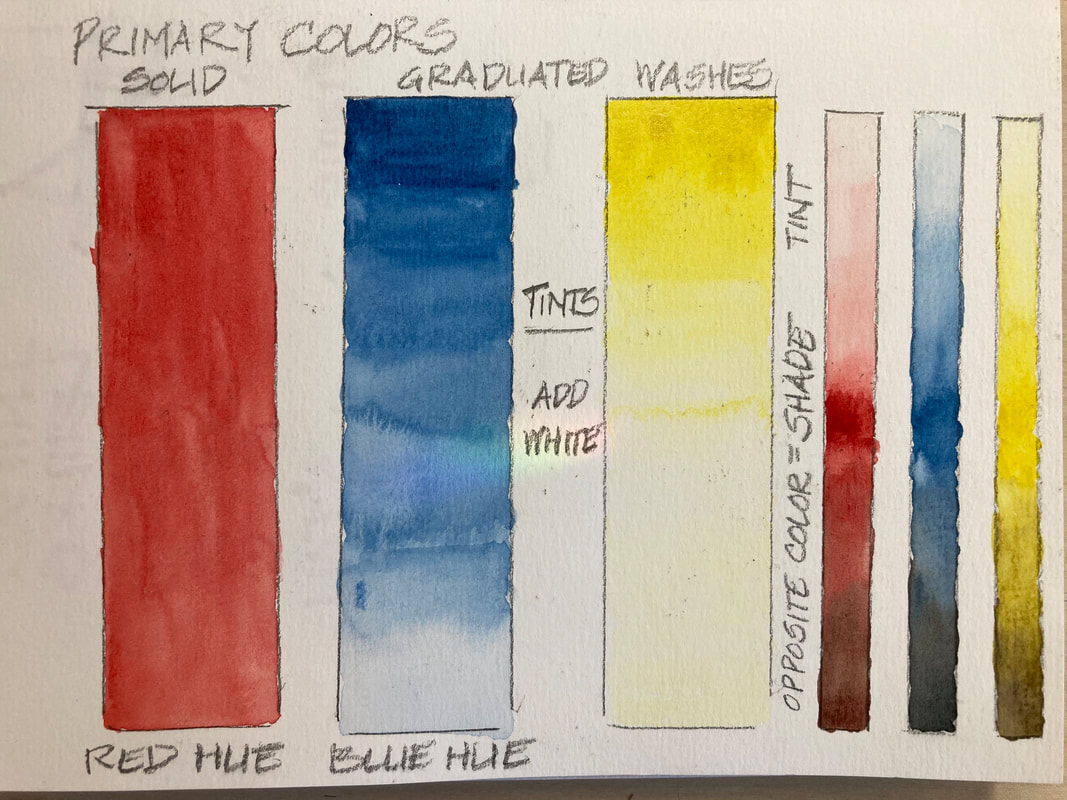
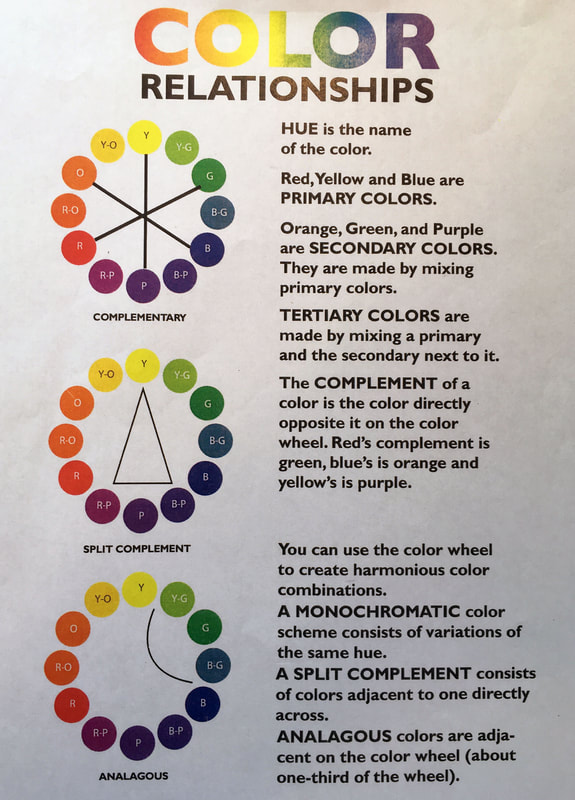
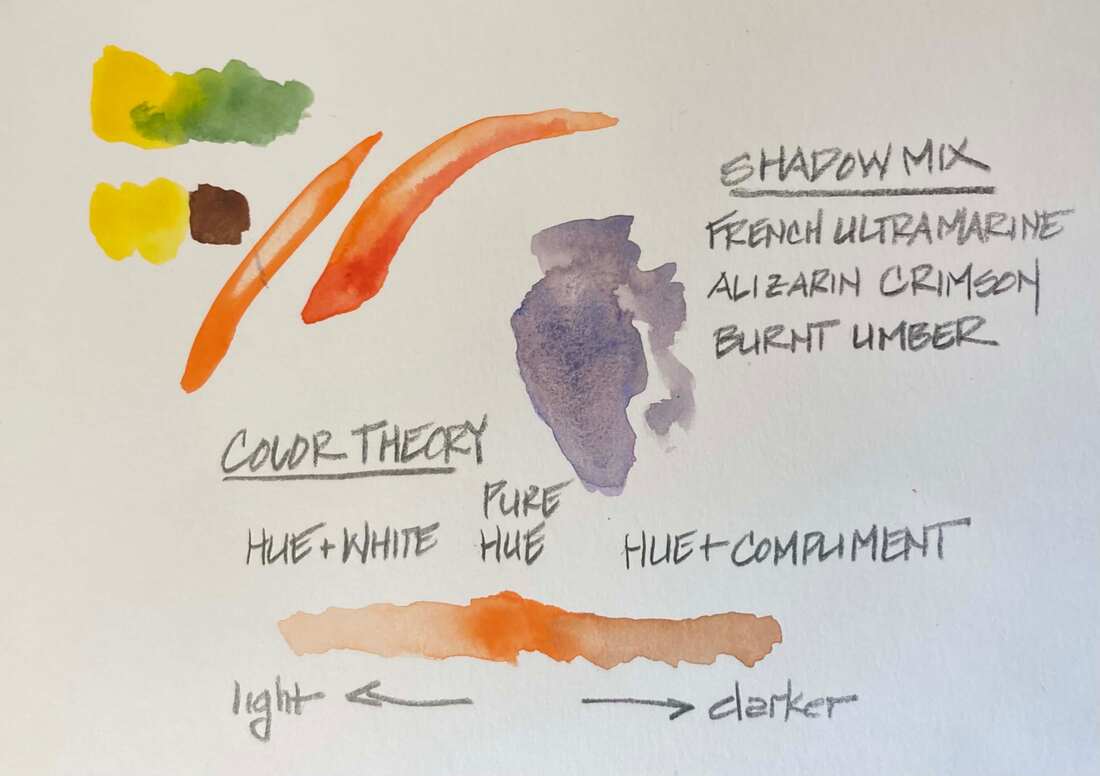
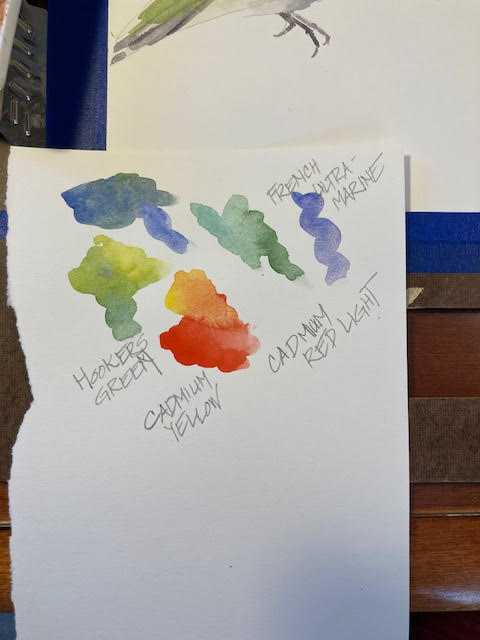
2. Review basic color theory, see reference sheet below to refresh your memory.
3. Remember these color theory "formulas":
hue=color
hue + opposite hue=shade (a darker value of the hue)
hue + white= tint (a lighter value of the hue)
4. Don't sweat the small stuff! No, you don't have to paint every little detail!
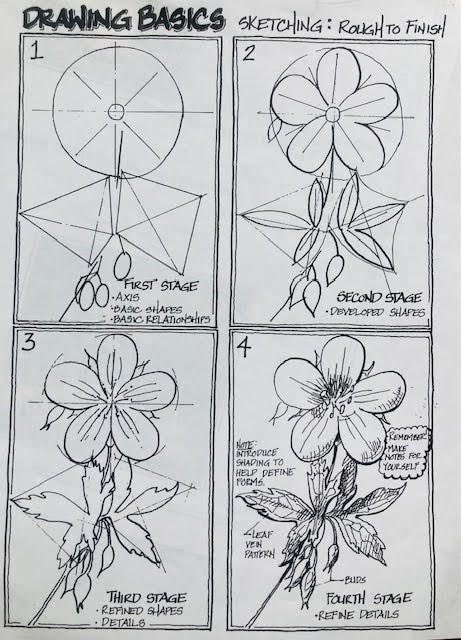
5. Good drawing skill is the foundation for artistic success! Check out my drawing basics below, in the meantime, use the tracing templates or trace your own printed photos to practice your painting. This is all demonstrated in the short video below.
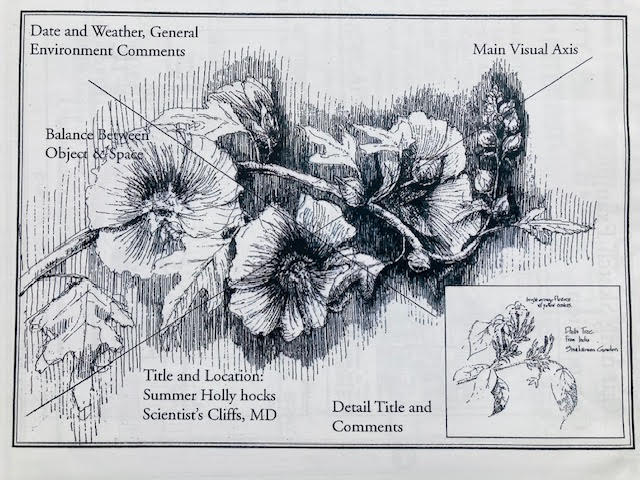
6. Use a full range of values to establish a visual hierarchy of line in creating the illusion of space and dimensionality as well as emphasis. Remember the human eye tends to look at dark and bold first and perceives those things as closer in space.
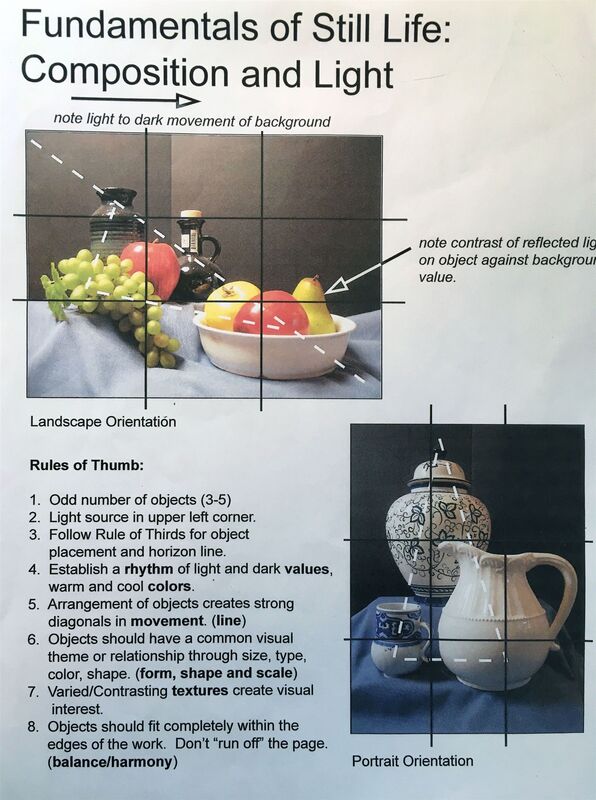
7. Seek to create balance in your subject's structure as well as in solid (positive space) and void (negative space). Balance is important too in value. See the worksheet on composition basics to help.
8. Relax and enjoy your practice! The terrific thing about flowers is that they are everywhere. Look out your window and sketch, take pictures of beautiful flowers you would like to paint for reference on a rainy day...the more you paint the more you will see and the better you will draw!
9. Establish an "art practice." Try to find a regular time and space for you to create. Consider finding an "art buddy." For more ideas, check out my Blog Post on this website from June 2018
10. Go to museums, art shows, online exhibits (museums put most of their past exhibits online). Read art books on artists and works you love. Keep looking. Keep asking Why? Keep asking how? This will help you to keep learning, sharpen your eye, and hone your skills with your hands!
Recommended text for your studio bookshelf:
How to Paint Wildflowers by Keith West
The Flower Painter’s Pocket Palette by Elisabeth Harden
“When you take a flower in your hand and really look at it, it's your world for the moment. I want to give that world to someone else. Most people in the city rush around so, they have no time to look at a flower. I want them to see it whether they want to or not.”
All of the references and examples from the workshop I have prepared for you here for your future review and use. This will allow you to listen and enjoy painting along during the workshop without having to worry about taking notes.
A few pointers before we get started:
1. Think specifically about the artistic elements of color, value, form, and space when painting flowers.
2. Review basic color theory, see reference sheet below to refresh your memory.
3. Remember these color theory "formulas":
hue=color
hue + opposite hue=shade (a darker value of the hue)
hue + white= tint (a lighter value of the hue)
4. Don't sweat the small stuff! No, you don't have to paint every little detail!
5. Good drawing skill is the foundation for artistic success! Check out my drawing basics below, in the meantime, use the tracing templates or trace your own printed photos to practice your painting. This is all demonstrated in the short video below.
6. Use a full range of values to establish a visual hierarchy of line in creating the illusion of space and dimensionality as well as emphasis. Remember the human eye tends to look at dark and bold first and perceives those things as closer in space.
7. Seek to create balance in your subject's structure as well as in solid (positive space) and void (negative space). Balance is important too in value. See the worksheet on composition basics to help.
8. Relax and enjoy your practice! The terrific thing about flowers is that they are everywhere. Look out your window and sketch, take pictures of beautiful flowers you would like to paint for reference on a rainy day...the more you paint the more you will see and the better you will draw!
9. Establish an "art practice." Try to find a regular time and space for you to create. Consider finding an "art buddy." For more ideas, check out my Blog Post on this website from June 2018
10. Go to museums, art shows, online exhibits (museums put most of their past exhibits online). Read art books on artists and works you love. Keep looking. Keep asking Why? Keep asking how? This will help you to keep learning, sharpen your eye, and hone your skills with your hands!
Recommended text for your studio bookshelf:
How to Paint Wildflowers by Keith West
The Flower Painter’s Pocket Palette by Elisabeth Harden
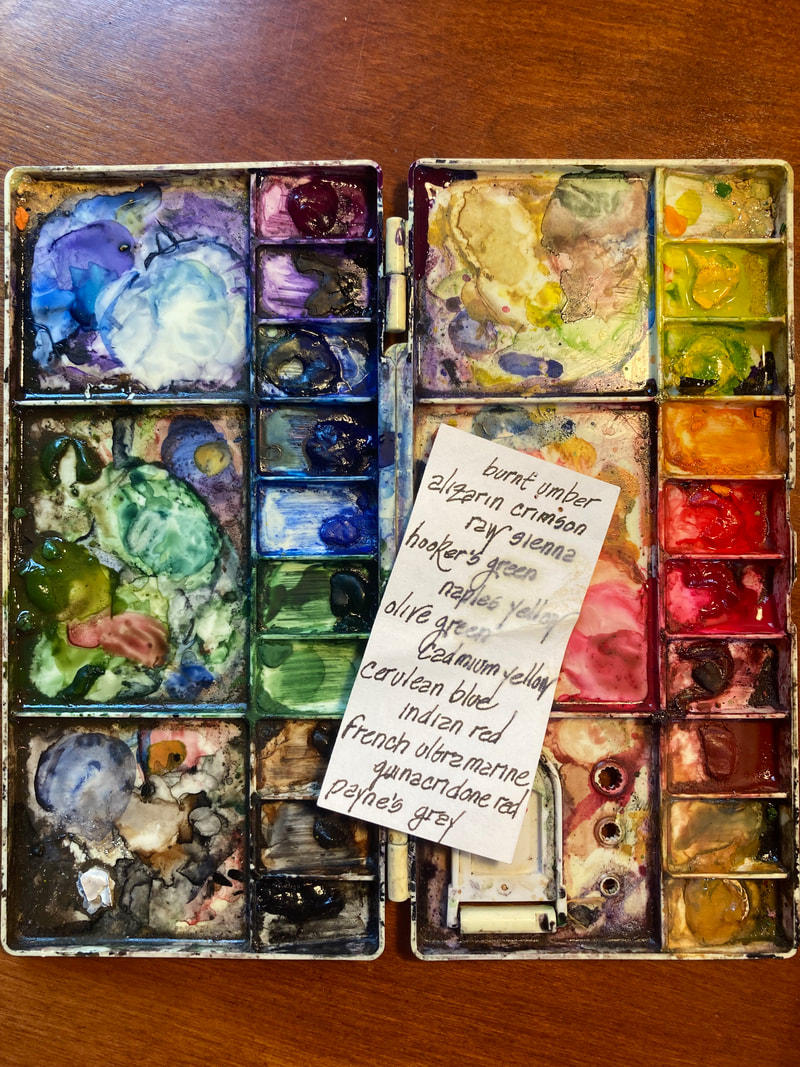
My Palette:
Prussian Blue
*Cerulean Blue
*Cobalt Blue
*French Ultramarine
Winsor Blue (Winsor Newton Brand Color)
Winsor Violet (Winsor Newton Brand Color)
Permanent Magenta
*Alizarin Crimson
Permanent Rose
Opera (Holbein Brand Color)
Winsor Red (Winsor Newton Brand Color)
Quinacridone Red
*Cadmium Red
*Cadmium Orange
*Cadmium Yellow
Winsor Yellow (Winsor Newton Brand Color)
*Naples Yellow
*Raw Seinna
*Raw Umber
*Burnt Seina
*Burnt Umber
*Hooker’s Green
*Sap Green
Viridian
*Davey’s Grey
*Pigments are my “must haves” the other are hardy, but can be achieved by mixing other pigments.
Please note that the brands are just based on my experience of what I have found useful and reliable.
I am not compensated for any recommendations or testimonials.
Reference Sheets

Watercolor Basics: Setup and Timelapse

|
|
Getting Prepared to Paint: A Short Video
Printable Flower Templates You May Trace for Painting
| black-eyed_susan_template.jpg |
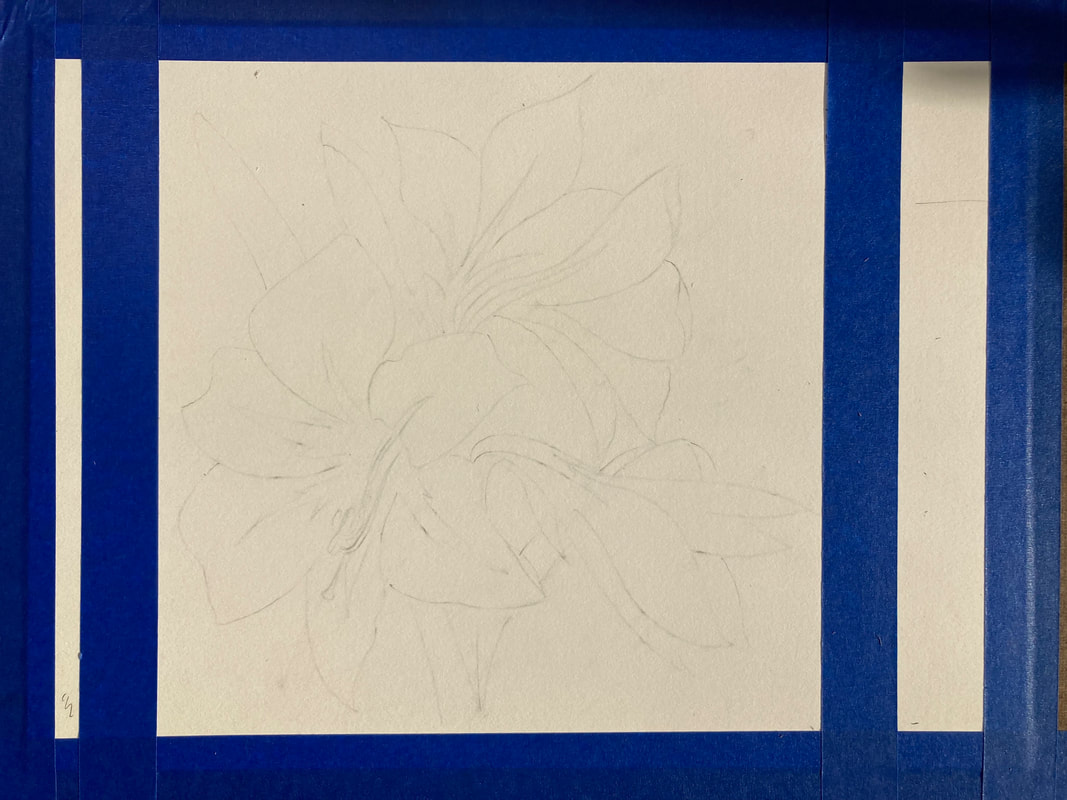
| amaryllistemplate.pdf |
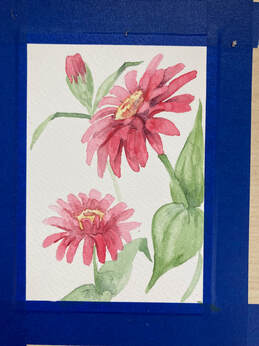
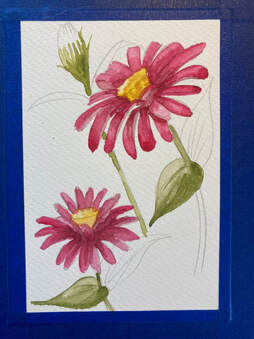
Zinnia
| zinnia.pdf |
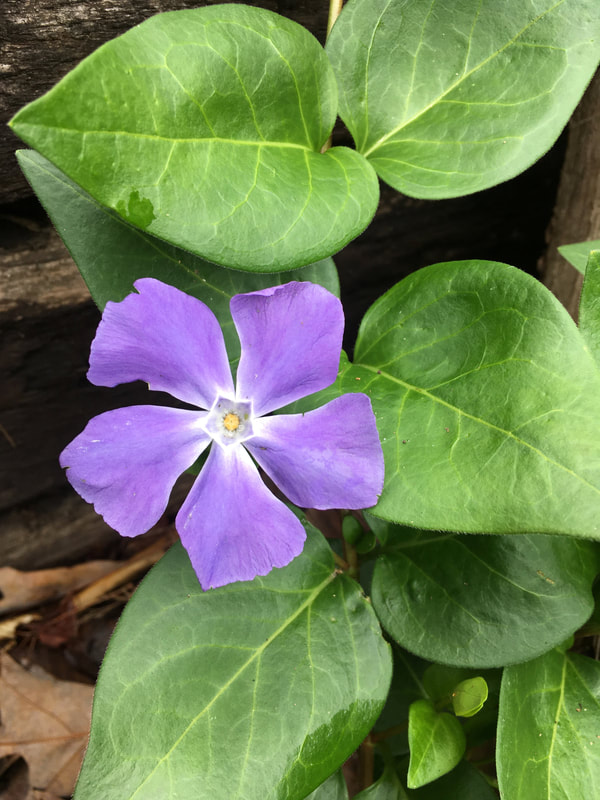
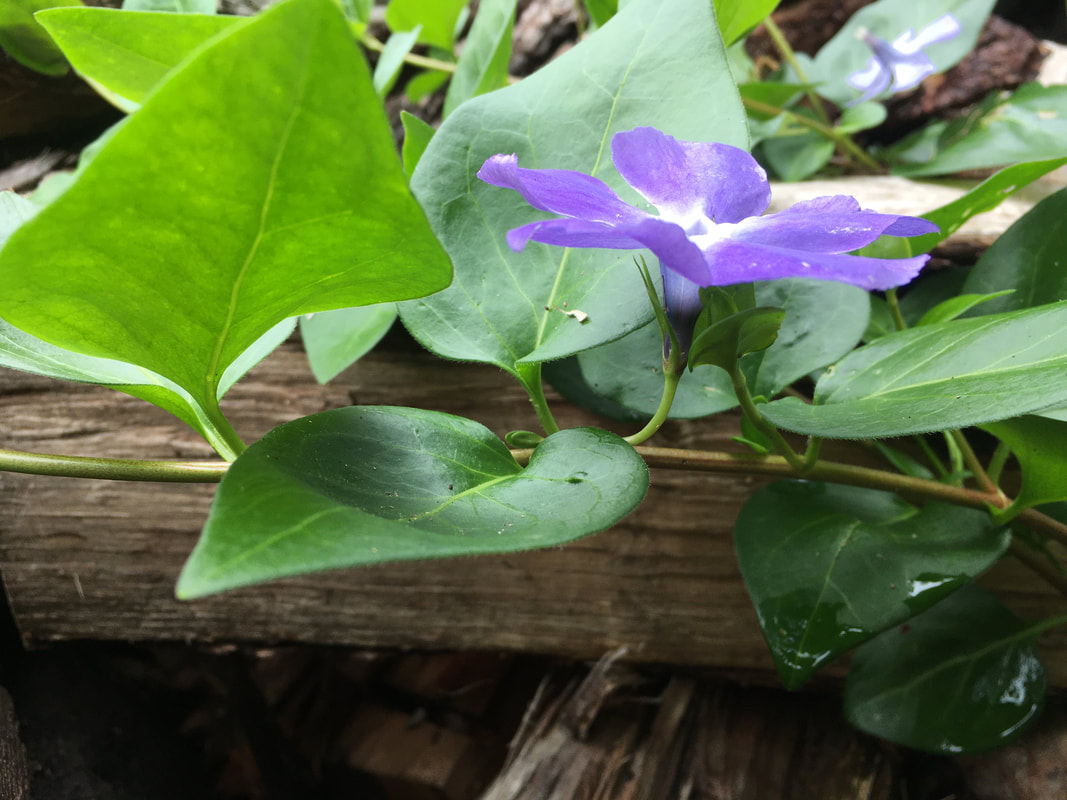
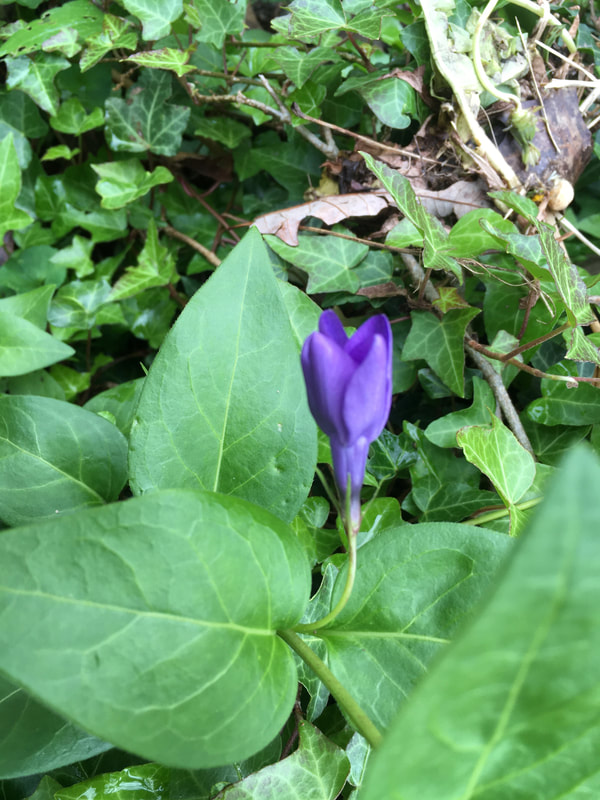
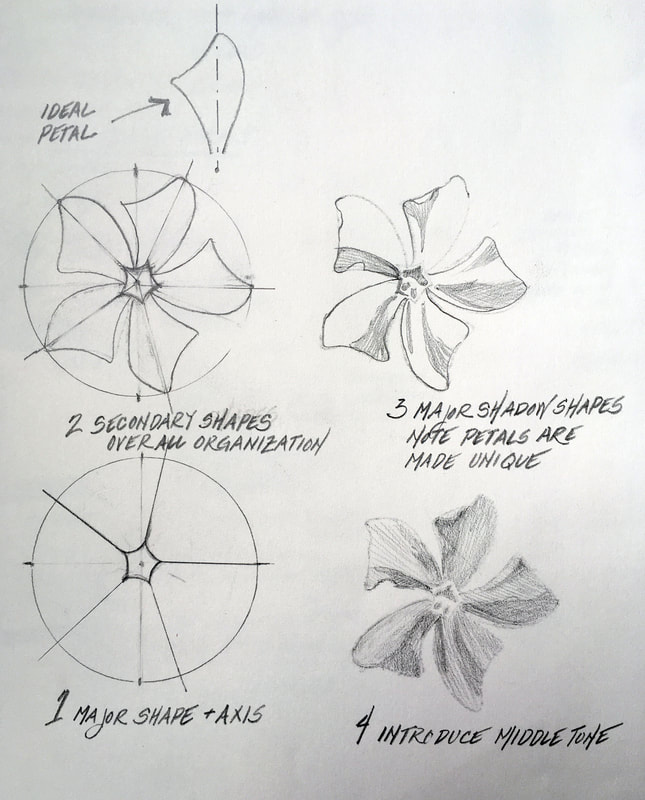
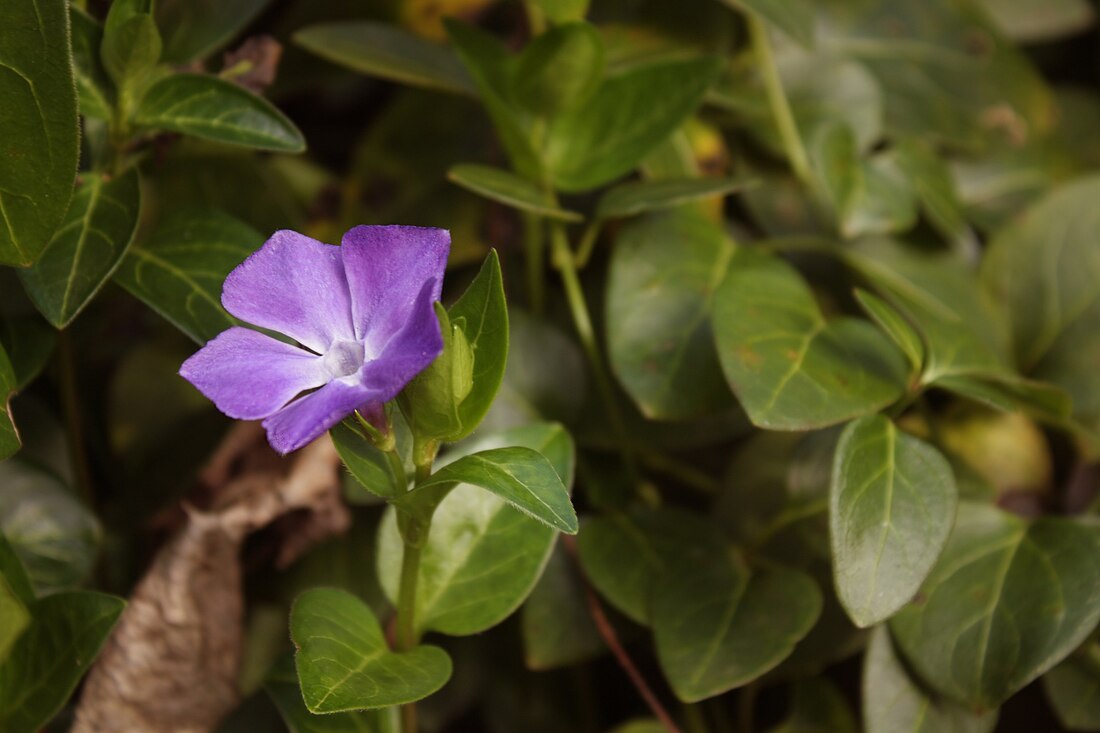
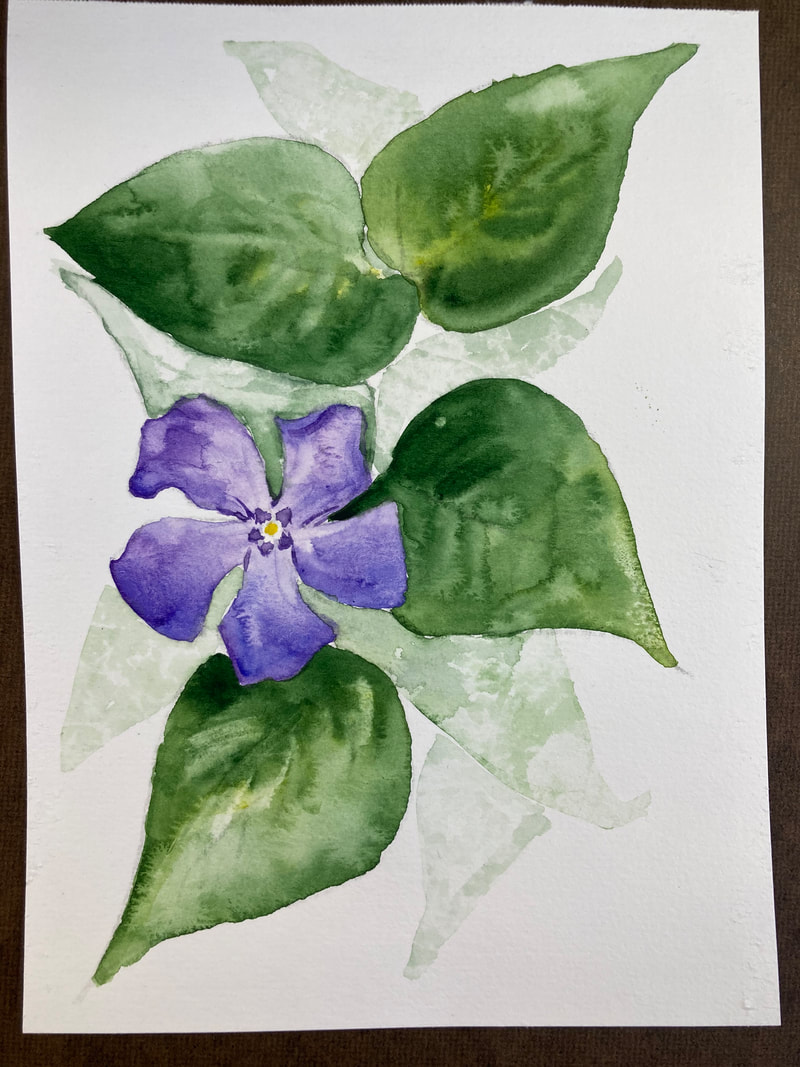
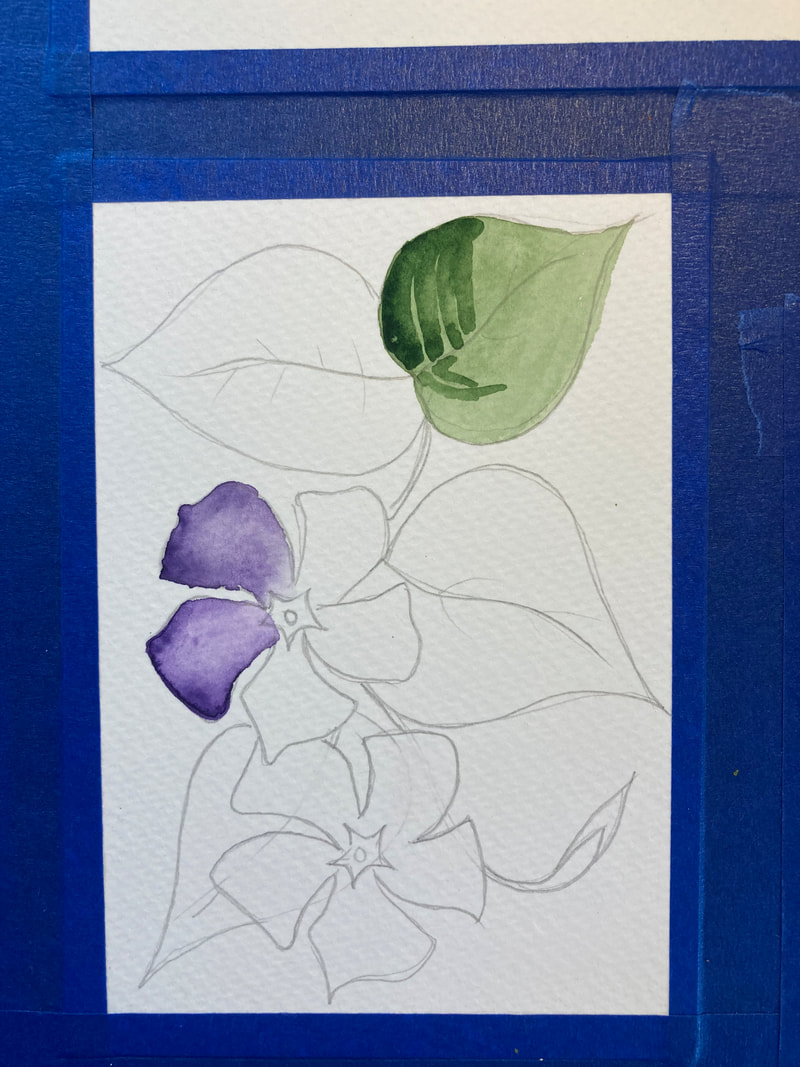
Vinca (for Summer Flowers)
| vincatemplate.pdf |
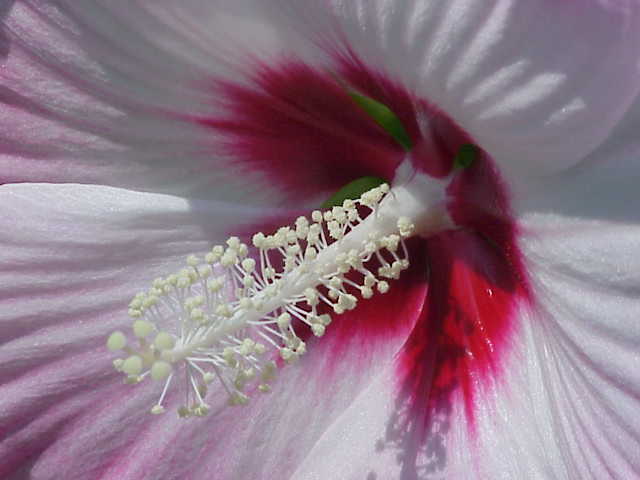
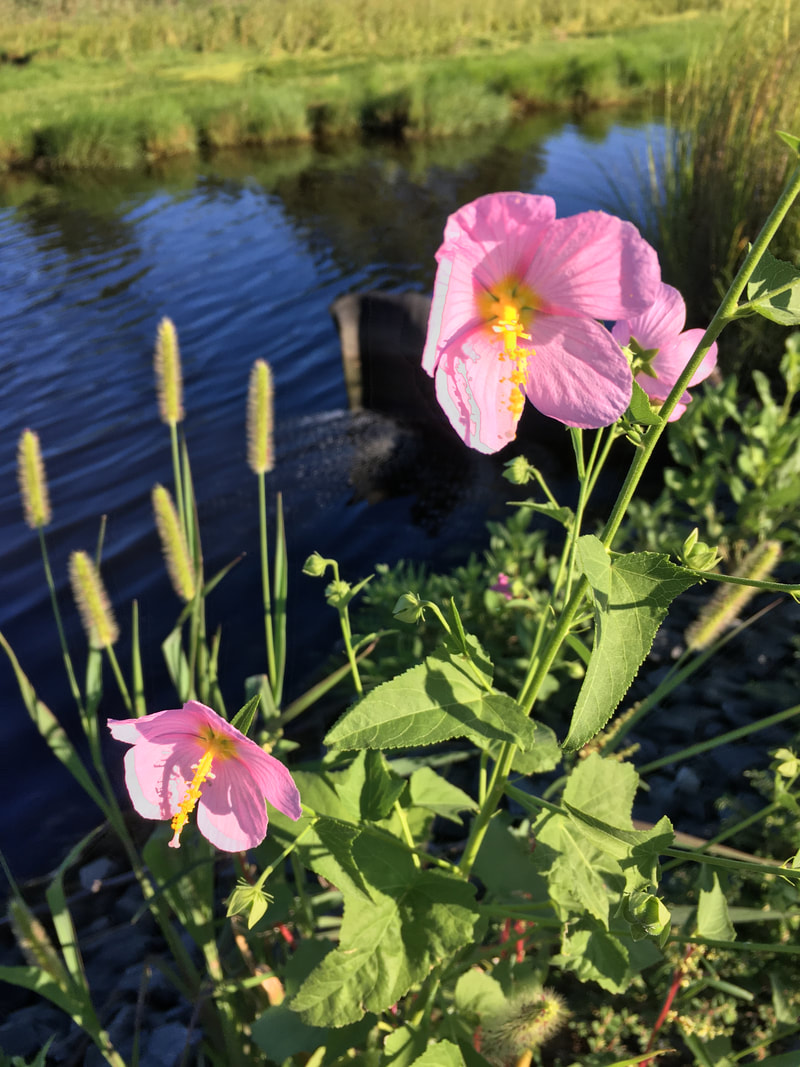
Rose Mallow (for Summer Flowers)
| rosemallowtemplate.pdf |
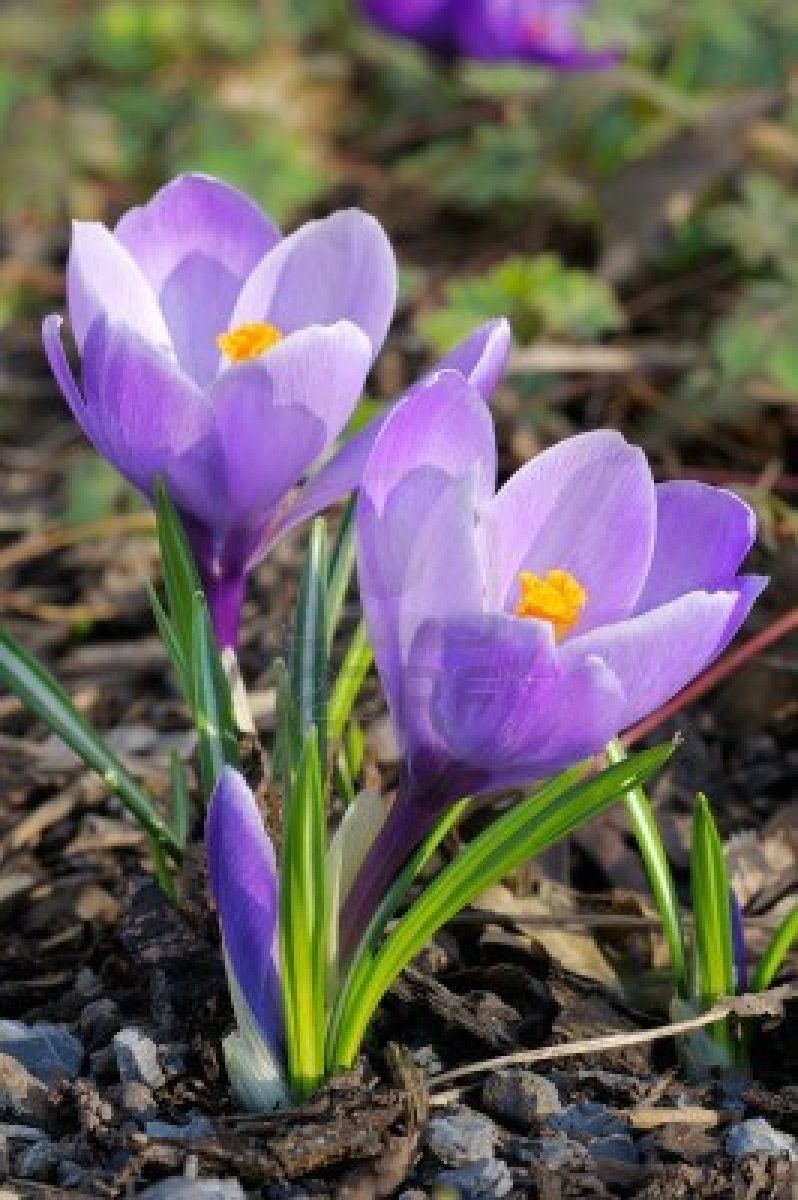
Crocus (for Spring Flowers)
| crocustemplate.pdf |
Reference Pictures for Templates Above, from Wikipedia & my own photos


Black-Eyed Susan Examples and Notes
for Saturday, June 8, 2024 USBG Online Workshop
Online class notes will be posted shortly after class. Please consider tracing the template at least three times on separate watercolor sheets as prepared underdrawings following the instructions above to help save you time during our class.


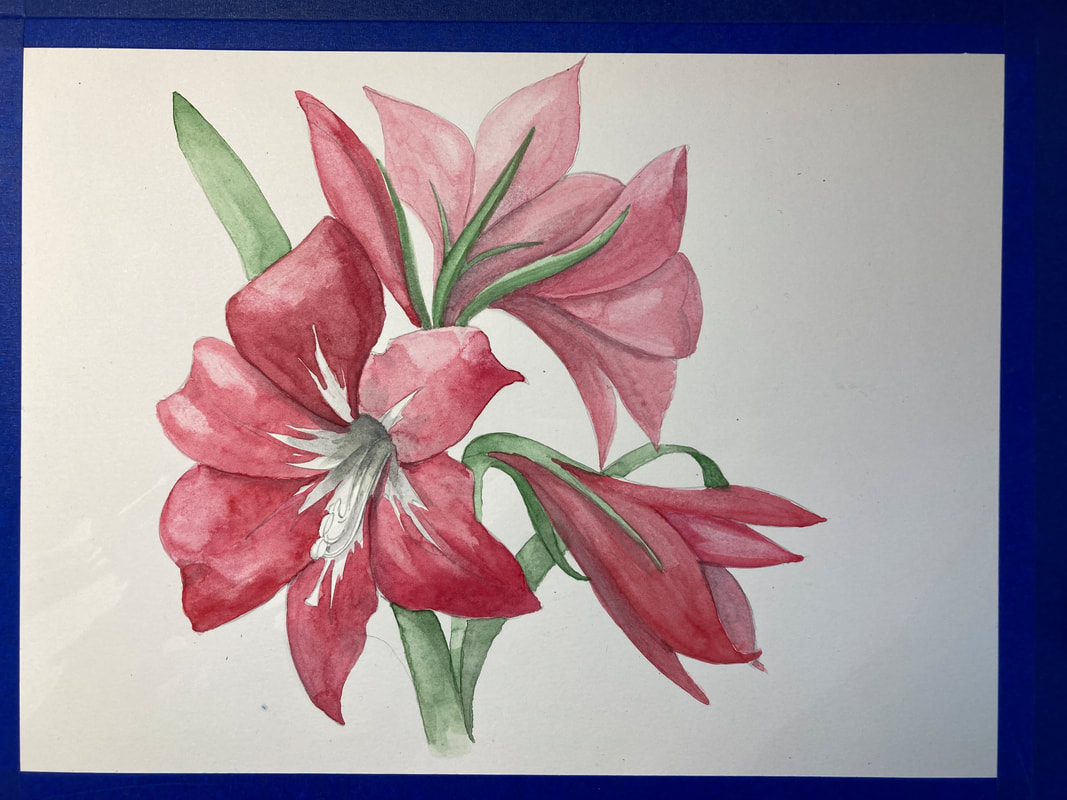
Step-by-Step Amaryllis


Timelapse Painting Zinnias
|
|
|
Step-by-Step Painting Gallery for Rose Mallow


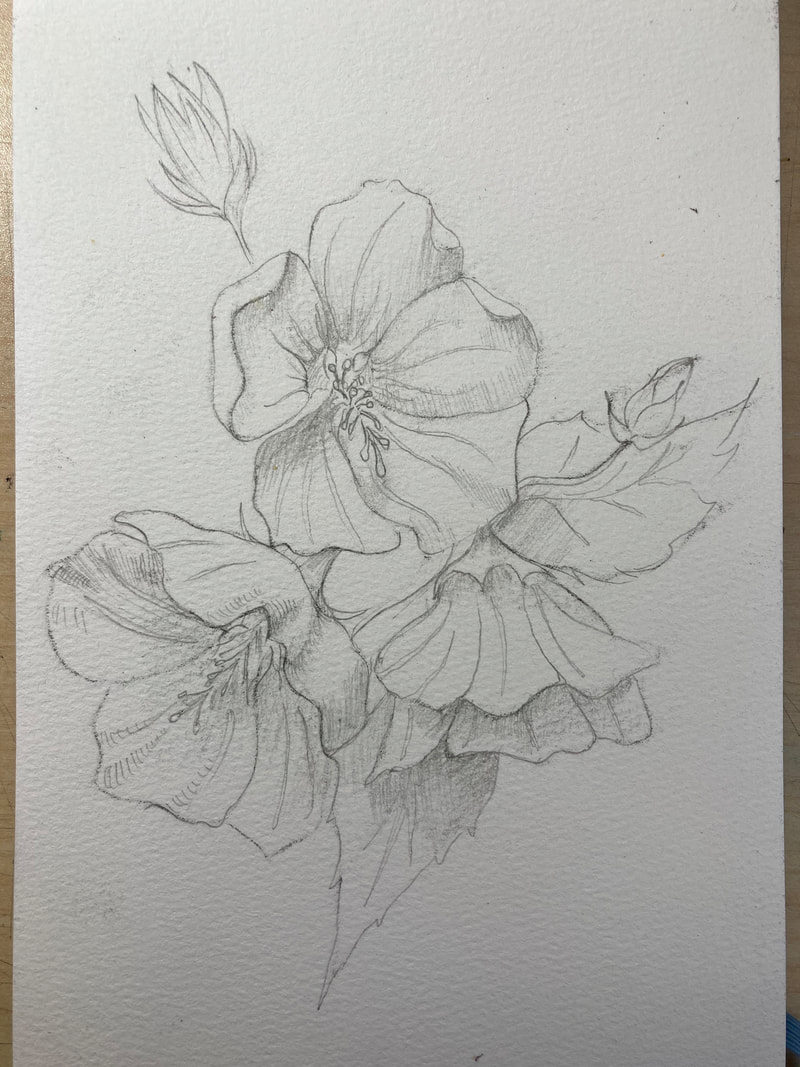


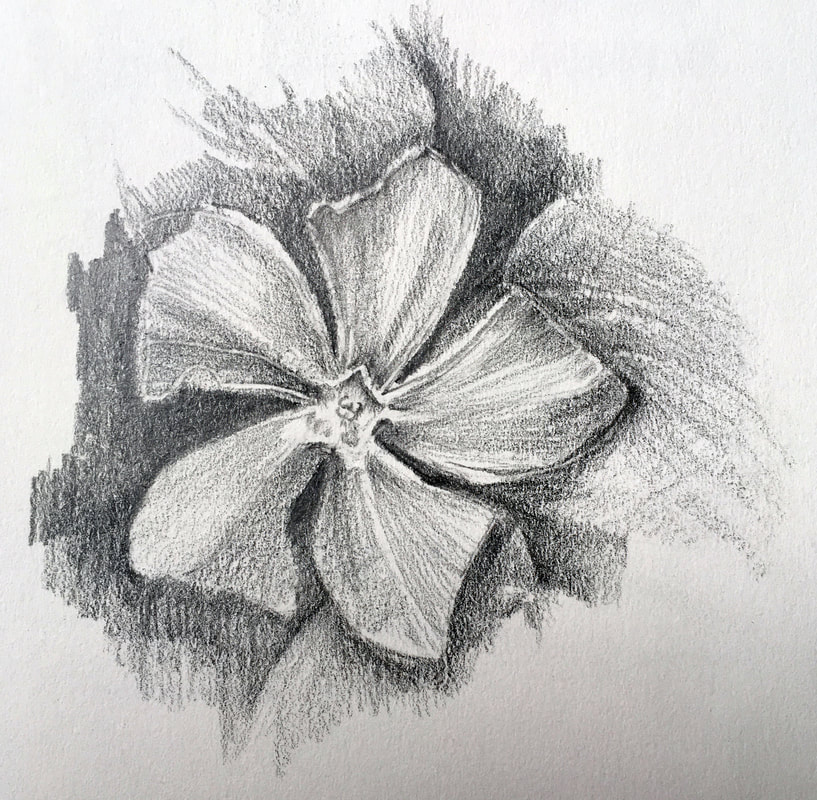
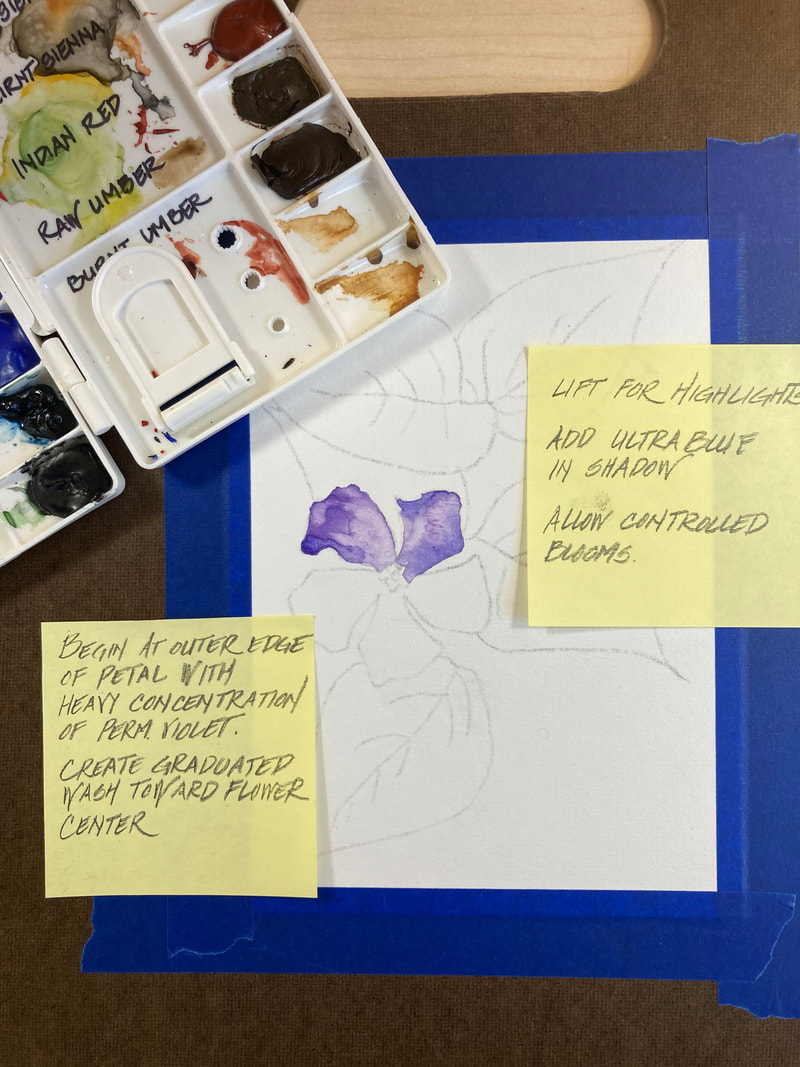
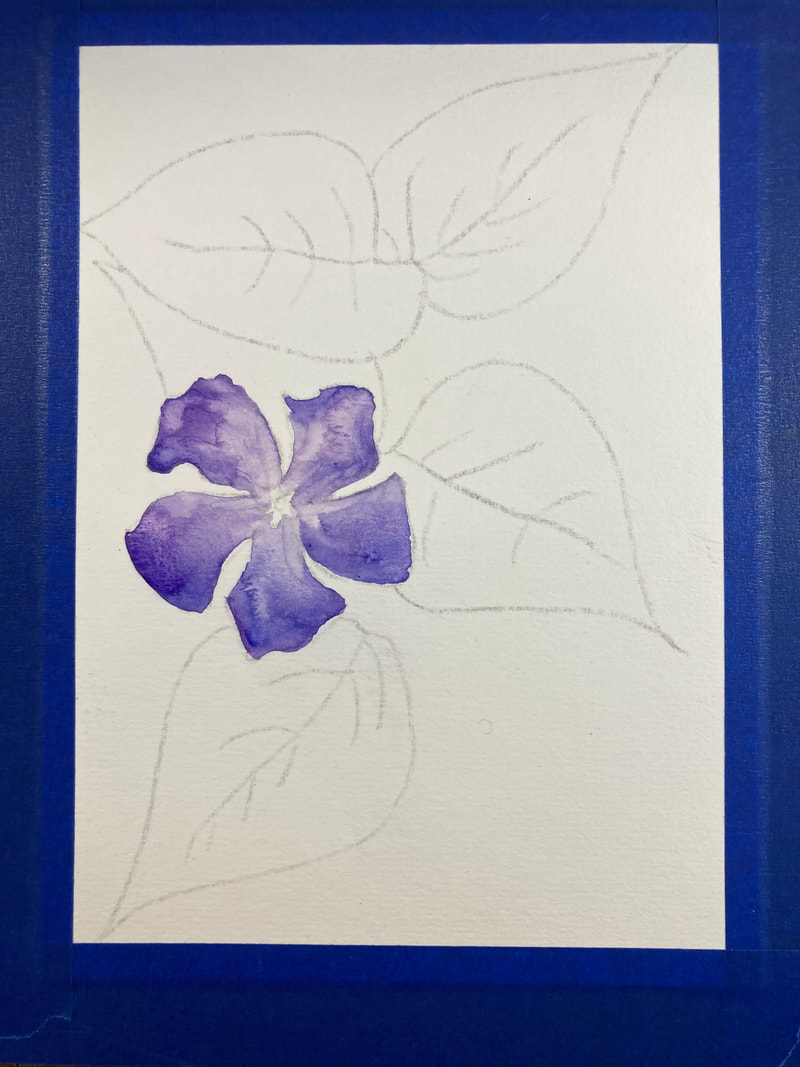
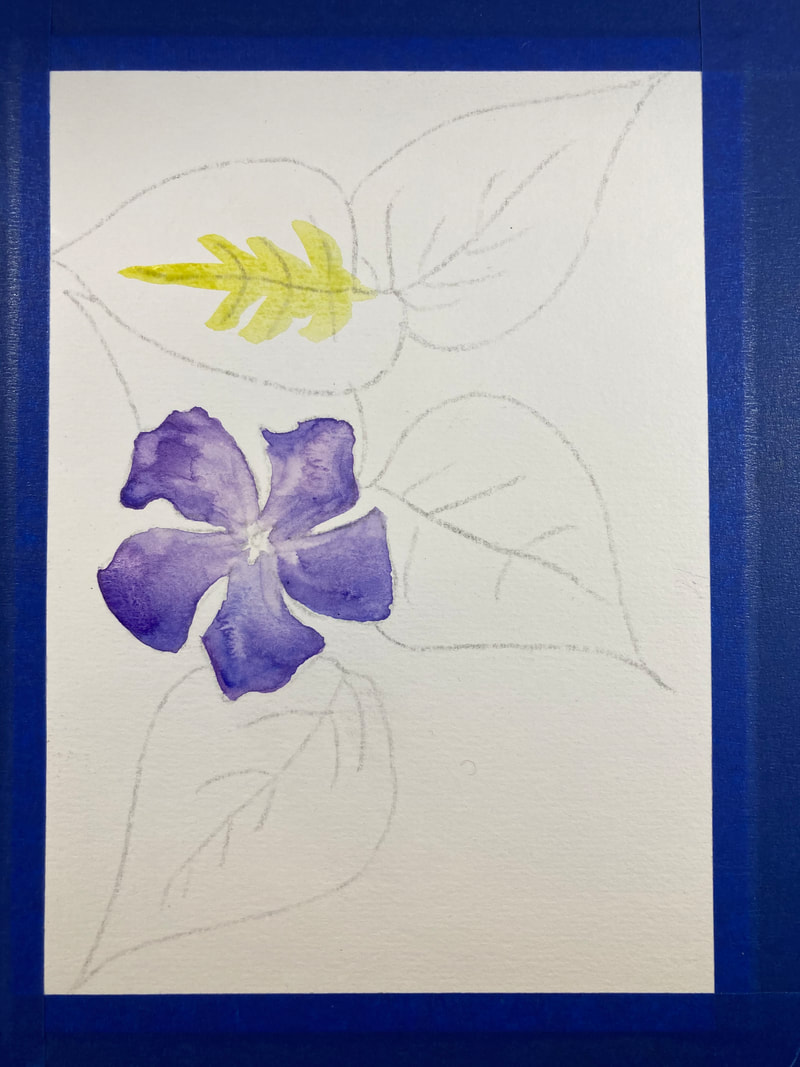
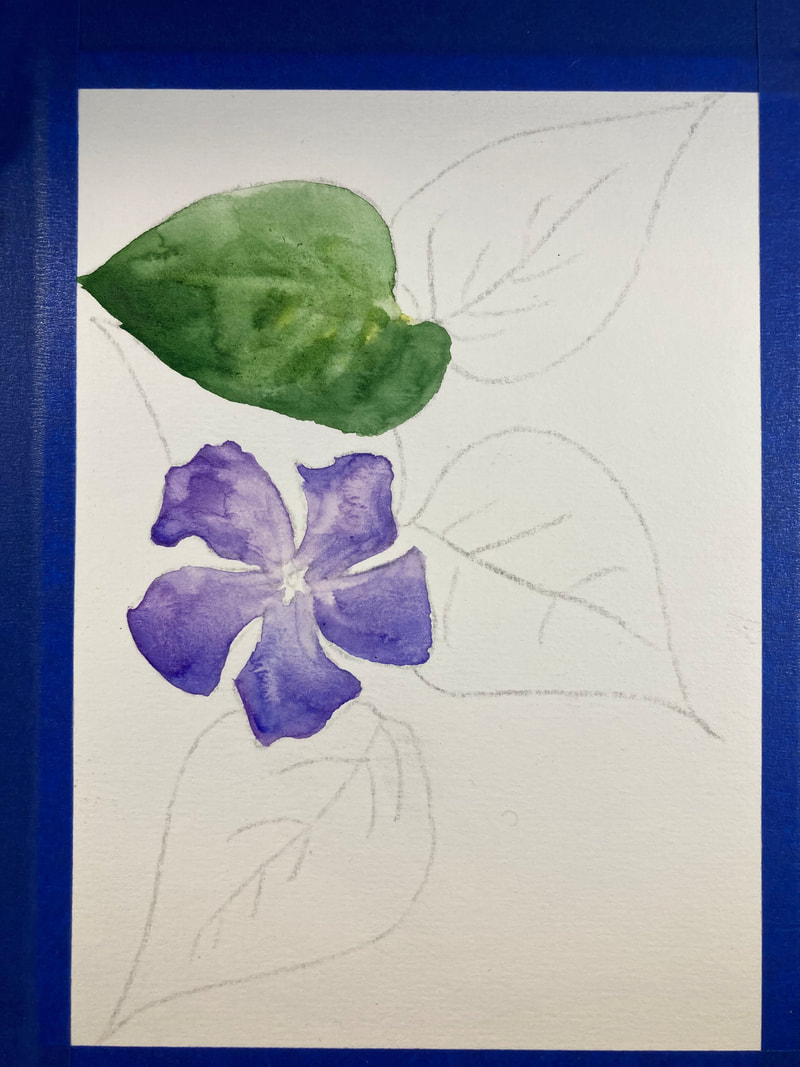
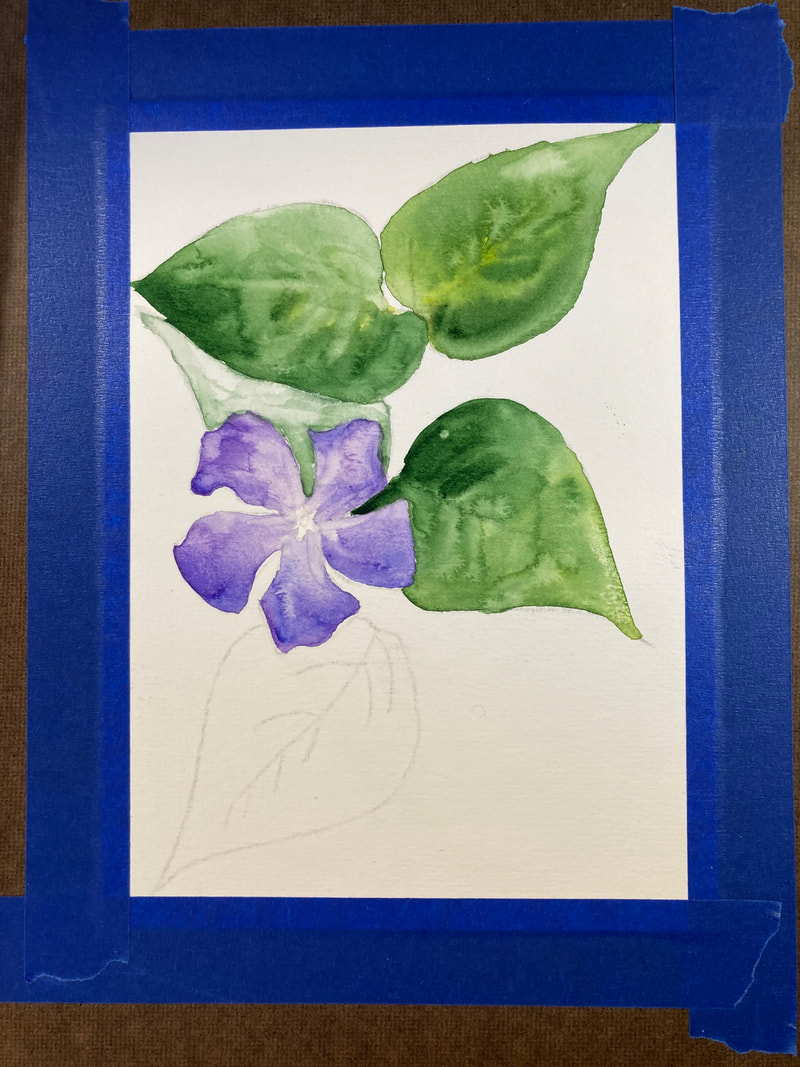
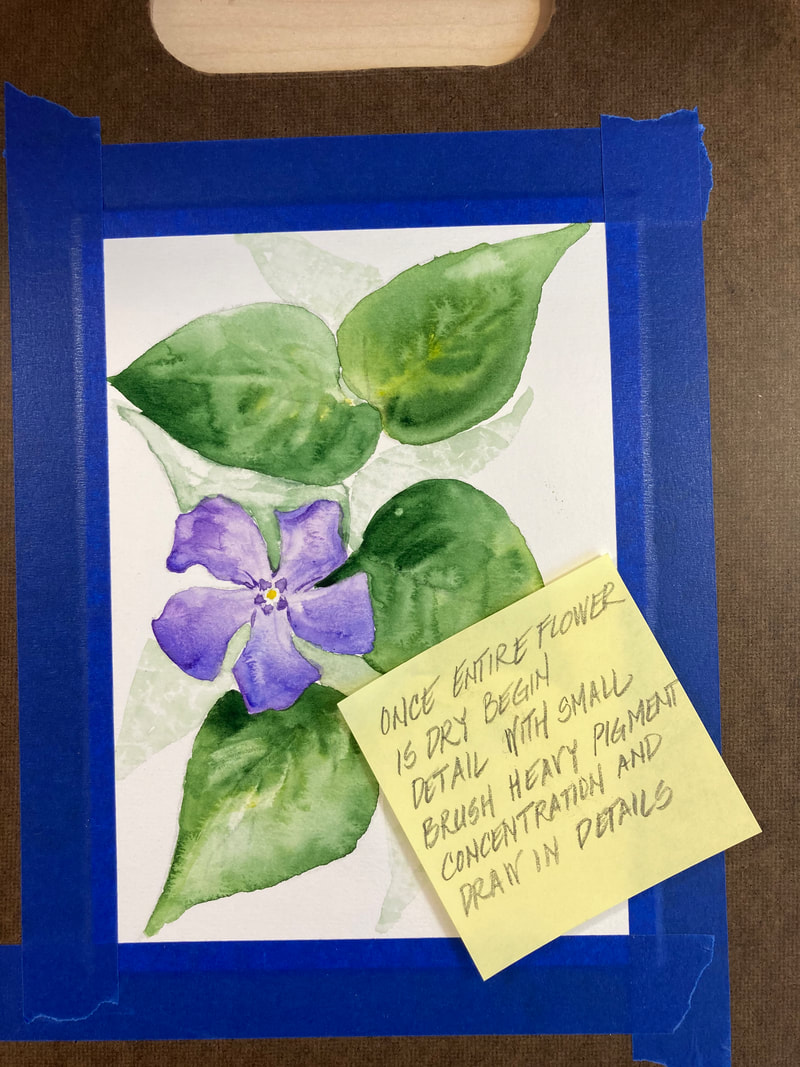
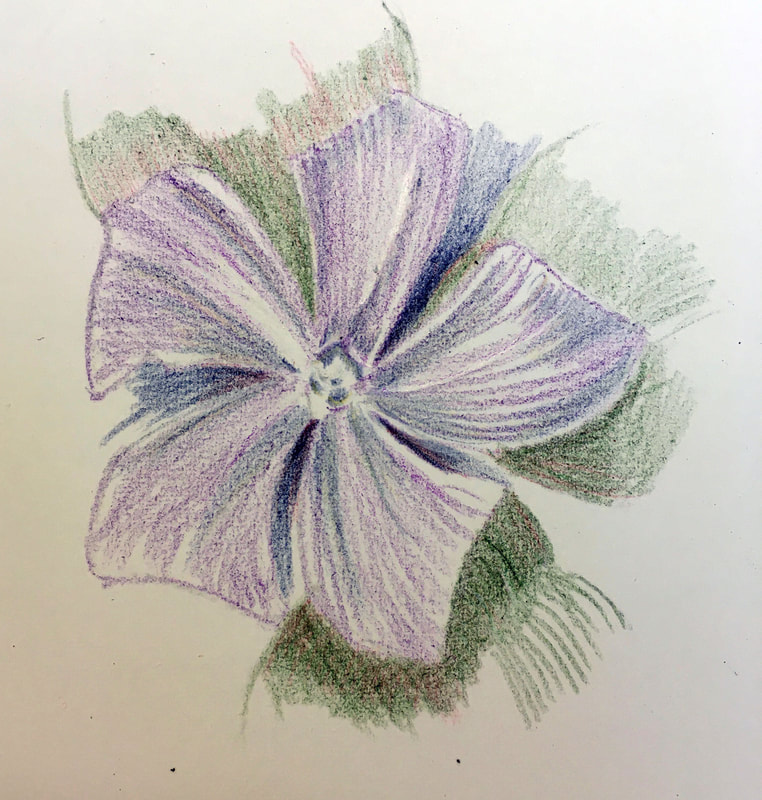
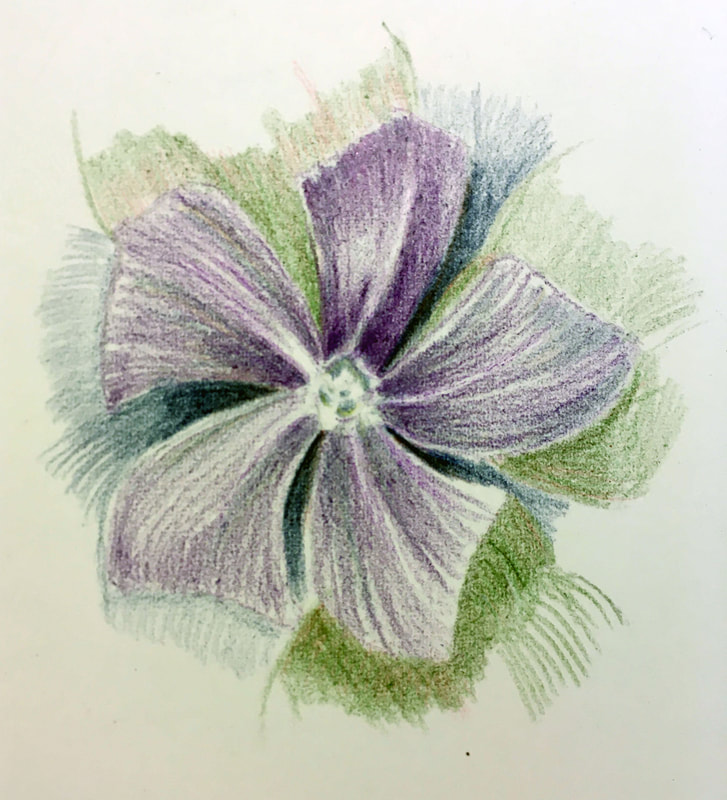
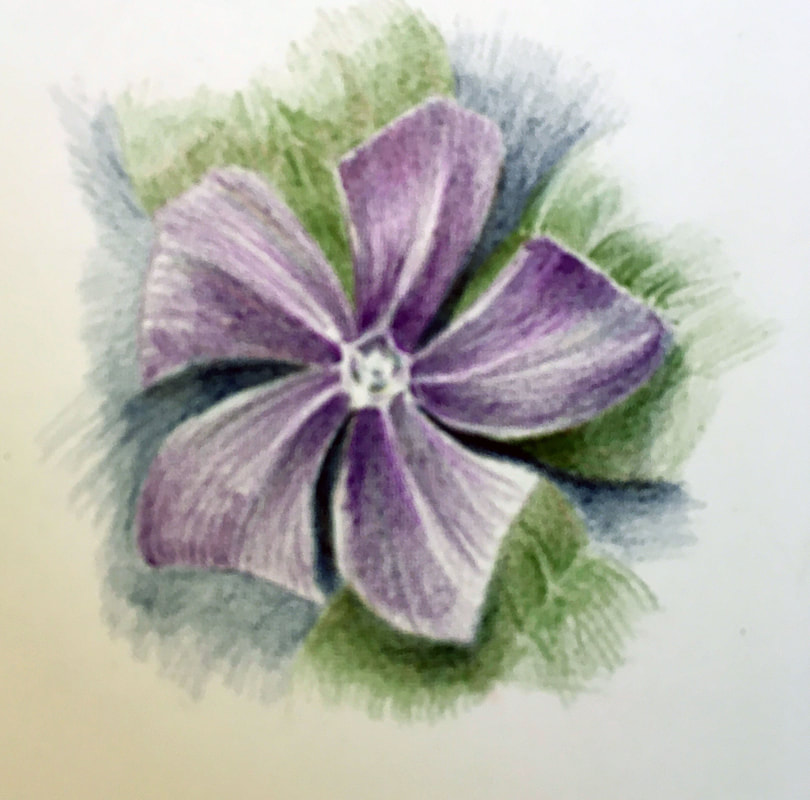
Step-by-Step Painting Image Gallery in Detail for Vinca


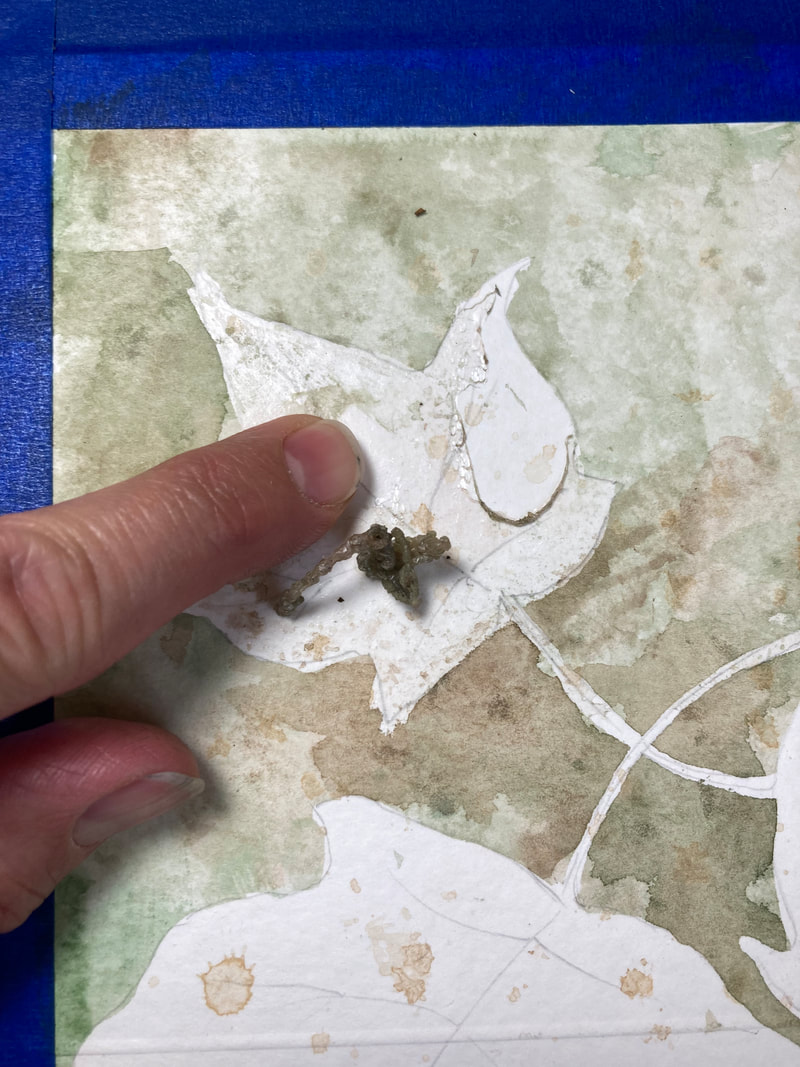
for Autumn Leaf Step by Step!


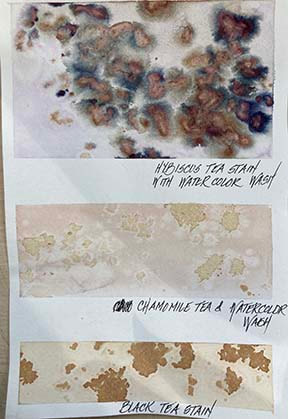
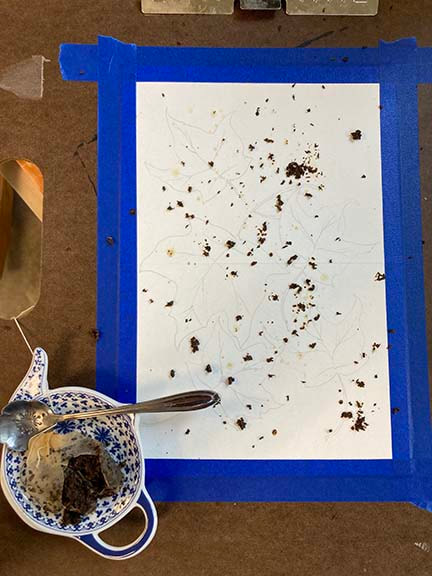
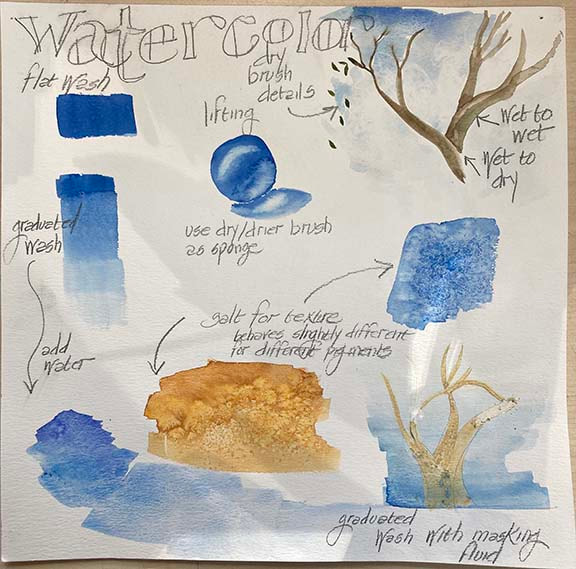
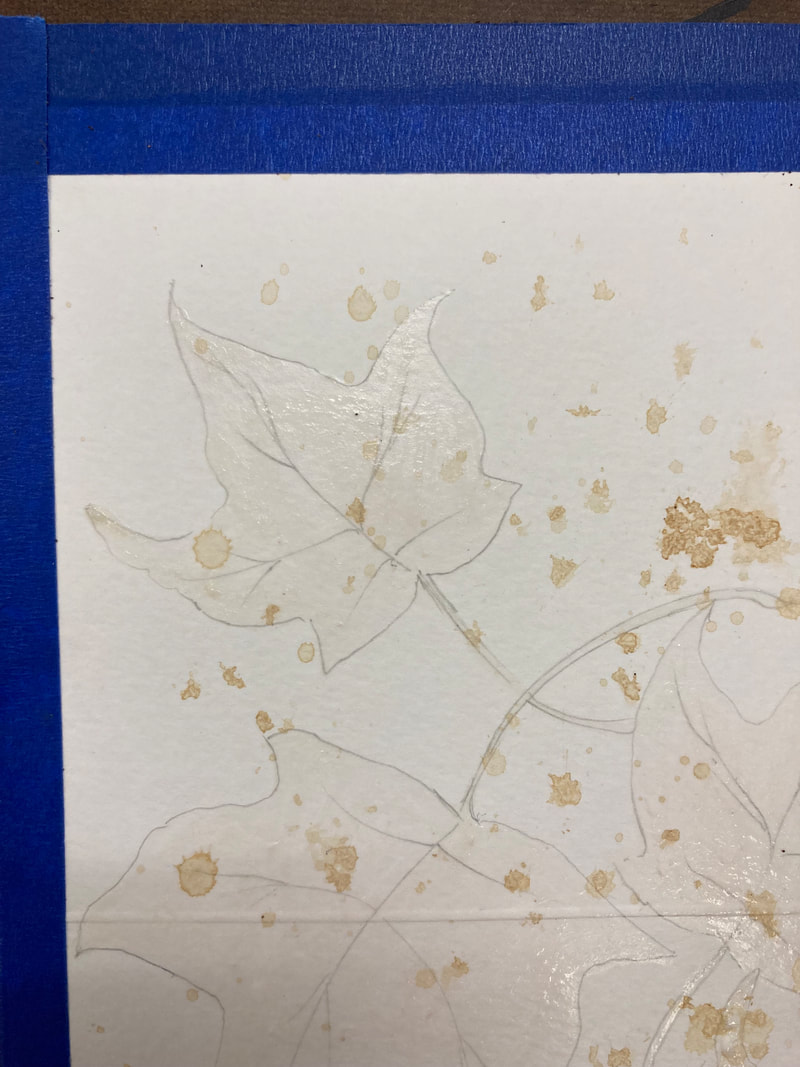
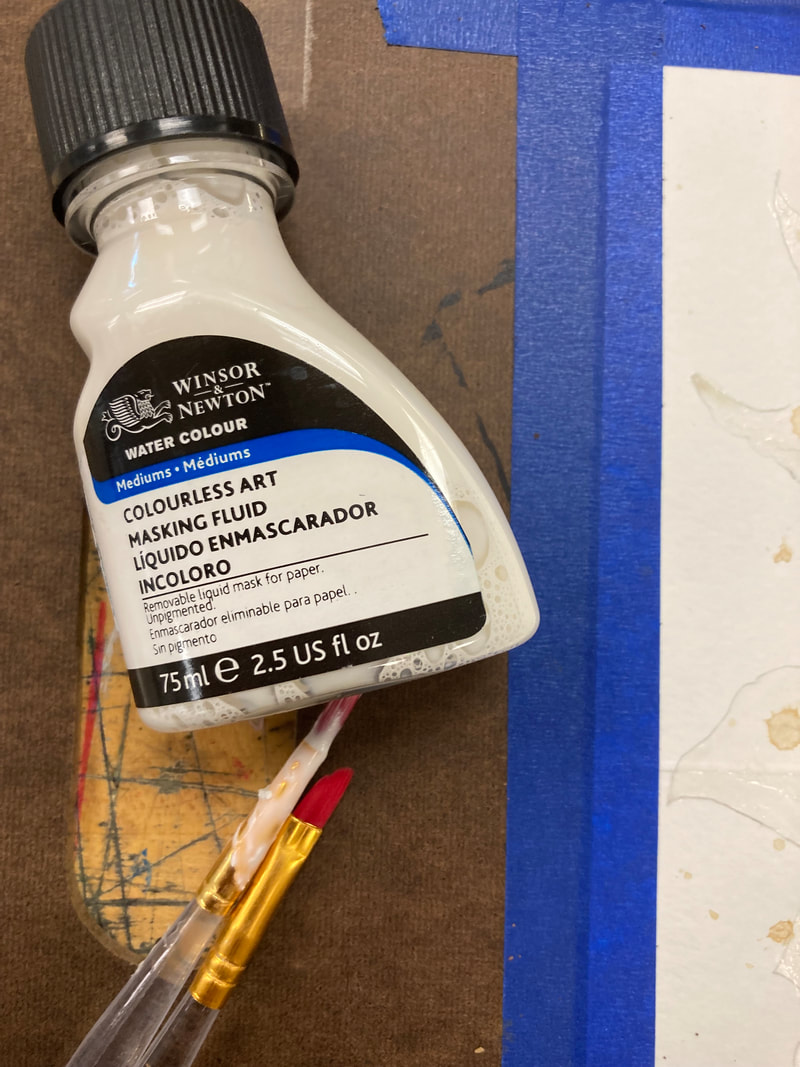
Fun Watercolor Techniques to Try!


Want to Continue Your Painting Practice? Try Fruit!
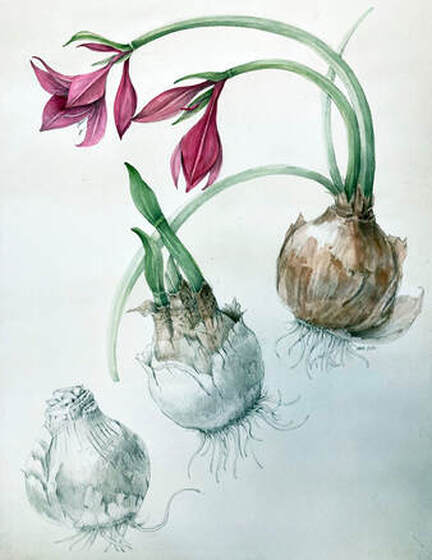
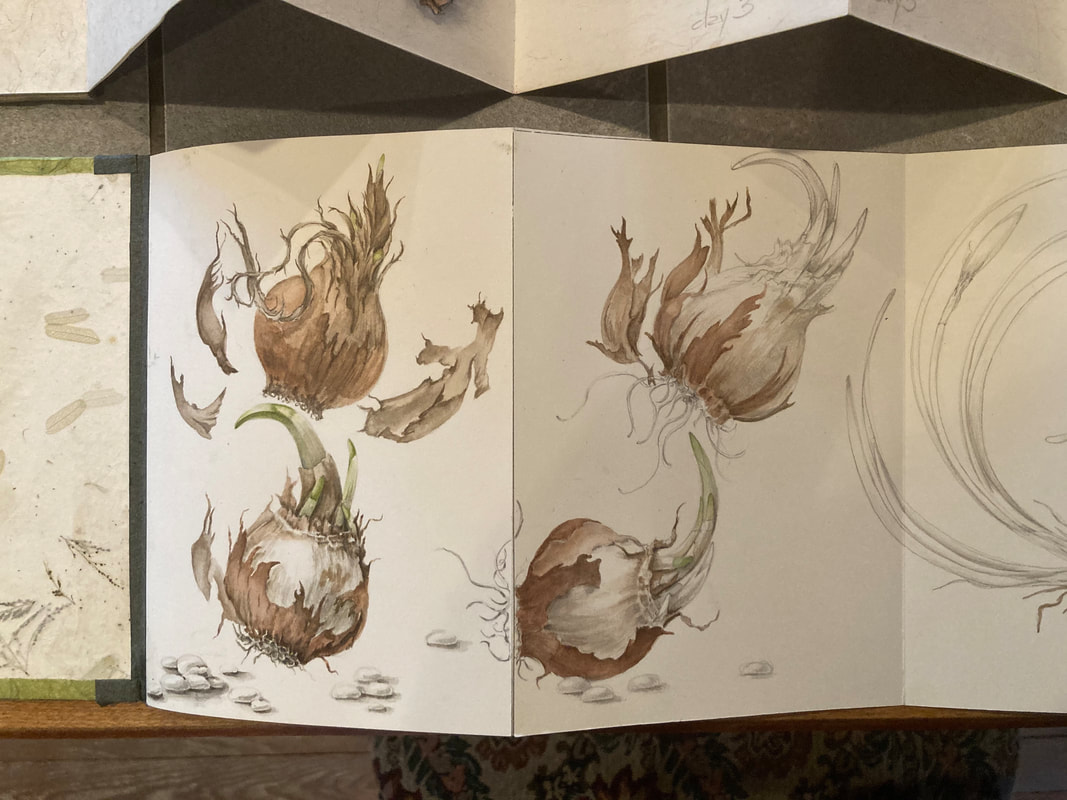
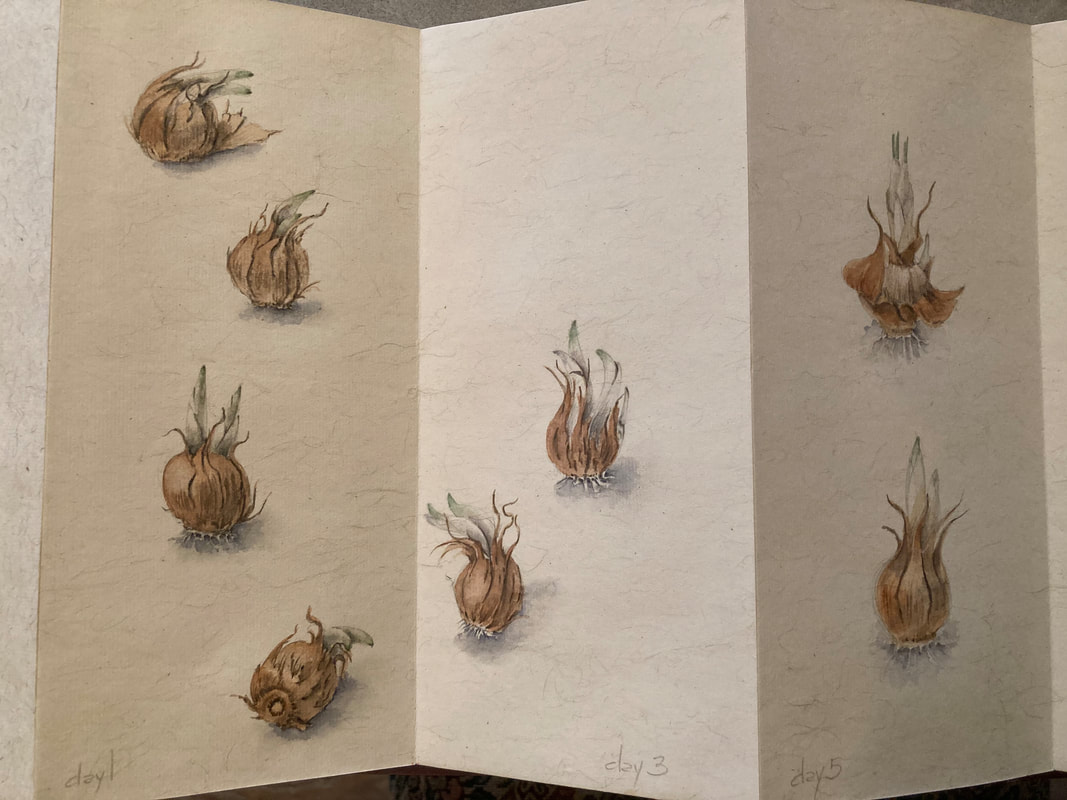
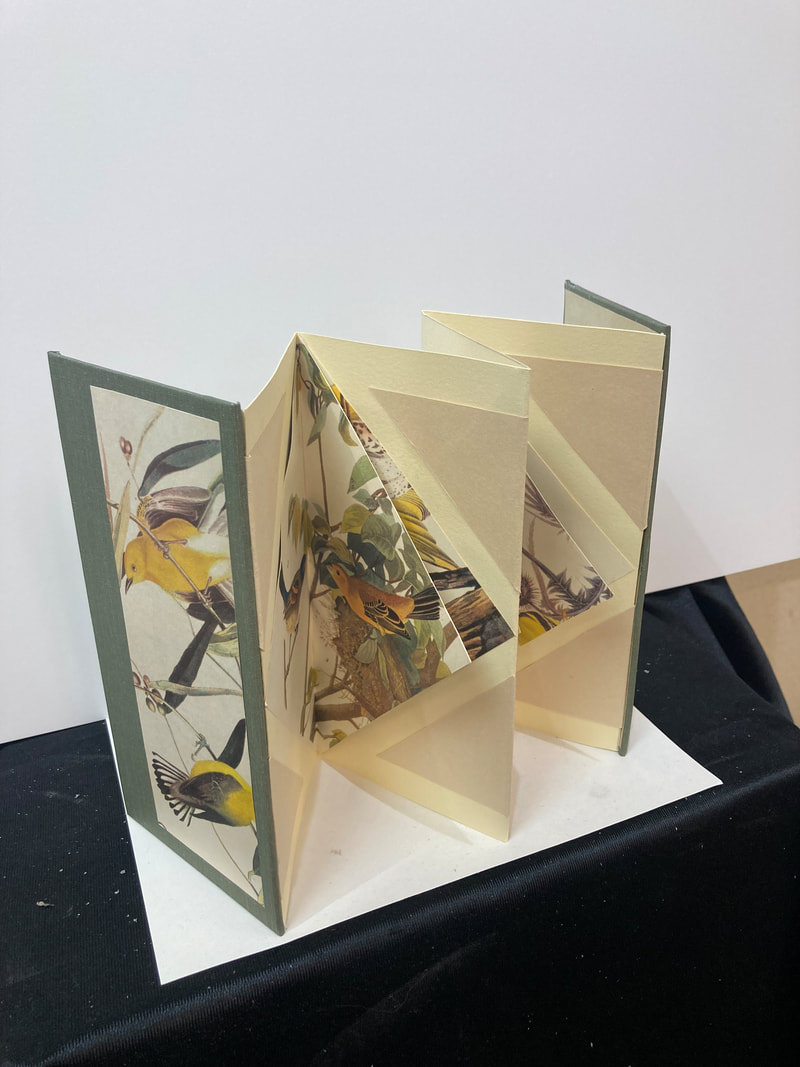
The Progressive Bulb Project
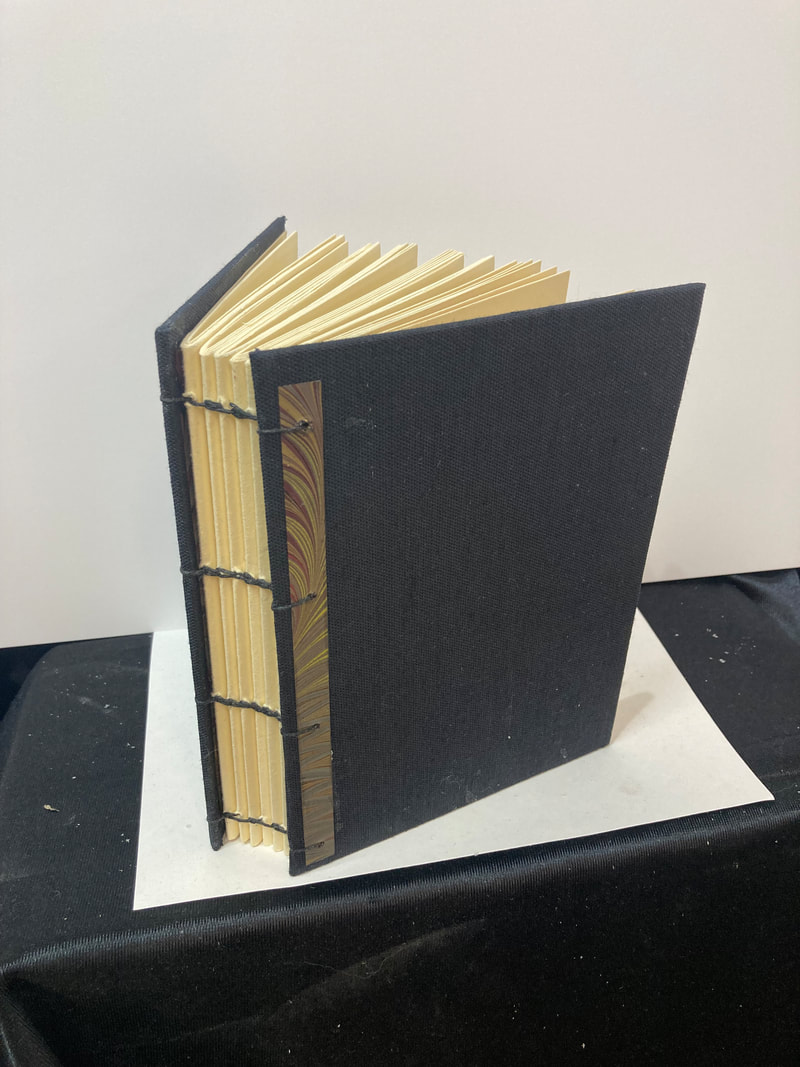
One of my favorite winter painting projects is to force bulbs inside and draw and paint them every day or so. Watching and recording the changes in form, color, line, and texture I find really is an artistic sensory "tune up." You can use any sketchbook, or even a watercolor postcard block, but I am most fond of the Japanese album style sketchbook as seen here below.

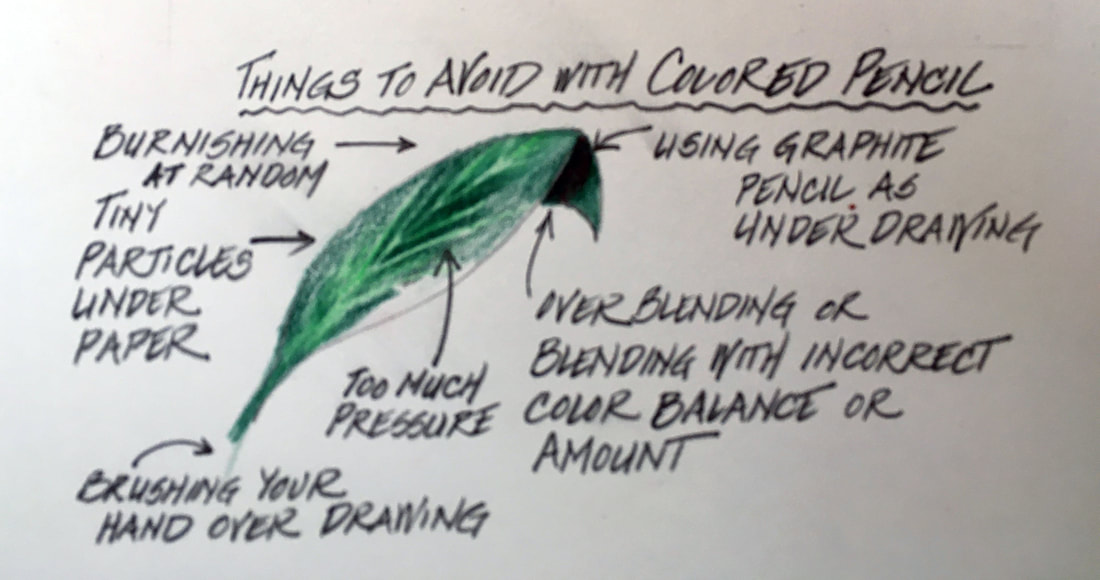
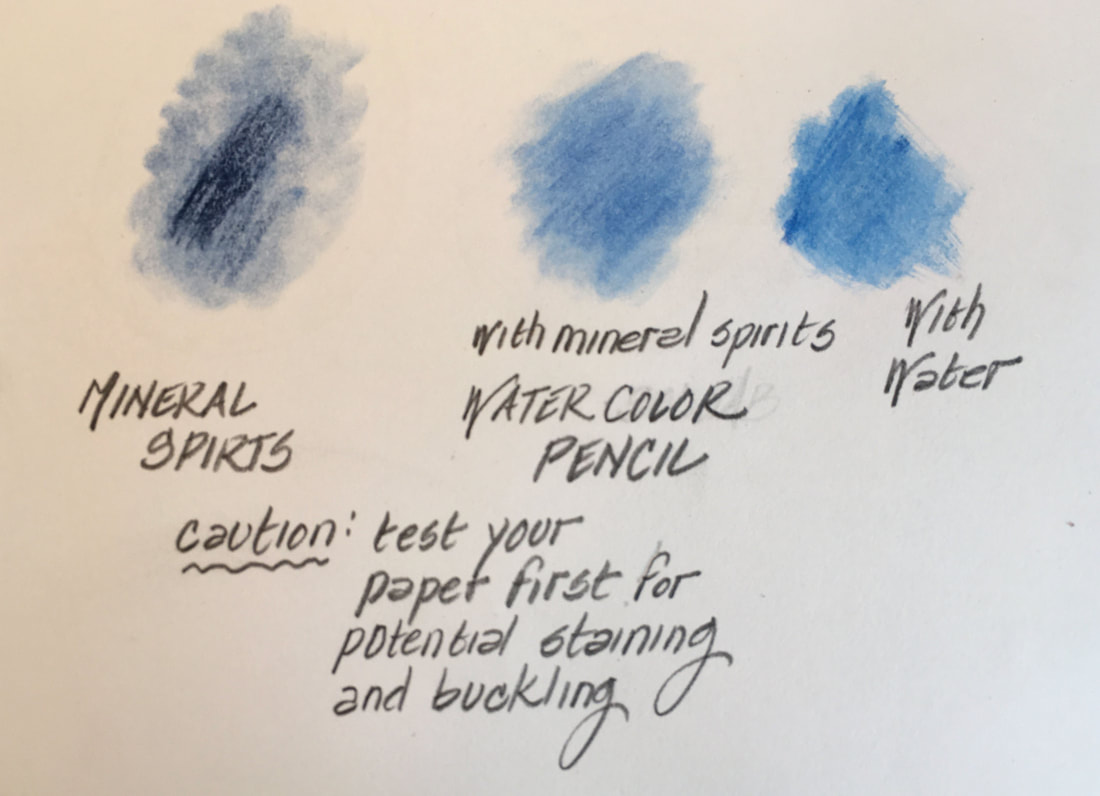
Botanical Drawing with Colored Pencil
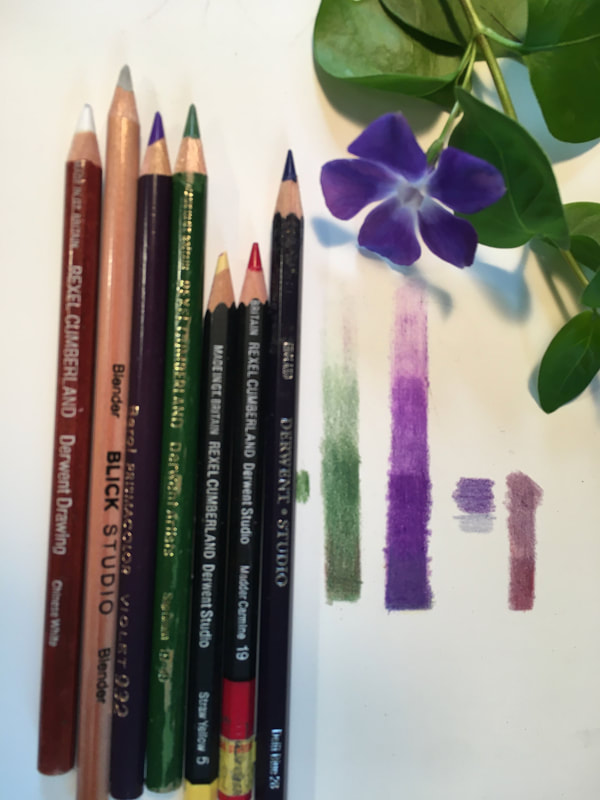
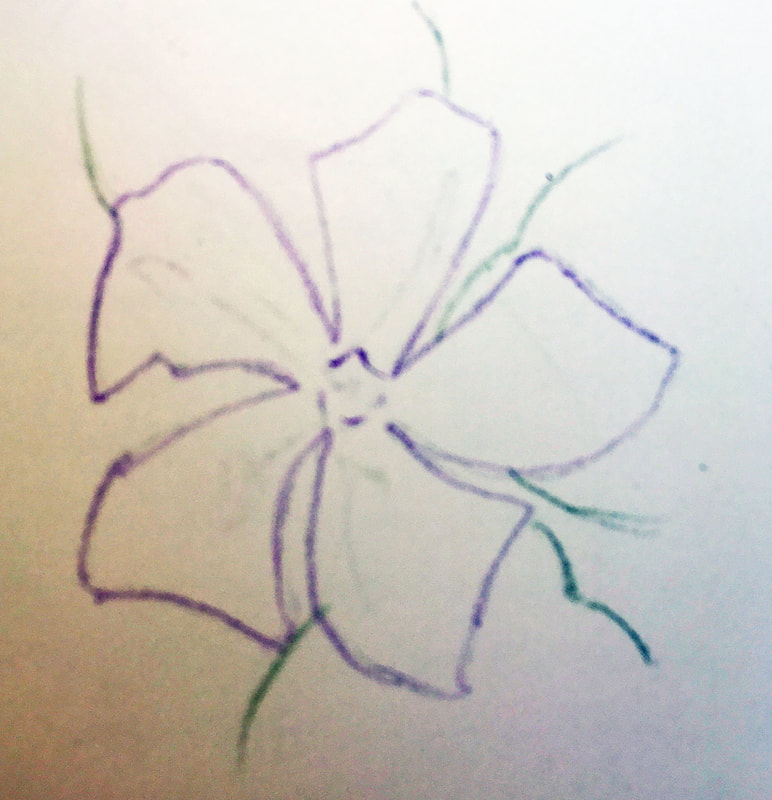
Reference and Step by Step Image Gallery for Vinca with Colored Pencil


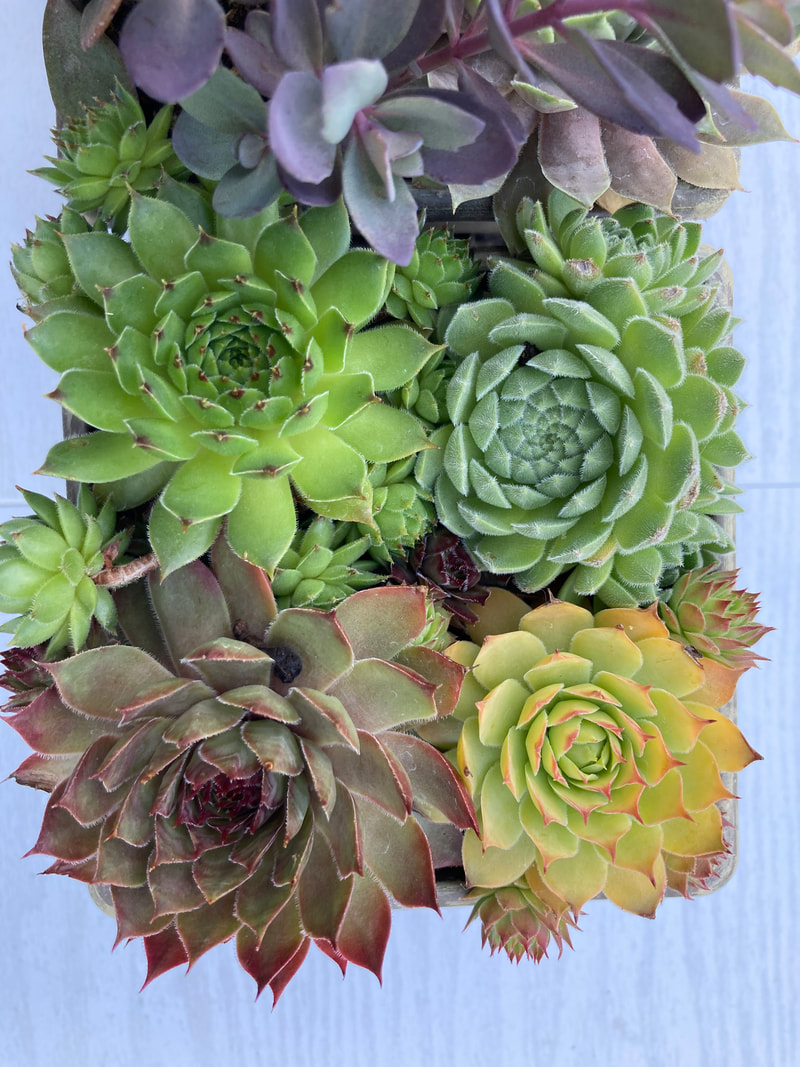
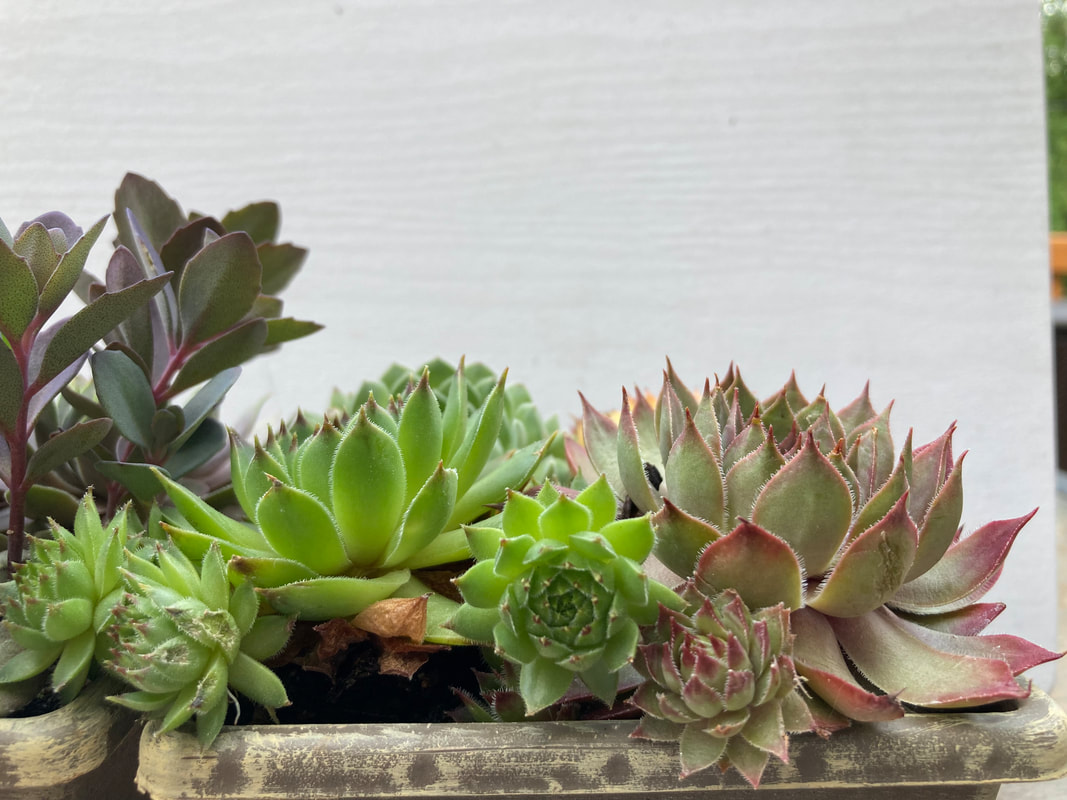
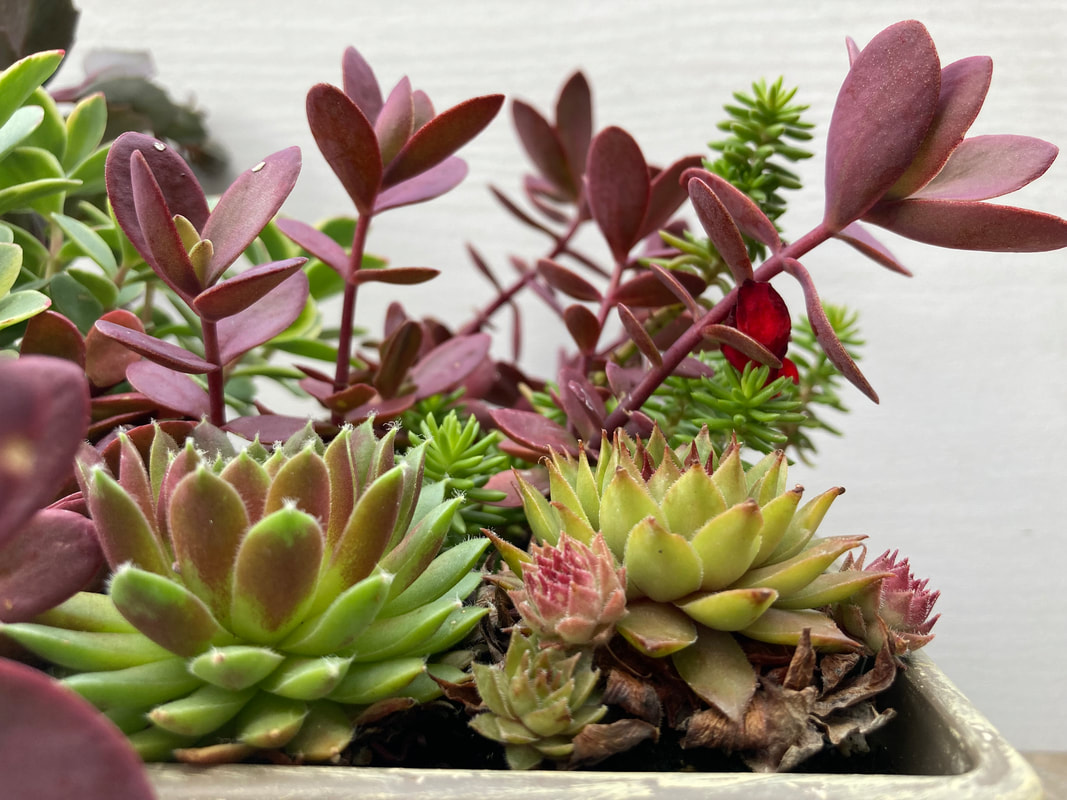
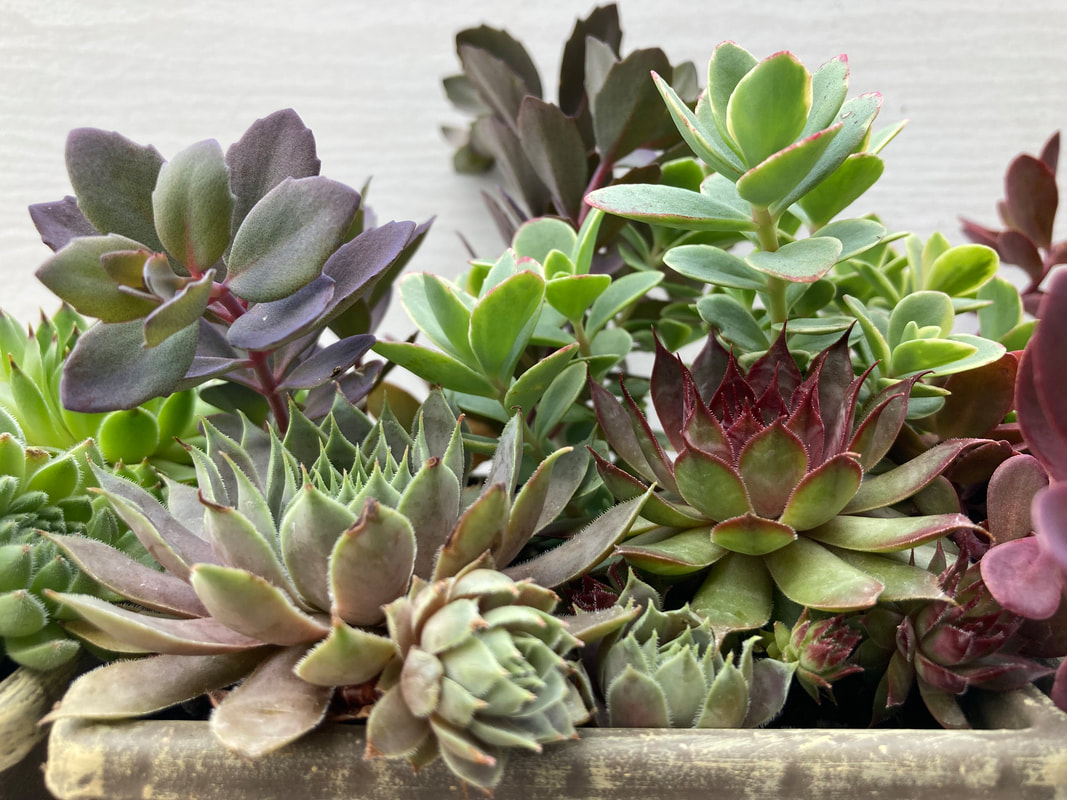
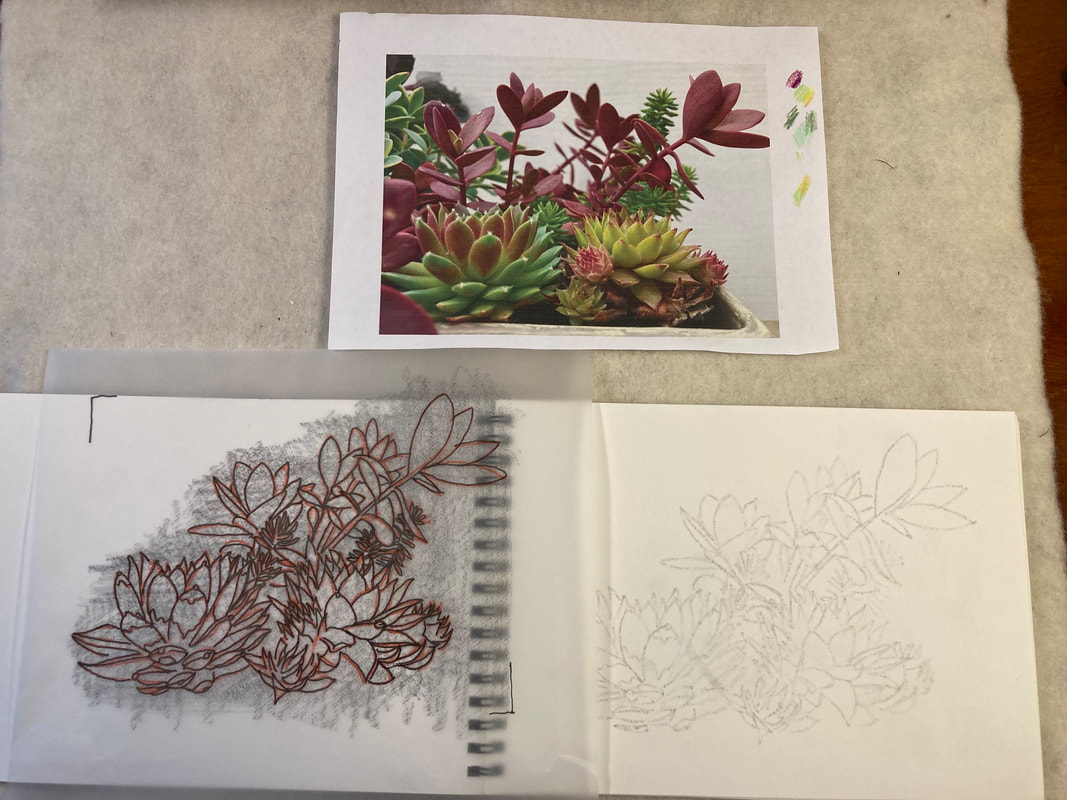
References for Drawing Cacti and Succulent Plants using Colored Pencil
At little about our featured plants: Succulents are plants with parts that are thickened, and fleshy, usually to retain water in dry and arid climates or soil conditions. The word succulent comes from the Latin word sucus, meaning 'juice', or 'sap'. Nearly all cacti and succulents, but not all succulents are cacti. The word "cactus" derives, through Latin, from the Ancient Greek κάκτος, kaktos, a name originally used by Theophrastus (3rd century BCE) for a spiny plant whose identity is now not certain. Cacti occur in a wide range of shapes and sizes. Most cacti live in habitats subject to at least some drought. How are cacti different? Cacti have spines are produced from specialized structures called areoles, a kind of highly reduced branch. Areoles are an identifying feature of cacti. As well as spines, areoles give rise to the flowers of a cactus. To learn more be sure to check out the slide show below on Drawing Cacti and Succulents.
It always helpful to have some understanding of a plant's biology, habit, and structure. This knowledge will inform your drawing and help you hone your ability to draw more realistically.

Welcome to the Subject Specific Workshop Section
The resources below are for workshops on
Orchids, Trees, Geometry in Plants, and Fundamentals of Garden Design.
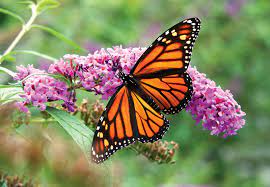
How to Draw Pollinators (Butterflies and Bees!)
Orchids, Trees, Geometry in Plants, and Fundamentals of Garden Design.
How to Draw Pollinators (Butterflies and Bees!)
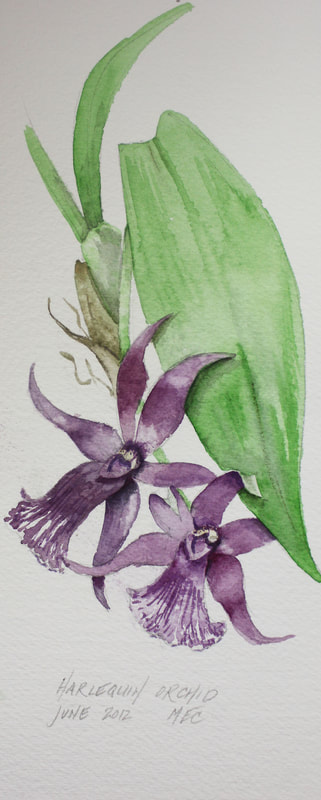
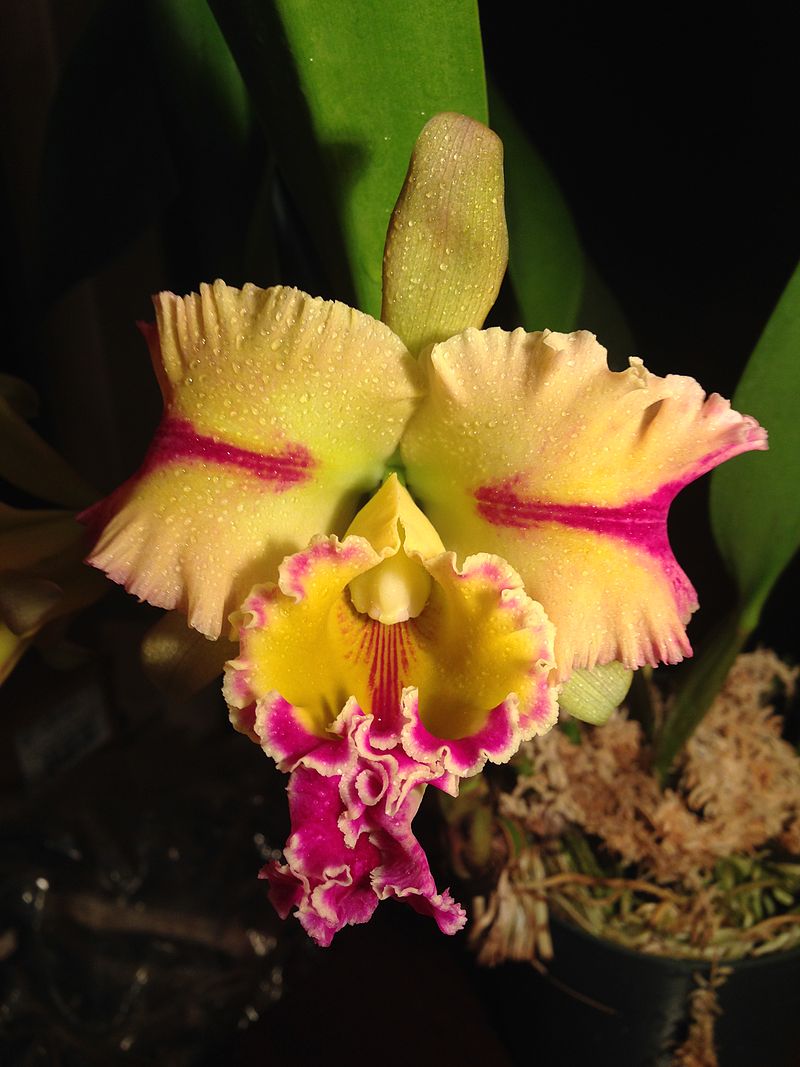
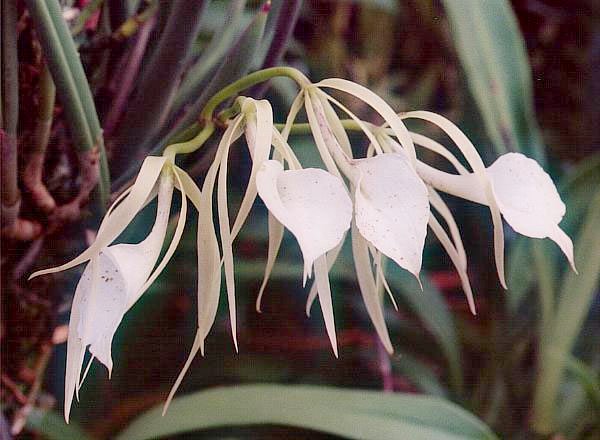
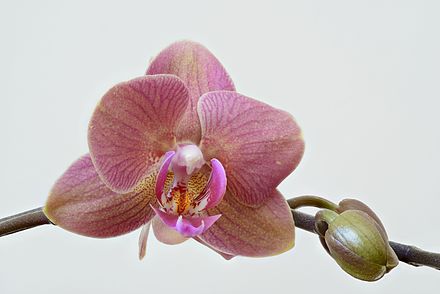
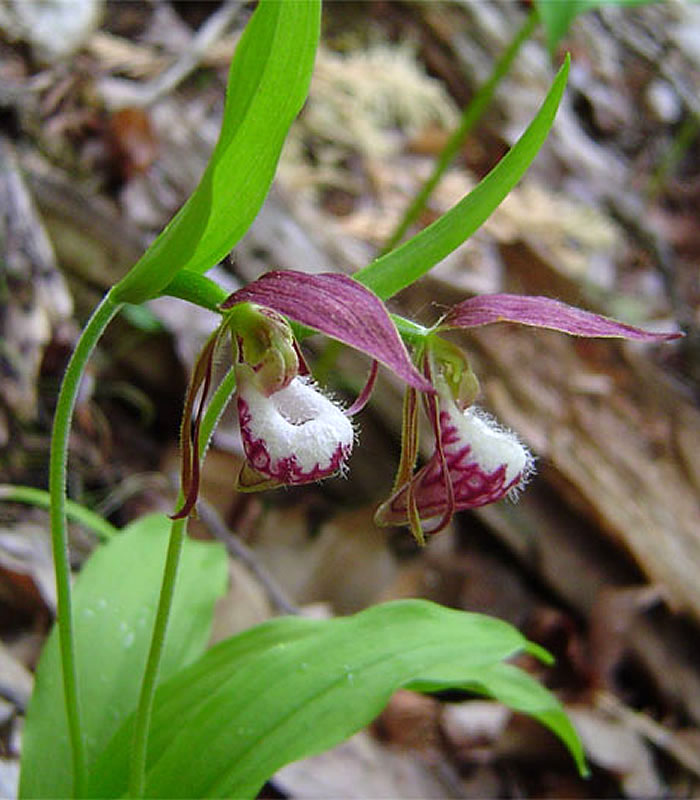
Orchids
|
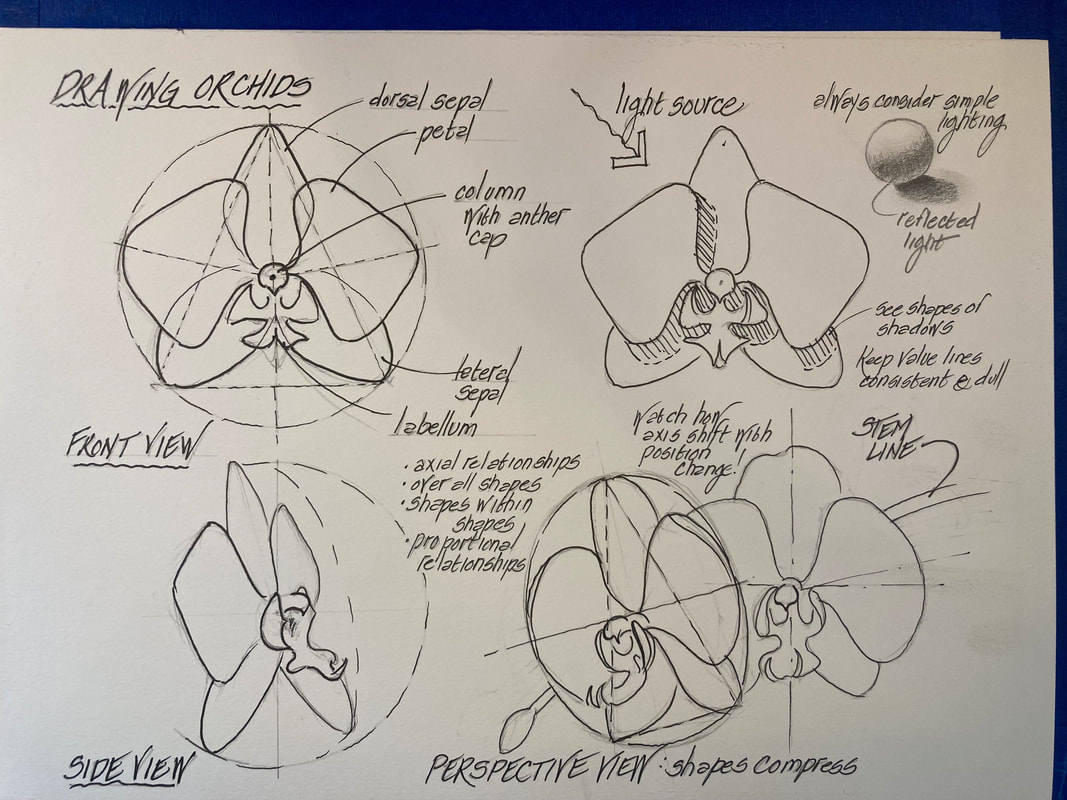
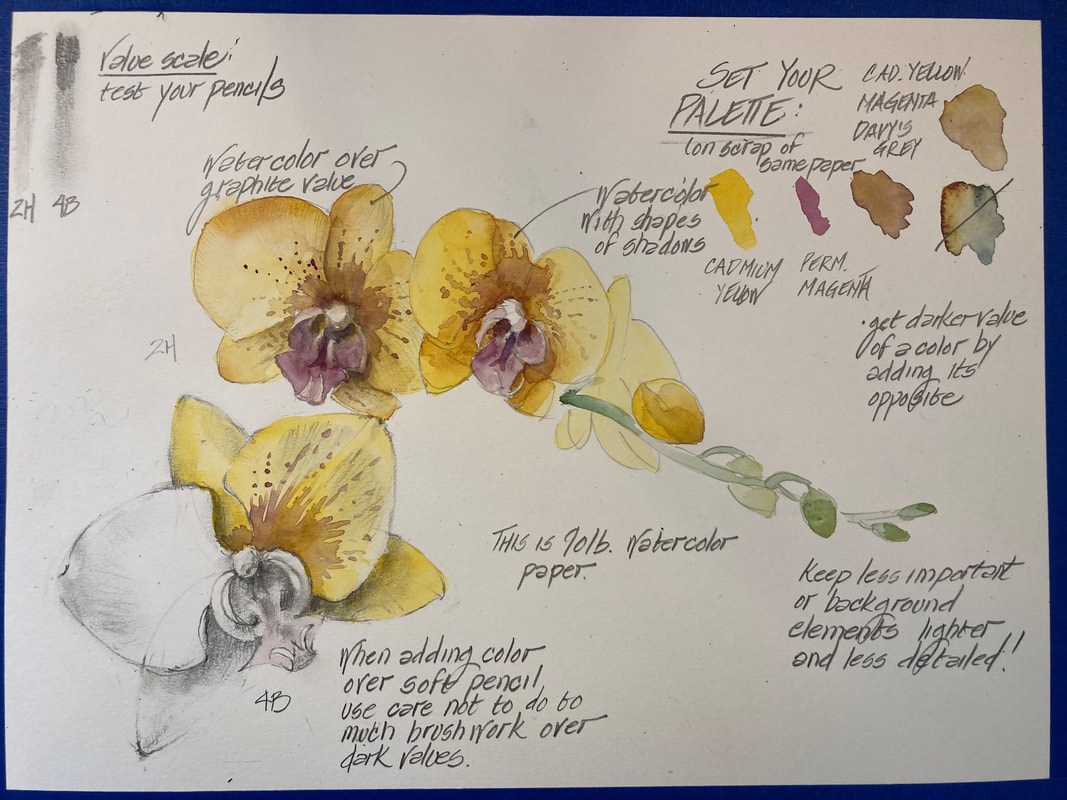
In learning to draw and paint orchids we will use the same techniques as describe above in the Drawing Flowers and Basics of Watercolor. However, this section will provide you with a bit more subject specific information that I hope is helpful!
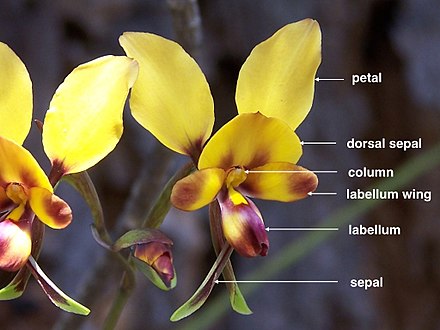
Understanding as much as possible about the basic anatomy and the constituent parts' functions of your subject will inform your drawing and help make your drawings more accurate, and believable as well as imbue them with "life." Here is a little about basic orchid anatomy below from one of my favorite resources "How Stuff Works" |
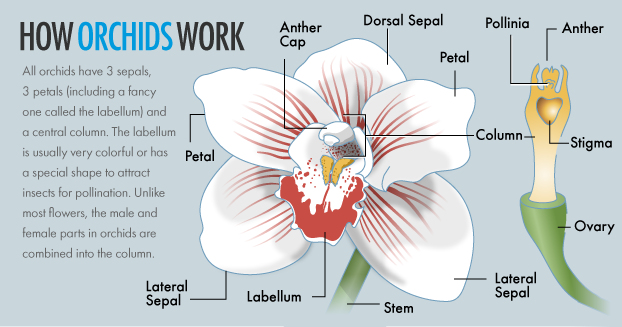
|
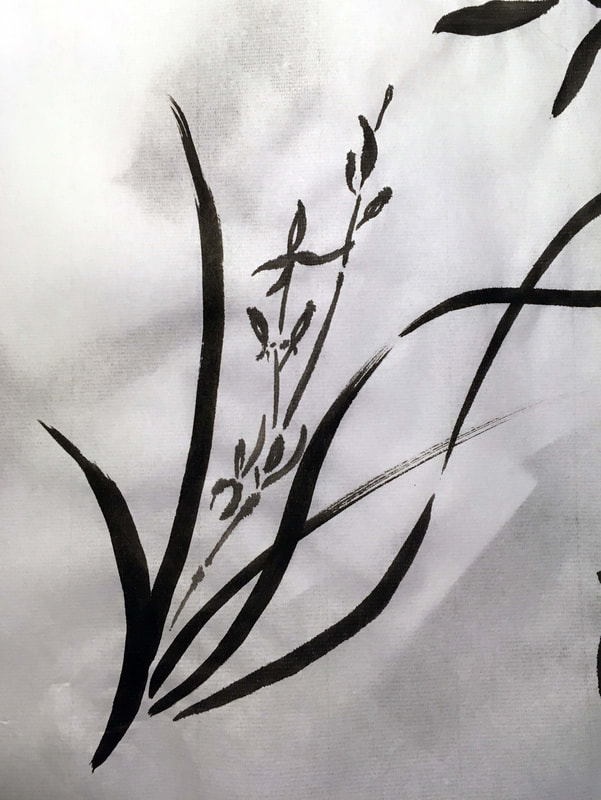
I have found the techniques of Chinese brush painting to help me see the large gestures and shapes that we instinctively identify with specific plants. This video is a super introduction to both! I have found this supplier to be a reliable and helpful resource. (please keep in mind I am Not paid to advertise for any supplier or resource, I'm only sharing my personal experience and hope that you will find it the same.)
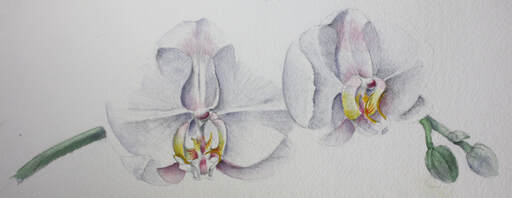
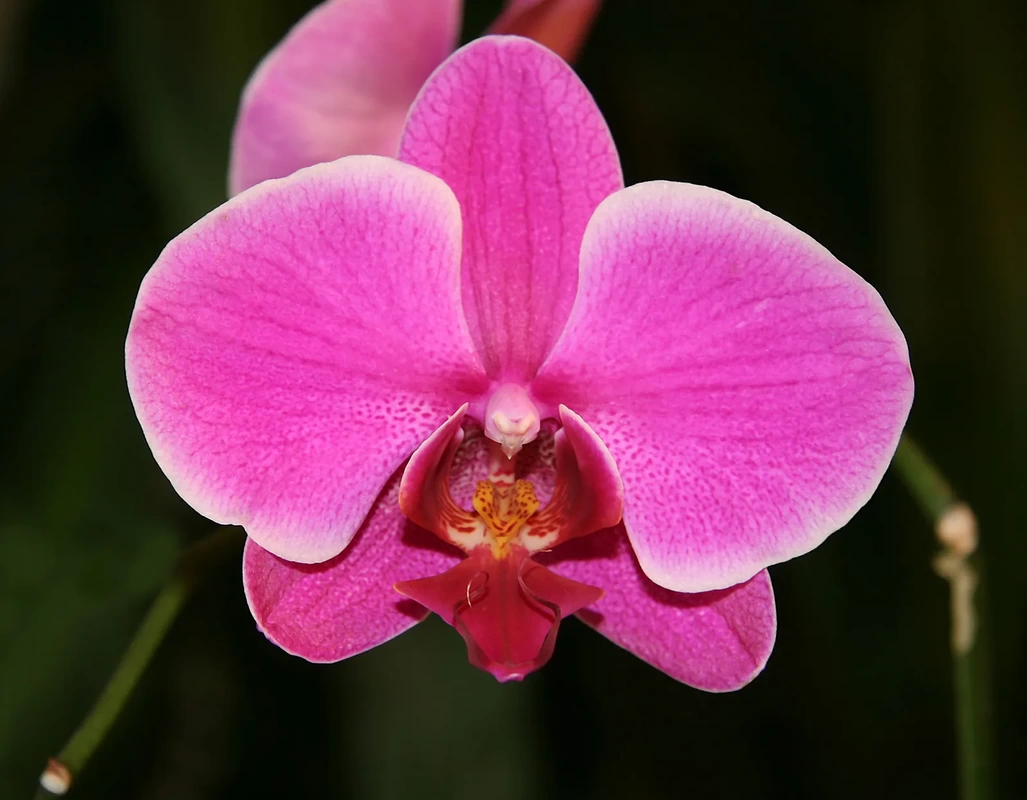
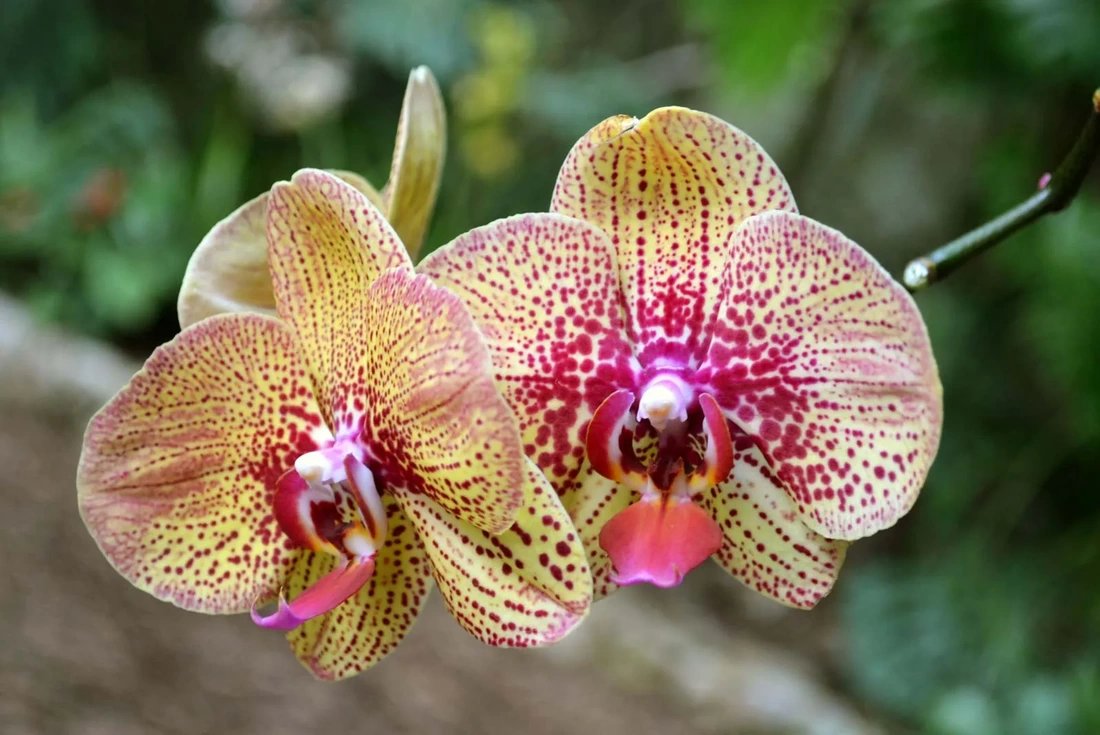
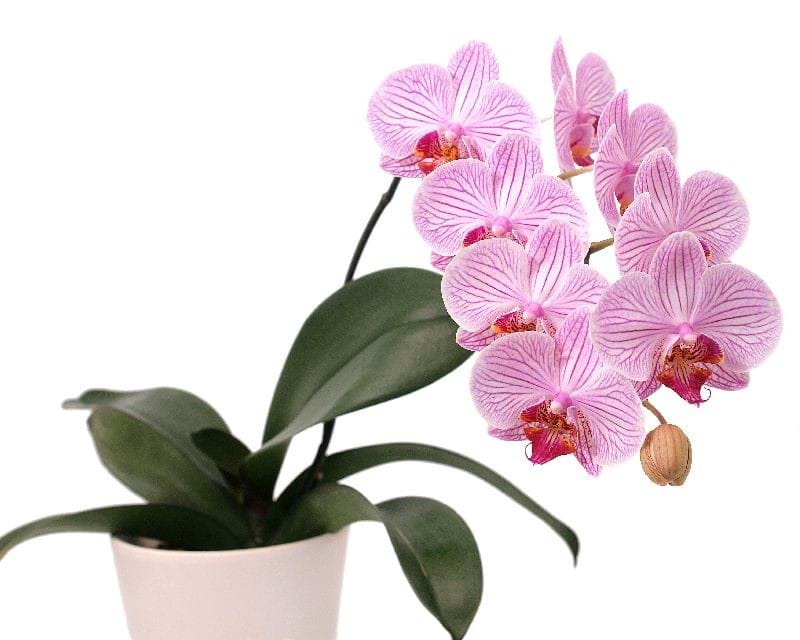
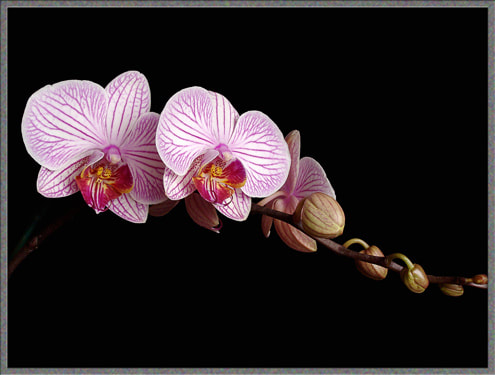
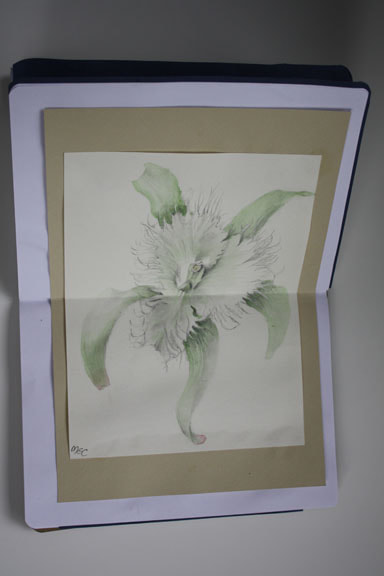
We Will Be Drawing and Painting from These Models
Your Class Notes Here
Orchid Example Gallery

Orchid Reference Images
Images from Wikipedia

Trees
Getting Started and Tree Anatomy for the Artist
|
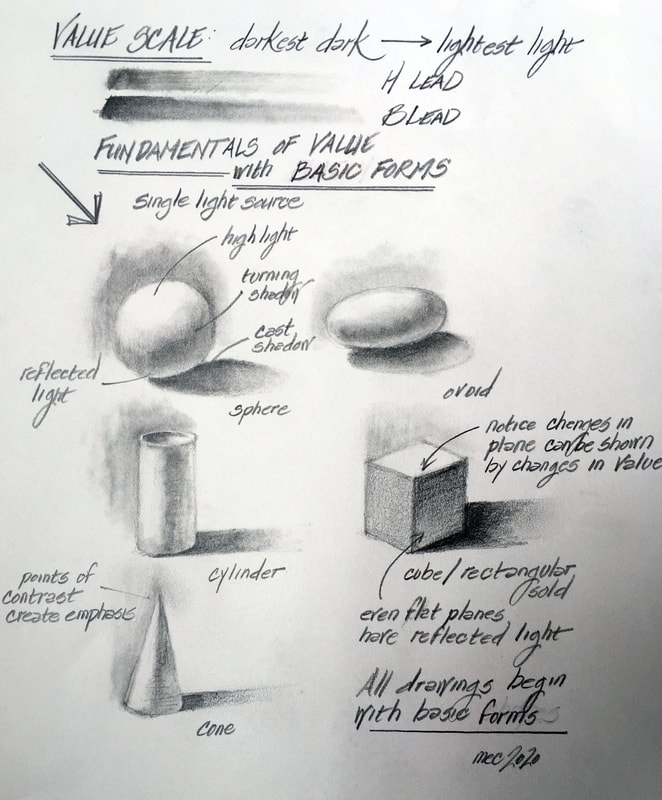
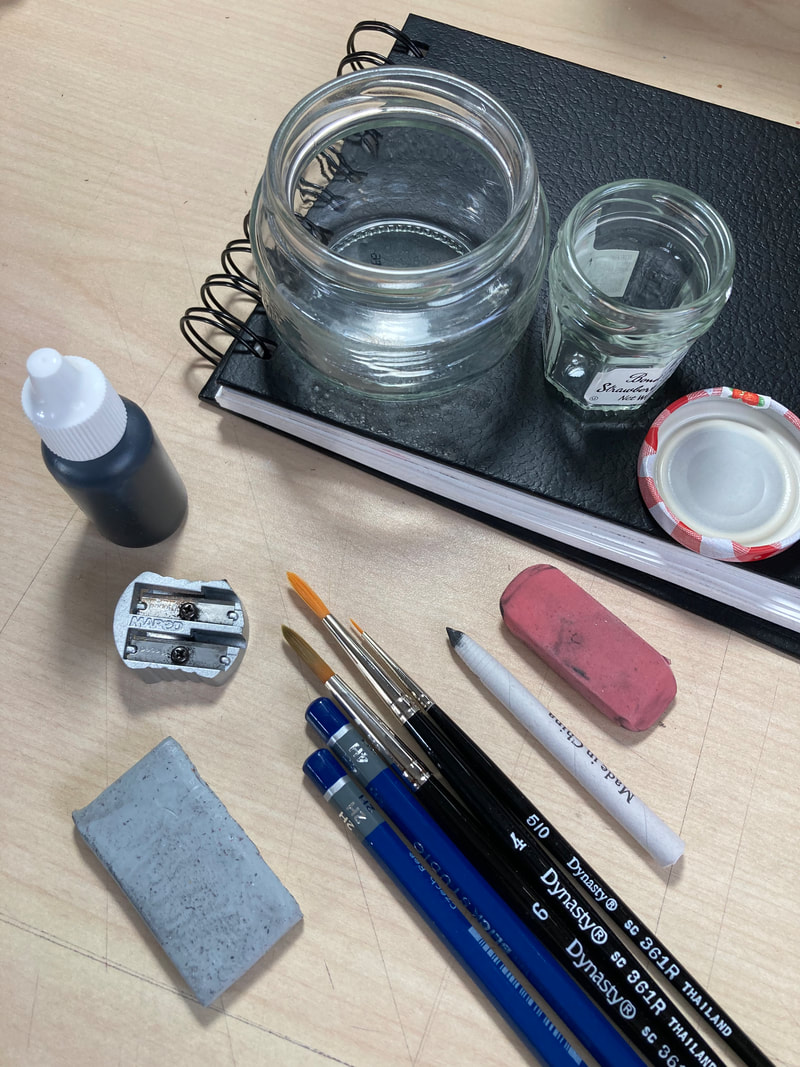
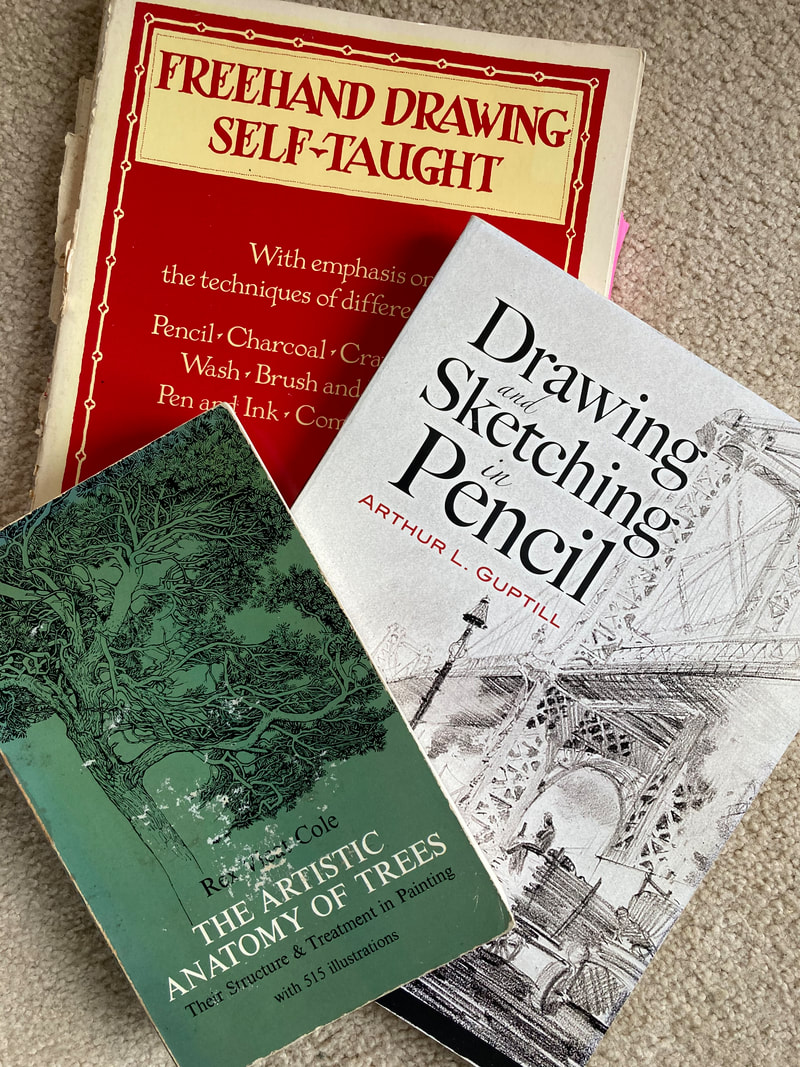
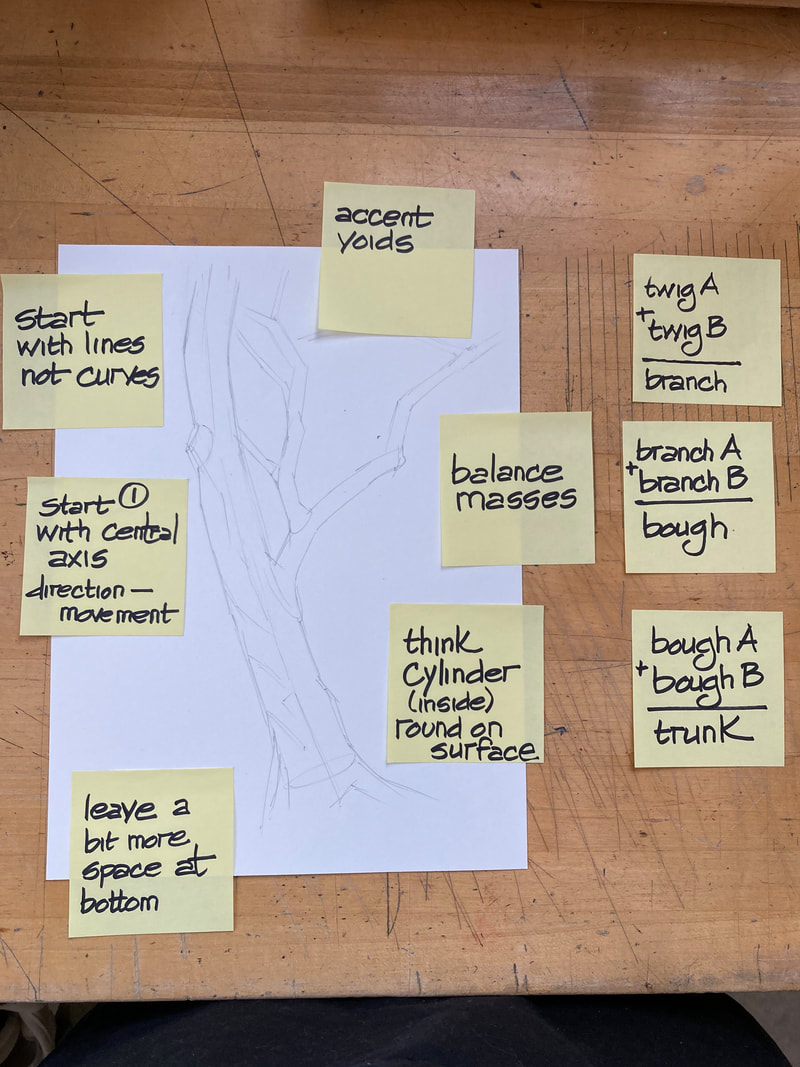
Welcome to Drawing Winter Trees! Drawing trees is one of the best ways I know of as an artist to build your eye for proportion, and detail. It also helps you to "see" your subject in 3-D in your mind and translate that understanding of the relationship parts into your drawing creating more believable and livelier works. The image on the left is a worksheet of notes I have prepared for your review and use. This will allow you to listen and enjoy drawing along during the workshop without having to worry about taking notes. A few pointers before we get started: 1. Thinking specifically about the artistic elements of line, value, space, and texture when drawing trees. 2. Don't sweat the small stuff! No, you don't have to draw every leaf! Learn to draw what you see not what you know and always work from the largest elements to the smaller elements. 3. Use a full range of values and a hierarchy of line in creating the illusion of space and dimensionality as well as emphasis. Remember the human eye tends to look at dark and bold first and perceives those things as closer in space. 4. Seek to create balance in your subject's structure as well as in solid (positive space) and void (negative space). Balance is important too in value as well as the weight of lines. 5. Relax and enjoy your practice! The terrific thing about trees is that they are everywhere. Look out your window and sketch, take pictures of beautiful trees you would like to draw for reference on a rainy day...the more you draw the more you will see and the better you will draw! Suggested Materials List: Drawing Pad/Paper 9”x 12” or larger for both wet and dry media 2H pencil 4B pencil at least three water-soluble graphite pencils assorted (2H-B) instructor recommend this kit or similar: https://www.dickblick.com/products/faber-castell-graphite-aquarelle-pencils/?fromSearch=%2Fsearch%2F%3Fq%3Dwatersoluable%2520graphite%2520pencils Paper tortillion / stump for blending 1 small pocket pencil sharpener 1 small watercolor brush (#2 or #4) 1 kneaded eraser 1 “pink pearl” or similar type eraser Watercolor brushes 3-4 small ceramic or glass jars for water and mixing washes (repurposed jam jars are excellent for this) A piece of paper towel Recommended text for your studio bookshelf: The Artistic Anatomy of Trees by Rex Vicat Cole Any Book by Arthur Guptill specifically: Free Hand Drawing Self-Taught Drawing and Sketching in Pencil Rendering in Pen and Ink Sketching as a Hobby |
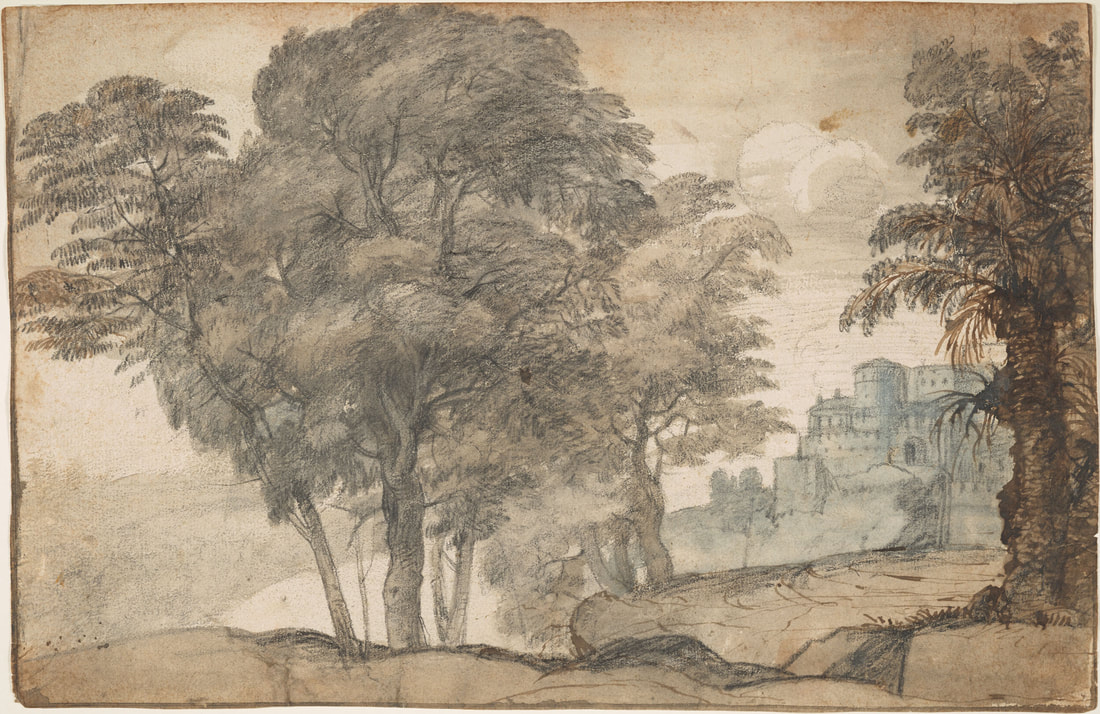
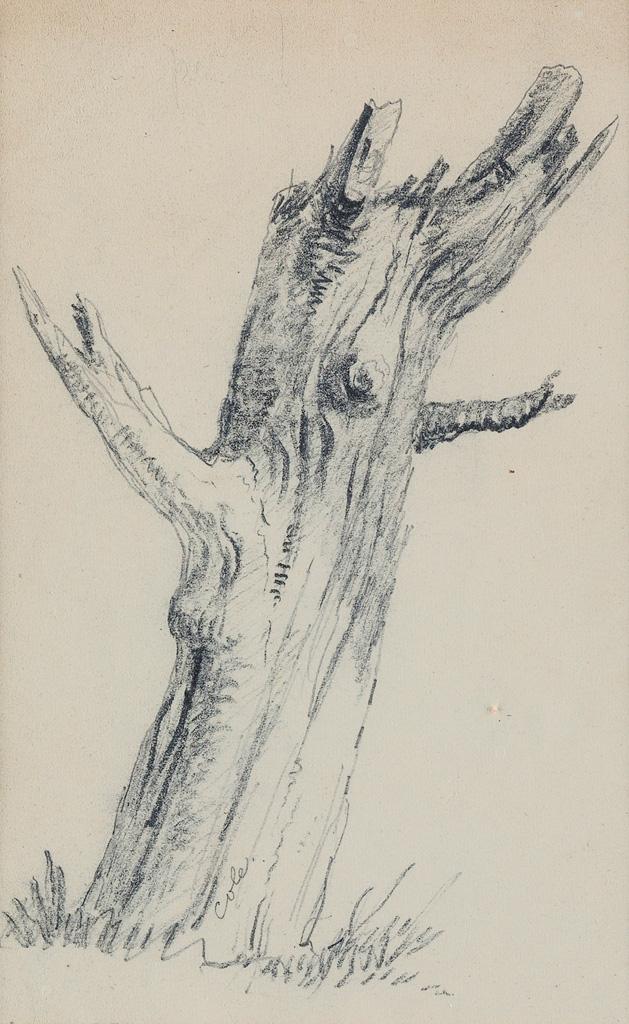
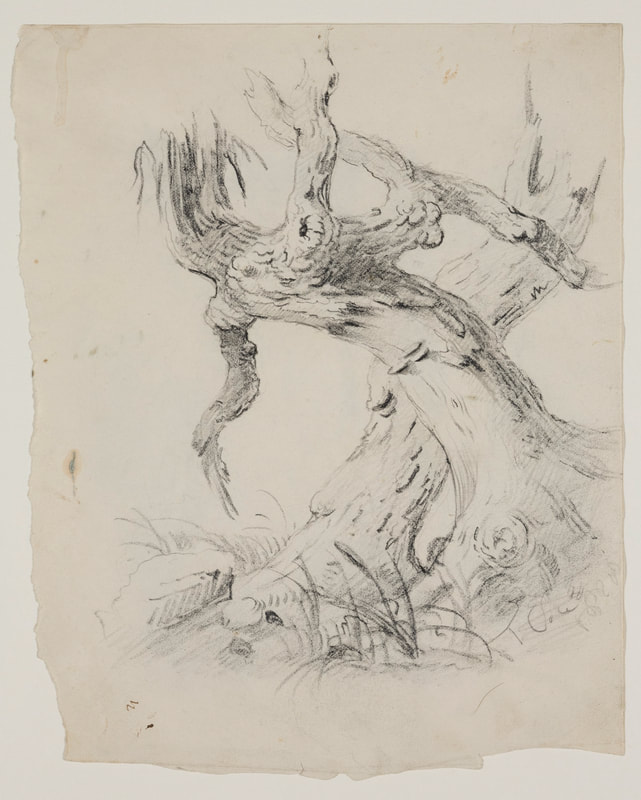
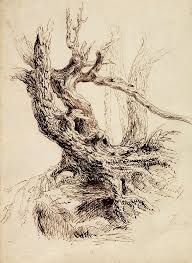
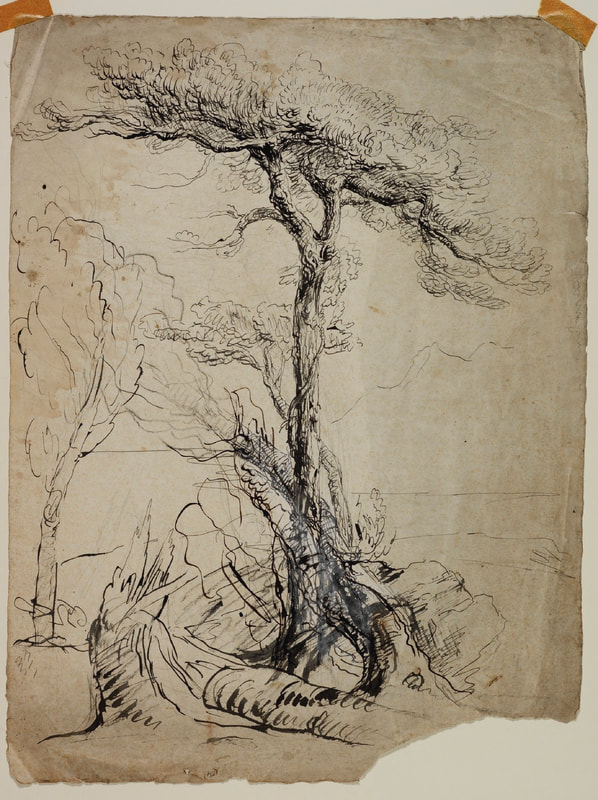
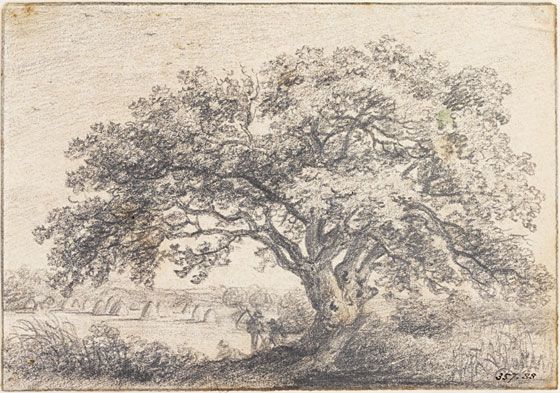
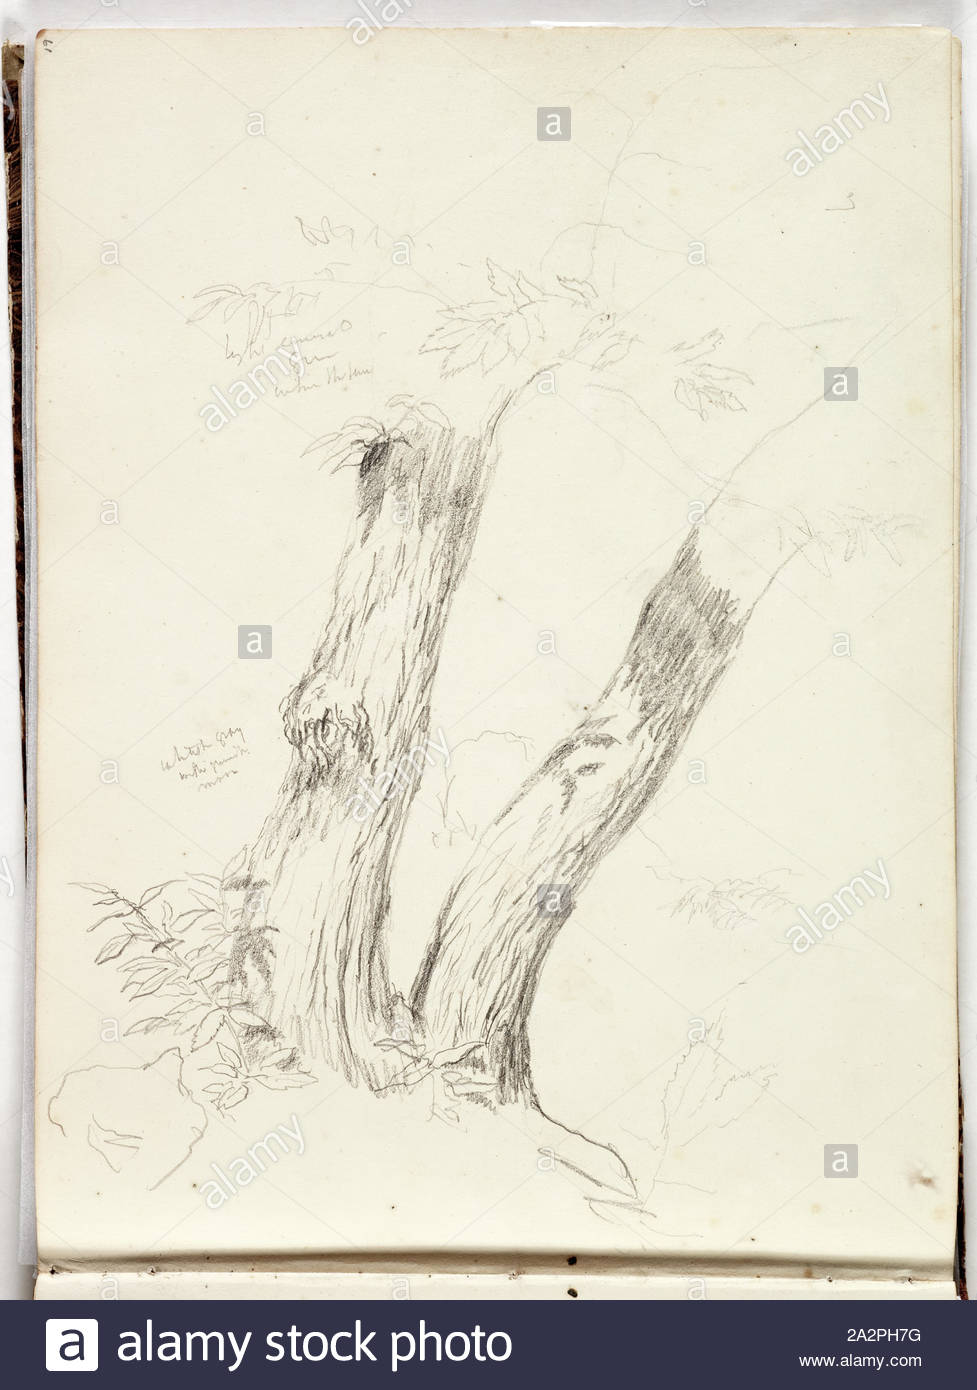
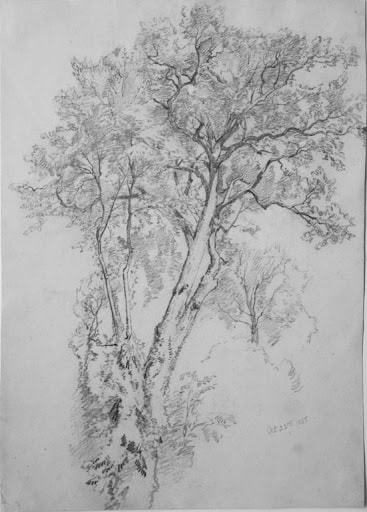
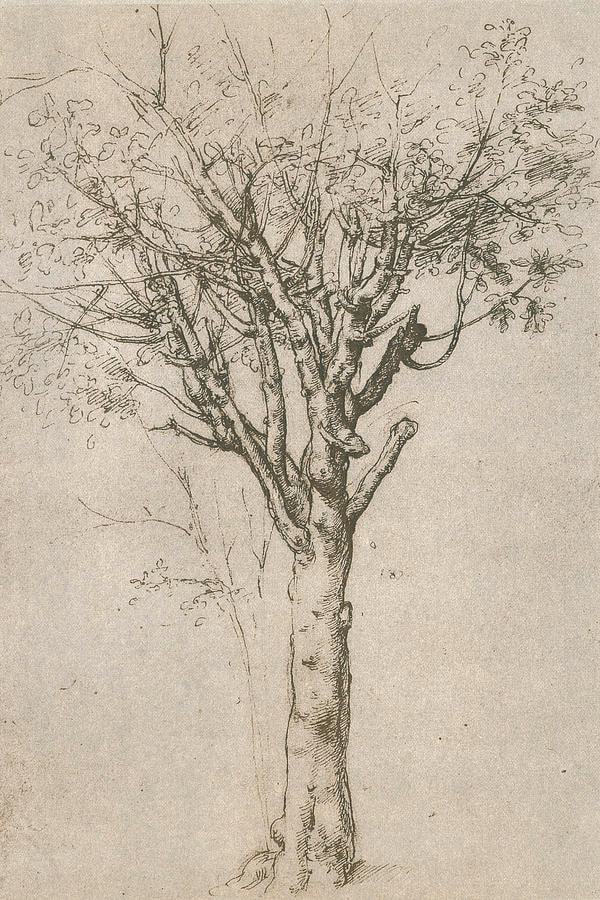
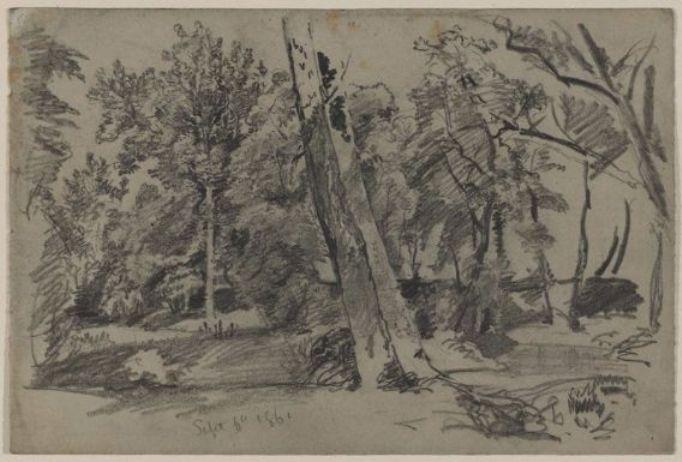
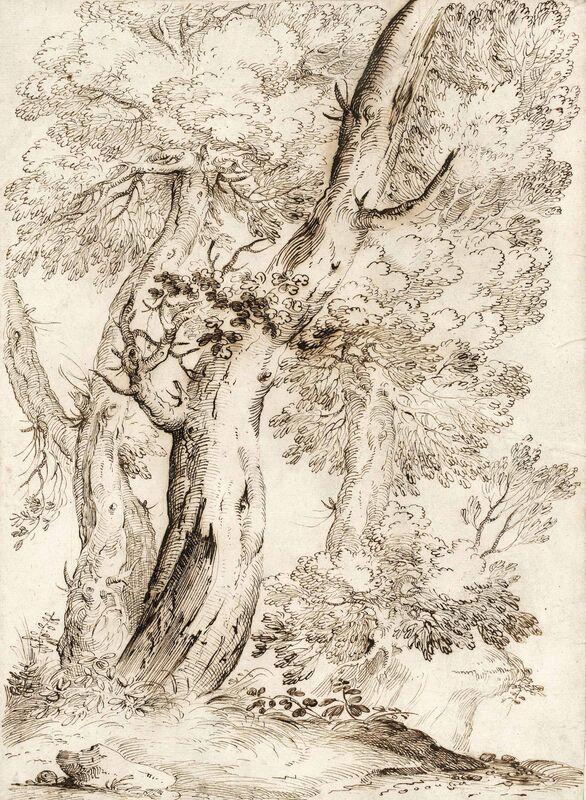
Master Drawing Reference Gallery
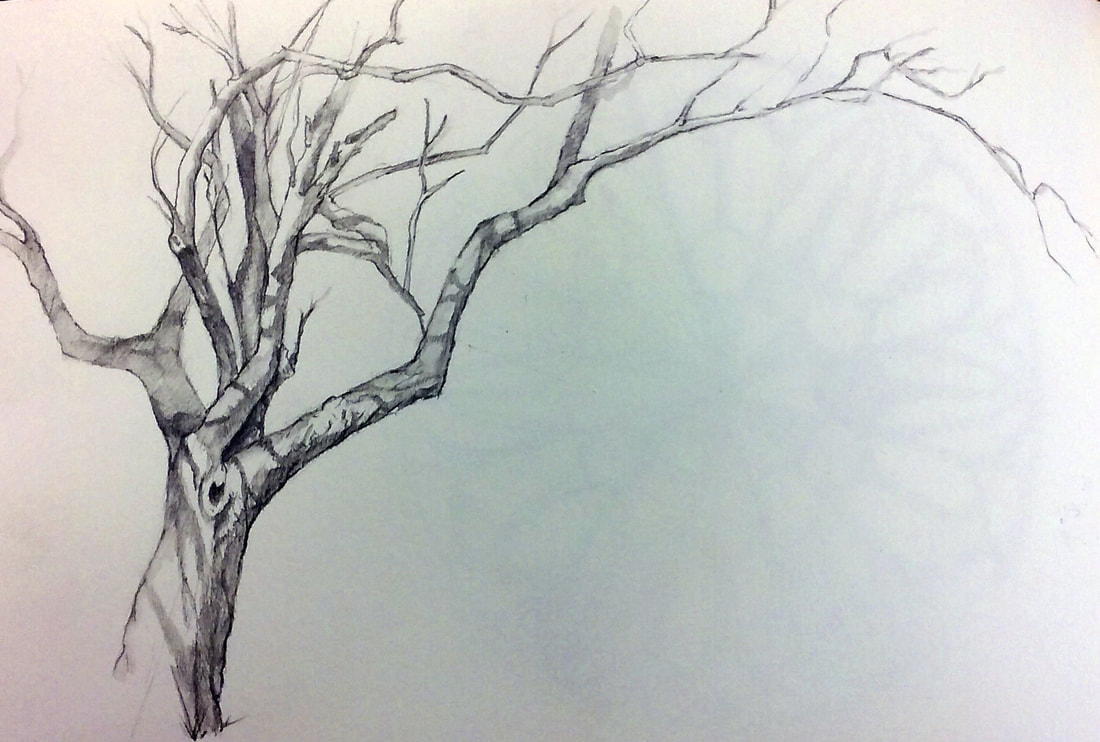
Study the way accomplished artists of the past create composition when drawing a tree. Notice the balance they create by juxtaposing solid (positive space) and void (negative space). Notice too how often voids that are shaped from branches or the trunks of trees are often points of interest. Experienced artists always create a rhythm of dark and light values to help create the illusion of space and keep the viewer's eye moving around the composition, as well as placing very dark and very light values next to each other to create emphasis. Notice that you tend to look at those things which have more detail and more contrast first and longer than those parts of the picture that are less detailed and lighter and closer in value. Use these strategies in your own sketches.
When drawing a tree try to see the big shapes, values, and general patterns/textures. Try not to get catch up in drawing every little nook and cranny or every leaf. Remember less is more and it will help you avoid fussiness and becoming overwhelmed. Decide from the beginning what your drawing is about: one specific part of the tree: e.g. a particular branch, a cavity in the trunk; or is it about the entire tree.
Pay close attention to the tree's posture and how it grows. If possible walk all around the tree and look carefully up and down the trunck both up close and from a distance. Take in as much three dimensional observational details as you can. This will greatly inform your drawing. As you observe, asking yourself questions. If it is leaning ask yourself: how is it balancing itself? Do the branches alternate or grow equally and opposite each other? Does the tree remind you of anything? If you are planning to work from photos, take pictures of your subject in the round, as well as up close details and from a distance to get the entire tree.


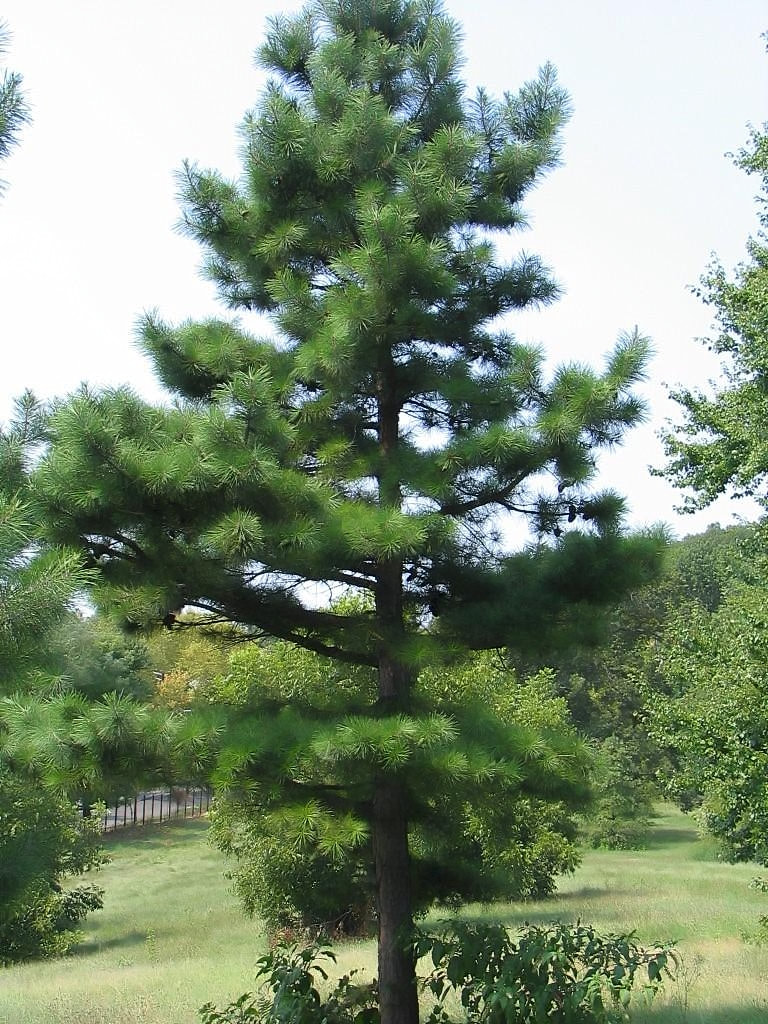
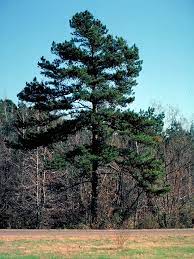
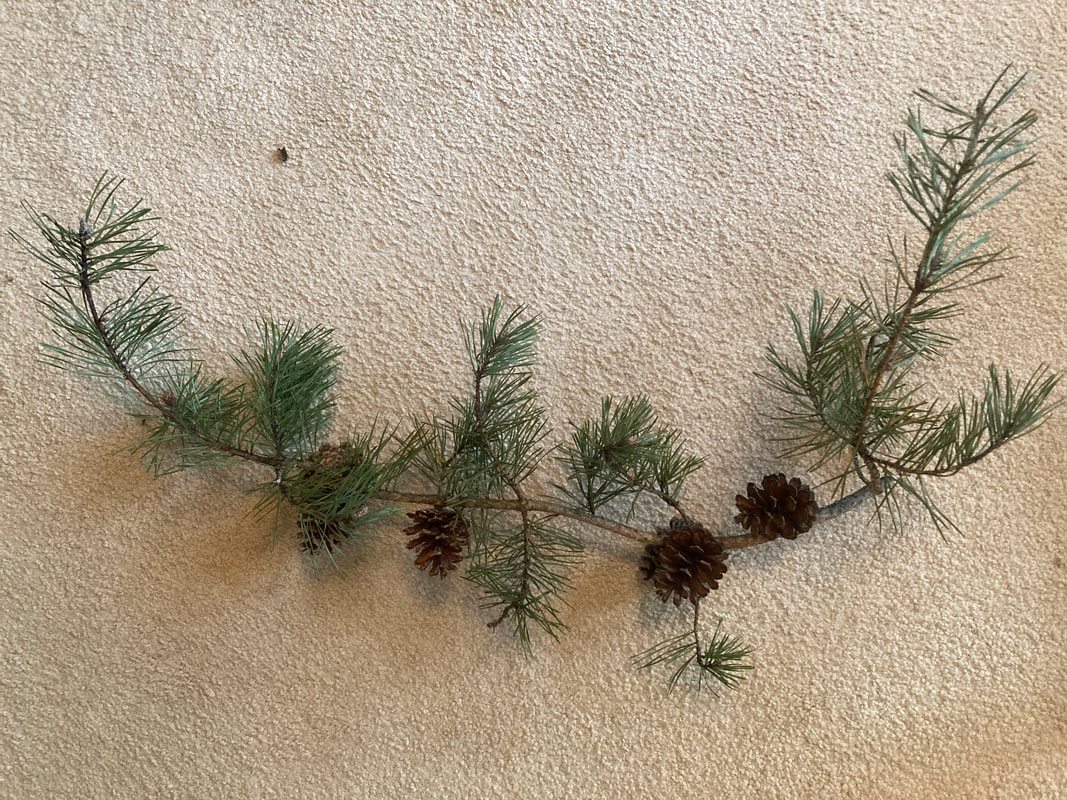
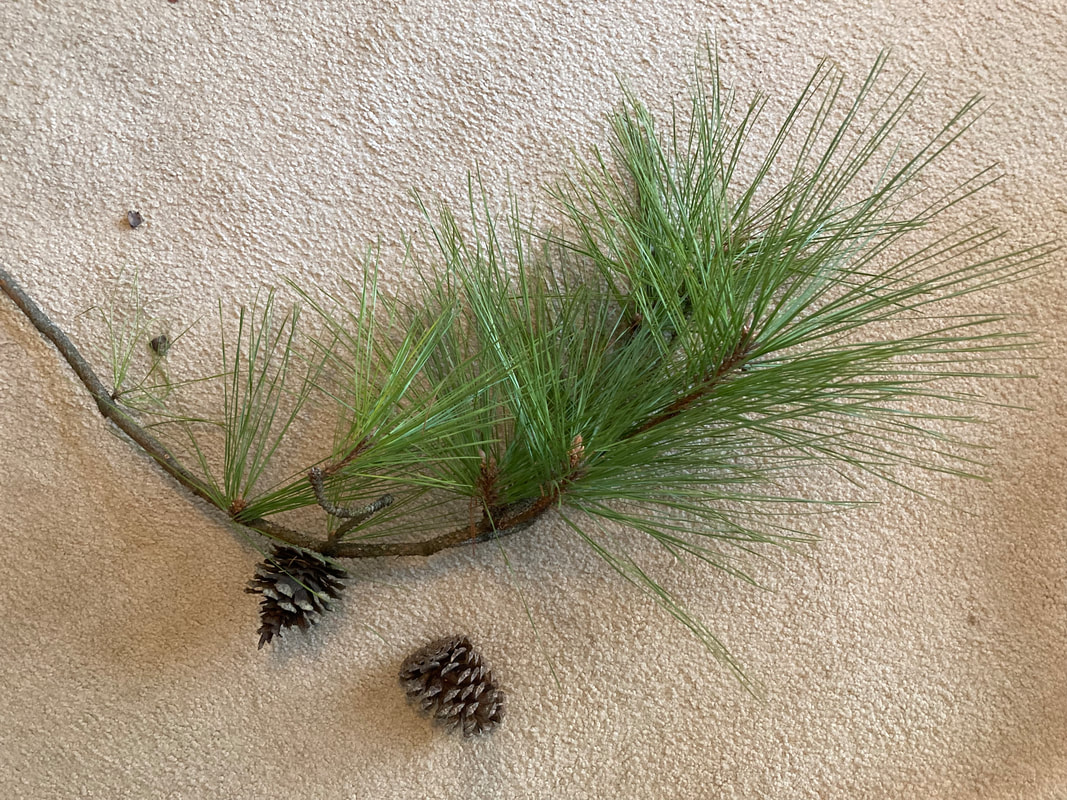
References for Pine Trees: Three Common US East Coast Pines
Eastern White Pine


Pitch Pine
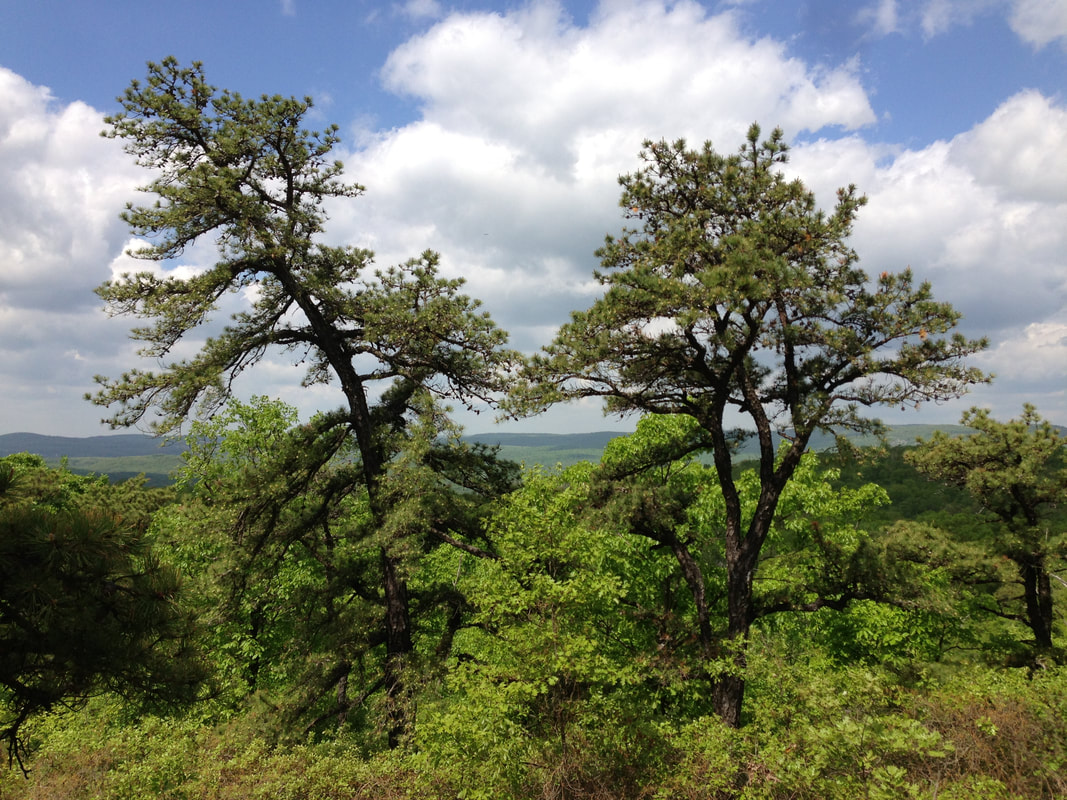
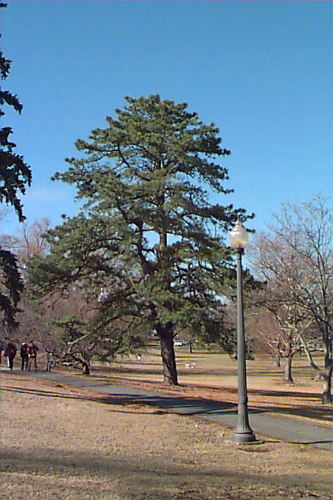
Shortleaf Pine
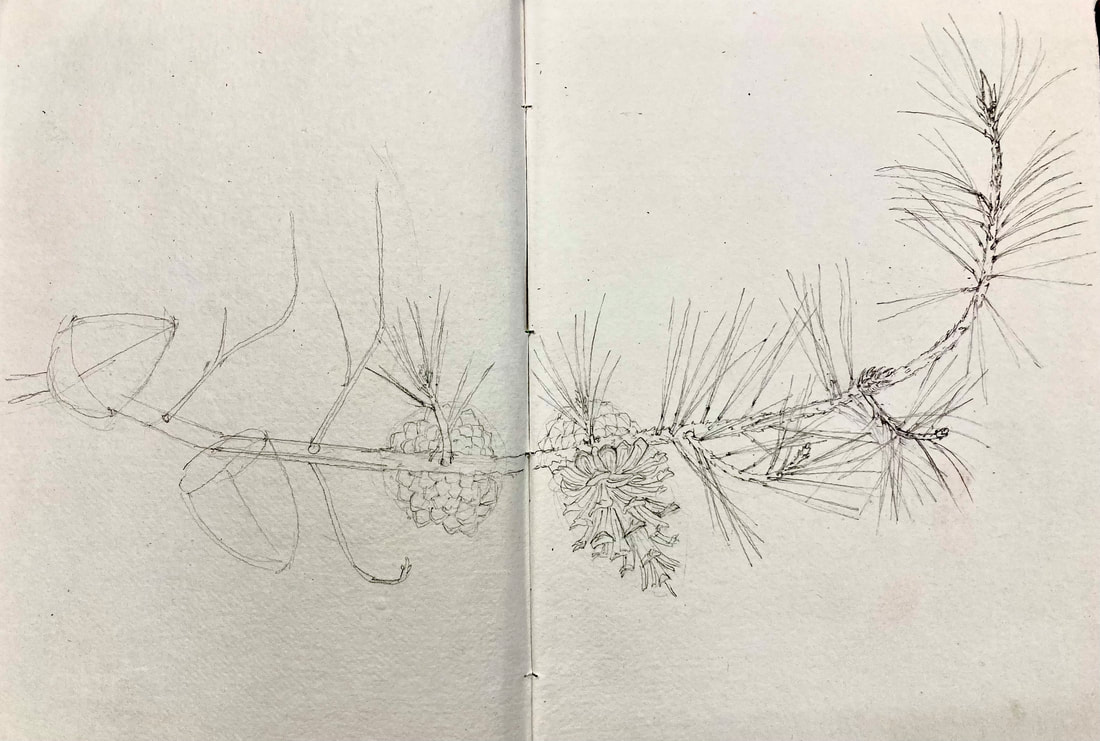
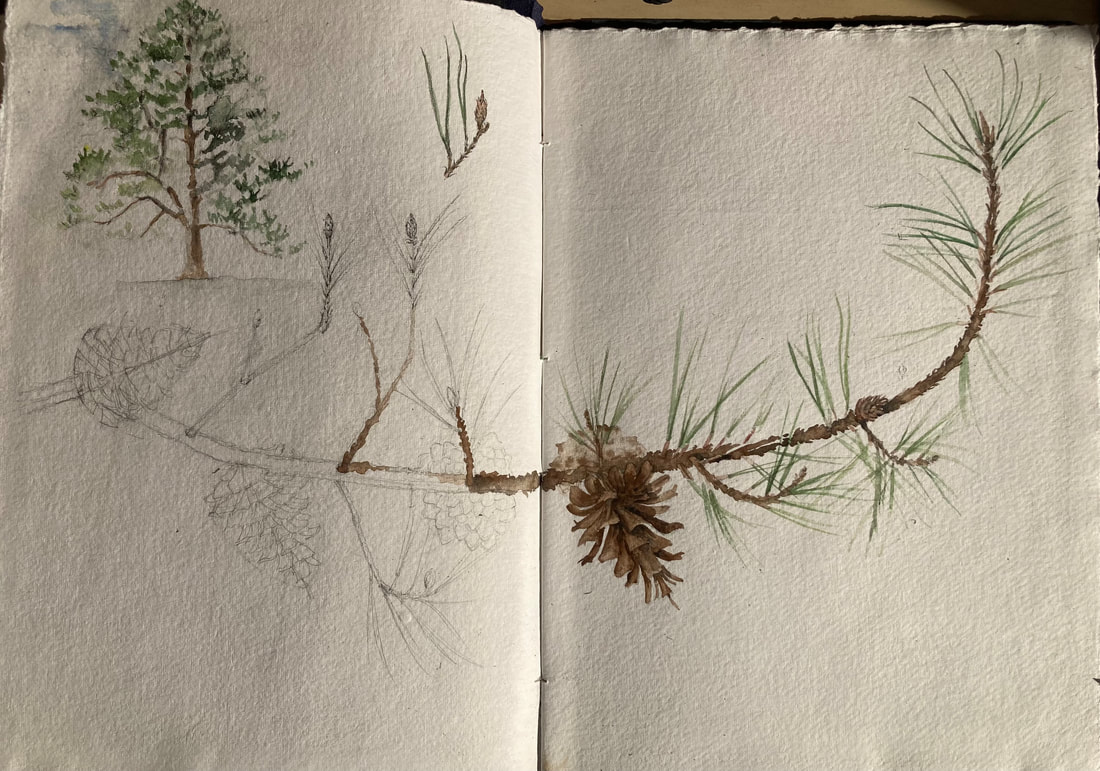
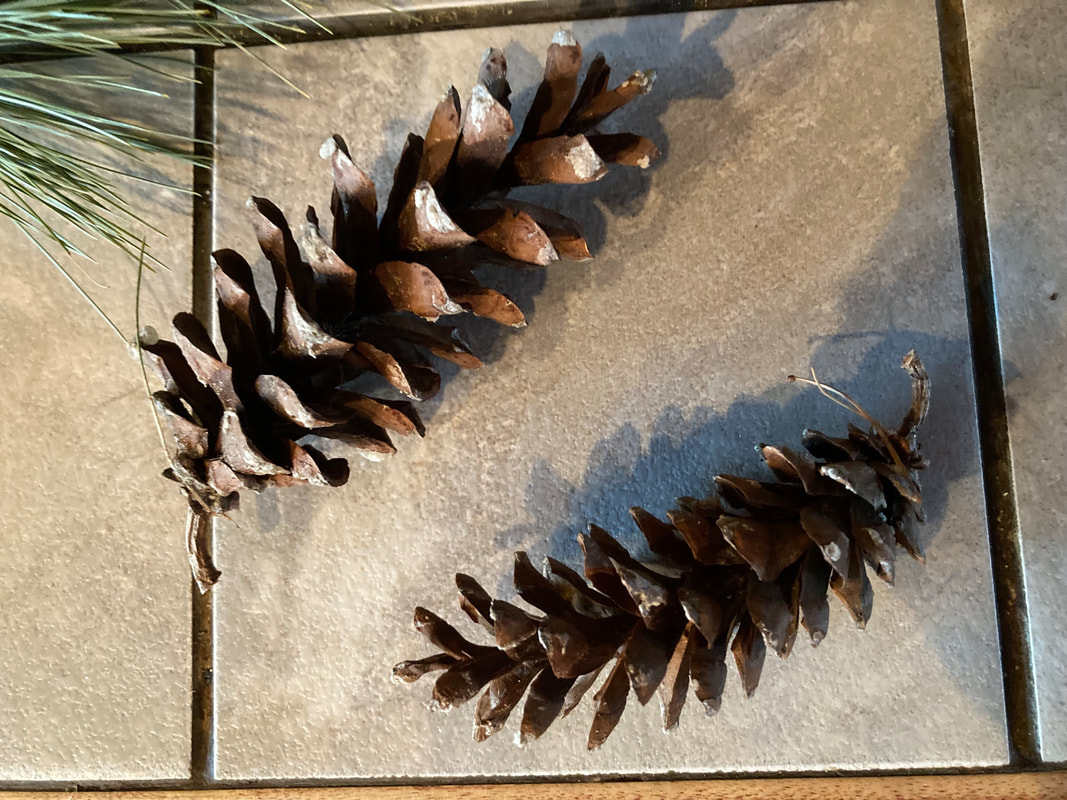
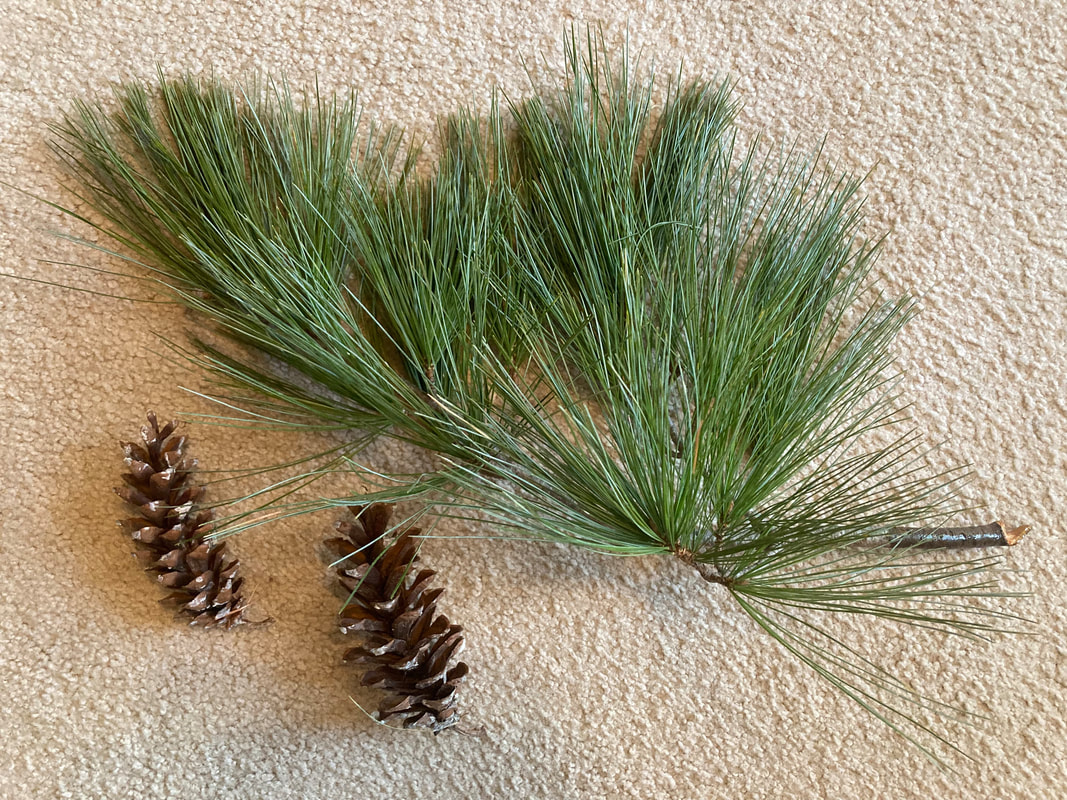
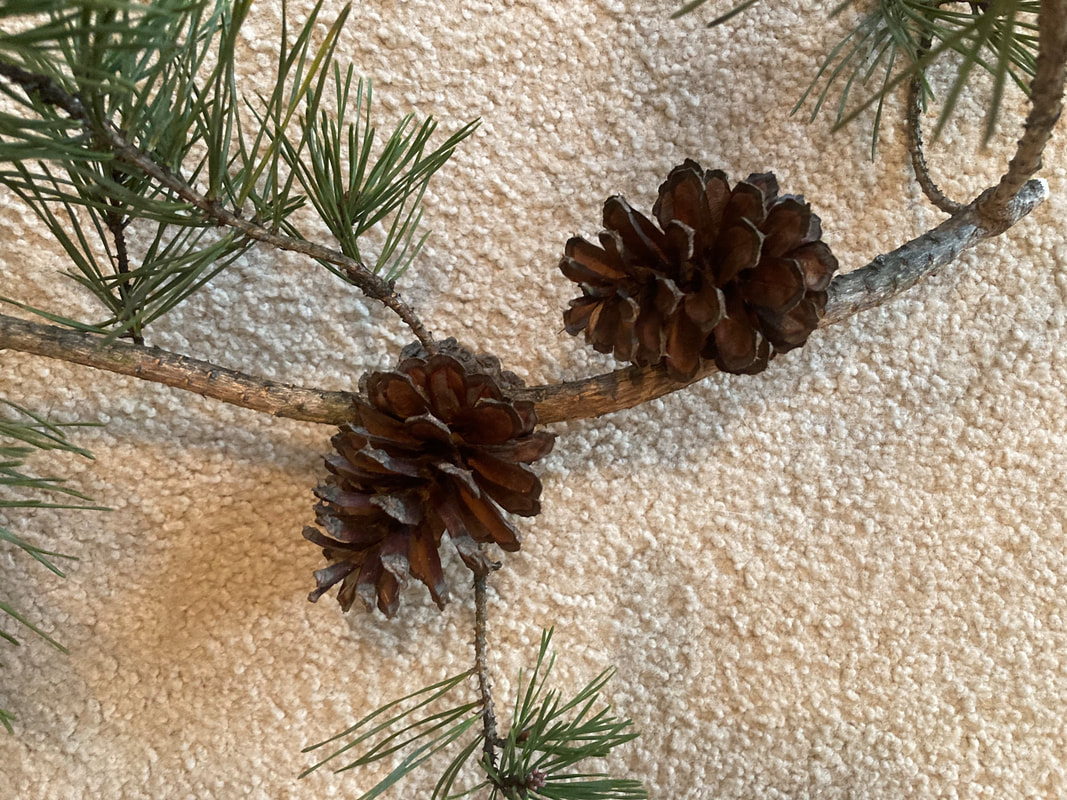
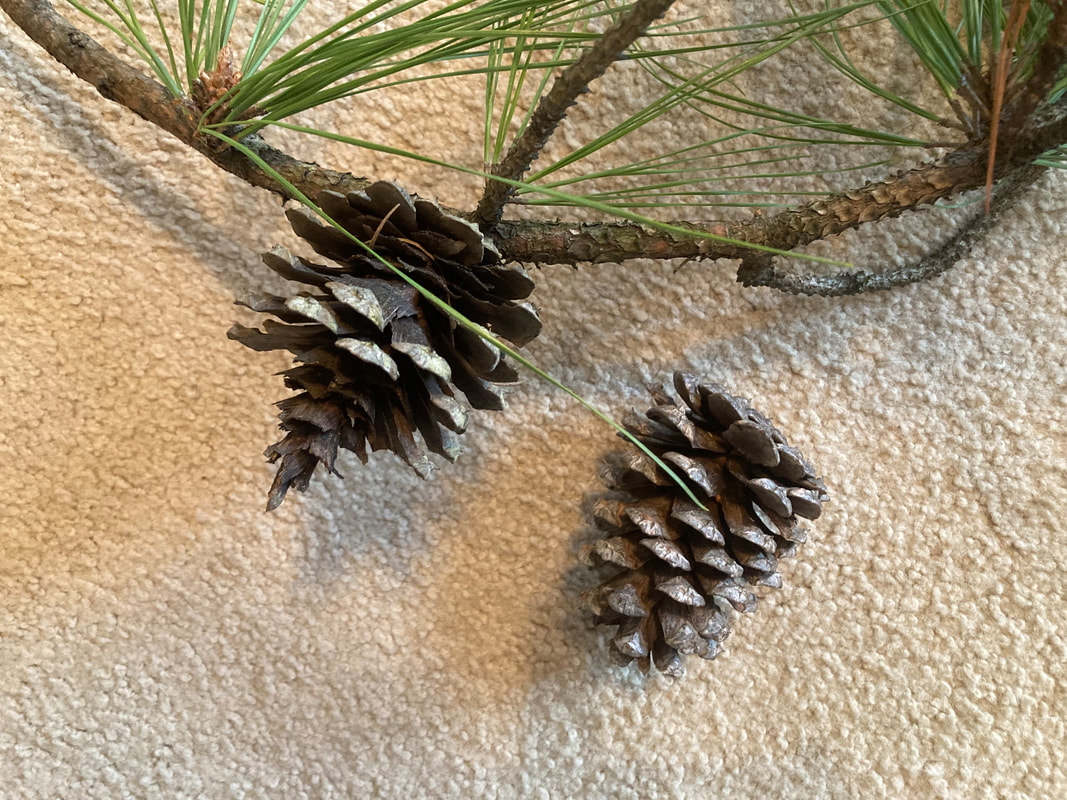
References for Pine Branches and Pine Cones
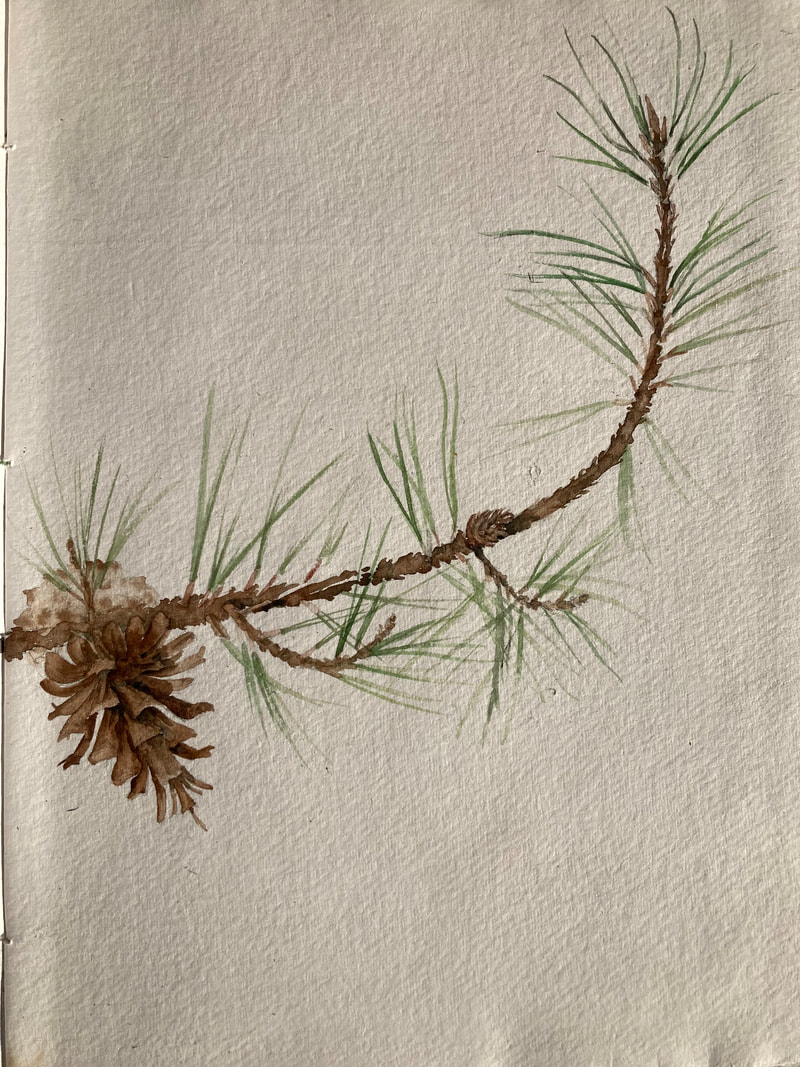
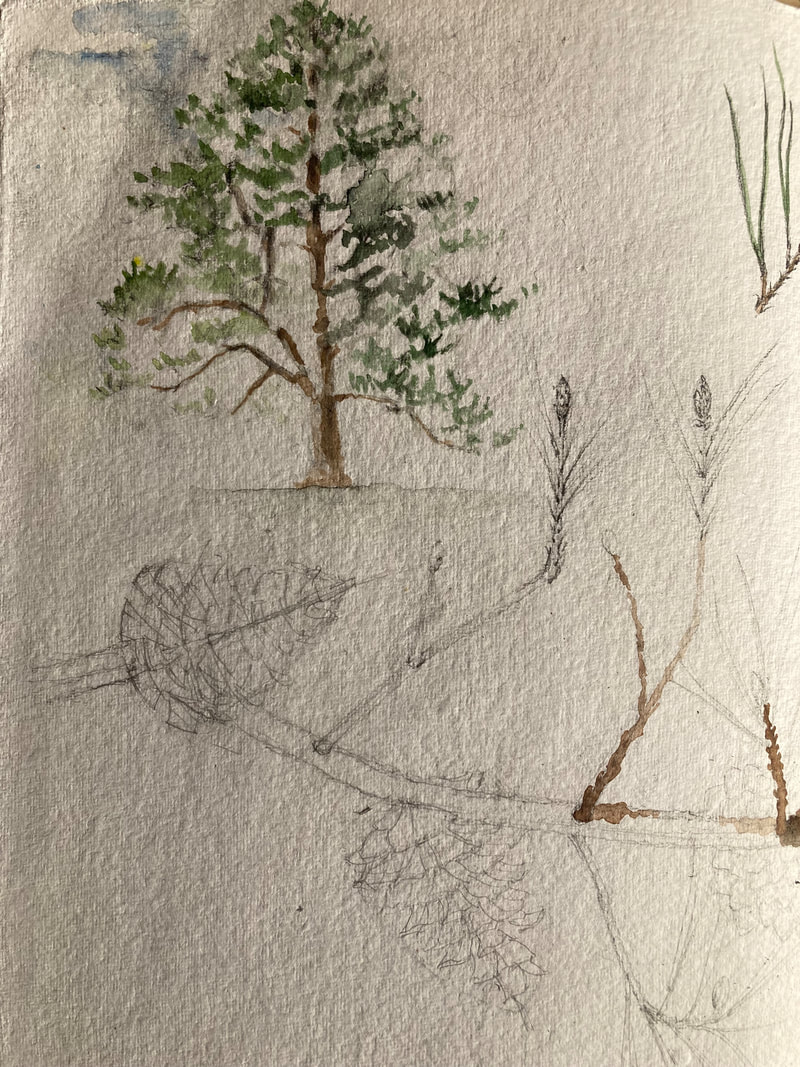
Below is an example of a pine branch sketch in progress.
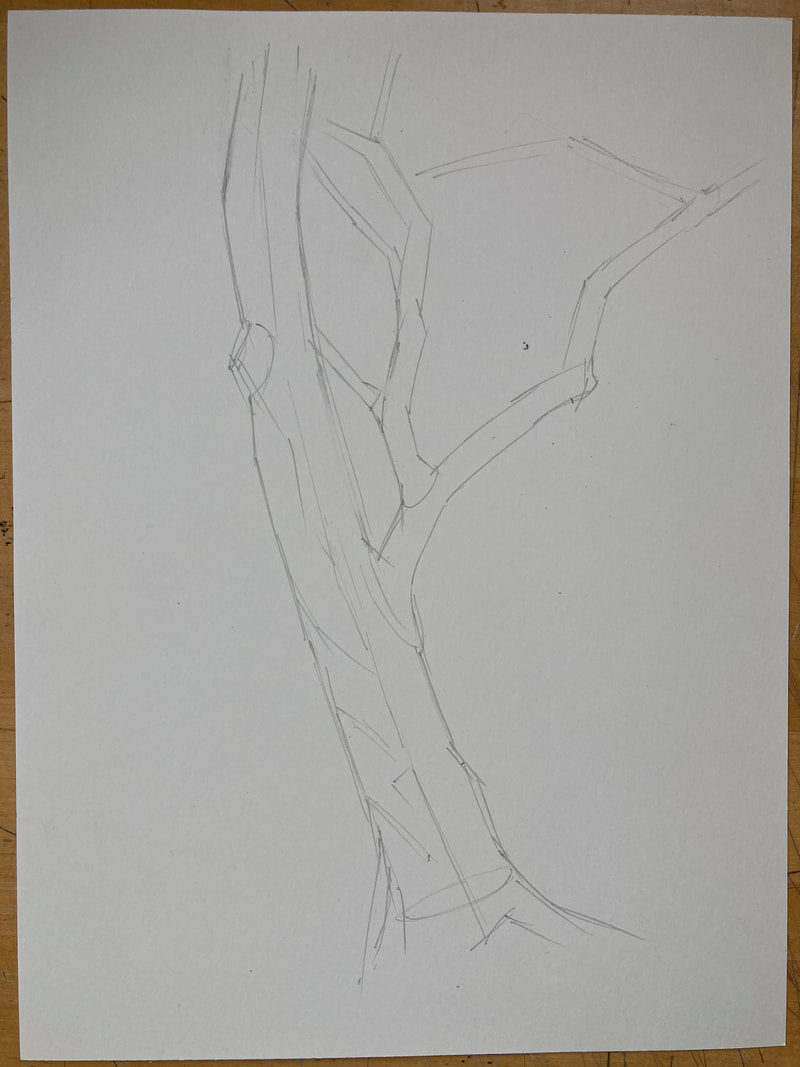
1. Begin with the basic line of the branch. Keep it "geometric" (straight and angular in style) rather than "organic" (soft and curvy in style). It is easier to be more accurate and capture the strengthen of the line of growth of the branch with geometric lines and then later soften them as you details. Curvy lines are easy to get lost in when laying out the drawing and lack visual commitment and strength.
2. Begin to thicken up the various portions of the branch. Keeping in mind that branches taper as they move toward their end. Also keep in mind that smaller "sub" branching is always thinner than the branch they are anchored to.
3. Put in the basic form of the terminal buds, cones, and lightly mark the areas with thick concentrations of needles paying special attention to the length and position relative to the branch of the needle groupings. Note that the smallest needle groupings are species specific!
4. Detail in parts of buds, cones, and lightly start to texture the branch bark. Remember to work lightly, it's easier to add more than to try to take away lines and value.
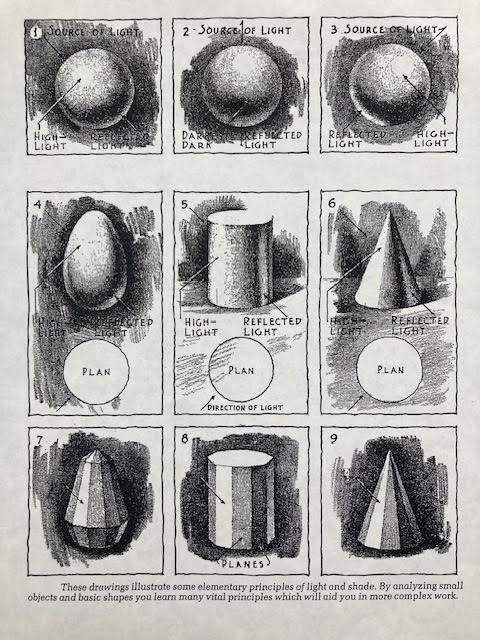
5. Once you have the bulk of the branch detailed pay attention to the overall lighting. Typically (from right handed artists) the light originates in the upper left hand corner (for left handed artists its reversed). When adding value to give your branch and cones dimension, remember there will be a lighted side and darker side. Don't forget your reflected light!
Thinking about adding color? You can carefully watercolor on top of a pencil drawing especially if its been executed in 2H pencil or harder lead. You can also use water soluble graphite with watercolor, just add color with a fairly dry brush so as not to "muddy" the pigment and graphite together.
1. Begin with the basic line of the branch. Keep it "geometric" (straight and angular in style) rather than "organic" (soft and curvy in style). It is easier to be more accurate and capture the strengthen of the line of growth of the branch with geometric lines and then later soften them as you details. Curvy lines are easy to get lost in when laying out the drawing and lack visual commitment and strength.
2. Begin to thicken up the various portions of the branch. Keeping in mind that branches taper as they move toward their end. Also keep in mind that smaller "sub" branching is always thinner than the branch they are anchored to.
3. Put in the basic form of the terminal buds, cones, and lightly mark the areas with thick concentrations of needles paying special attention to the length and position relative to the branch of the needle groupings. Note that the smallest needle groupings are species specific!
4. Detail in parts of buds, cones, and lightly start to texture the branch bark. Remember to work lightly, it's easier to add more than to try to take away lines and value.
5. Once you have the bulk of the branch detailed pay attention to the overall lighting. Typically (from right handed artists) the light originates in the upper left hand corner (for left handed artists its reversed). When adding value to give your branch and cones dimension, remember there will be a lighted side and darker side. Don't forget your reflected light!
Thinking about adding color? You can carefully watercolor on top of a pencil drawing especially if its been executed in 2H pencil or harder lead. You can also use water soluble graphite with watercolor, just add color with a fairly dry brush so as not to "muddy" the pigment and graphite together.
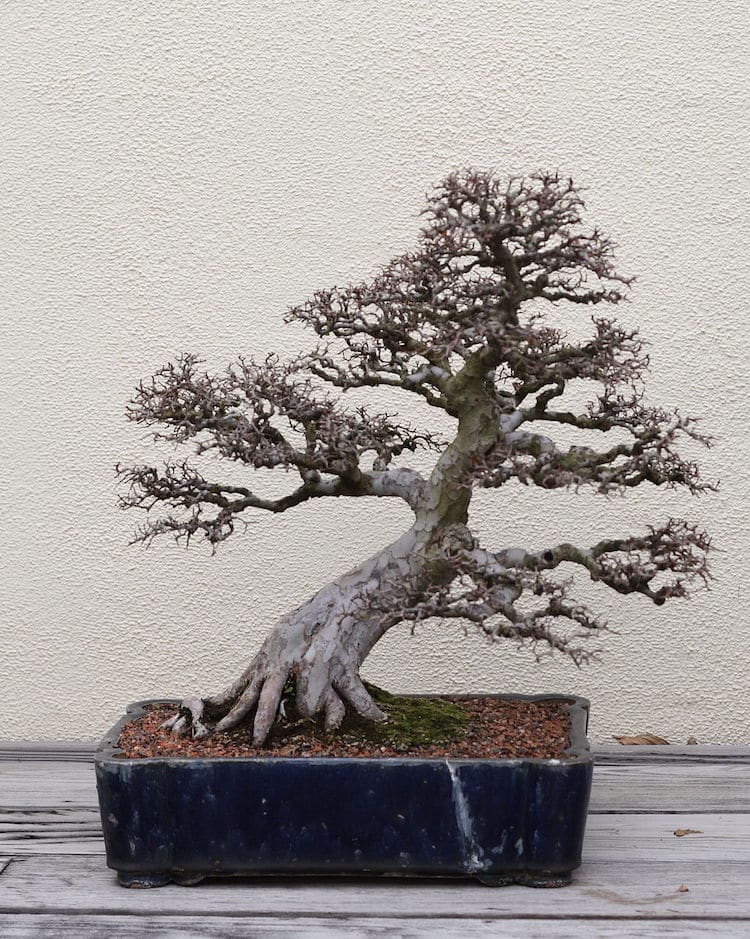
References for Drawing Bonsai
All trees from the National Bonsai and Penjing Collection Washington DC, photos for National Bonsai Foundation website.
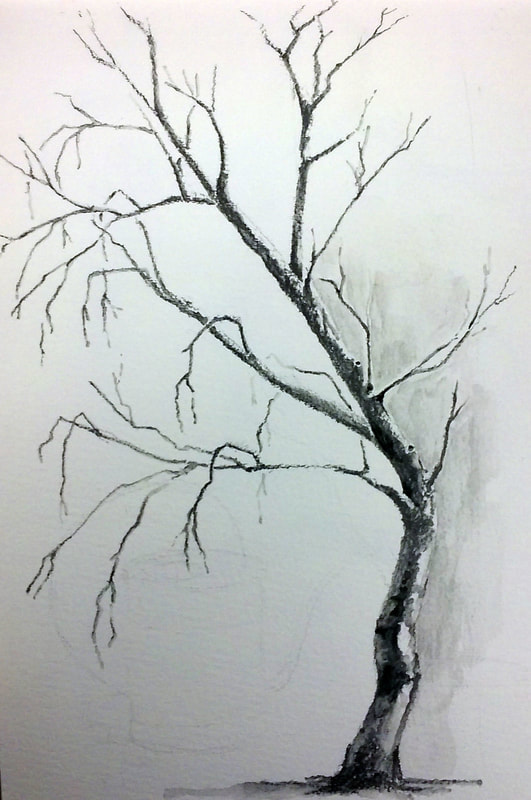
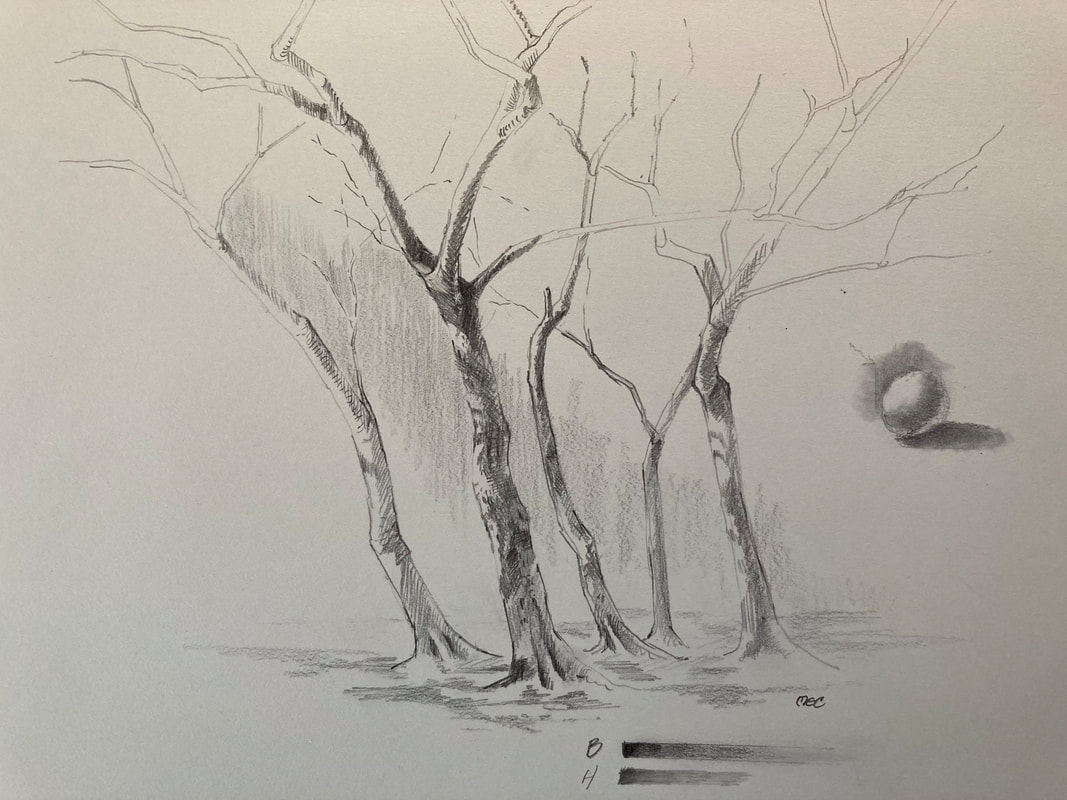
For more and completed examples of the water soluble wash technique be sure to check my postcards under "Works in Progress" on this website.
For more and completed examples of the water soluble wash technique be sure to check my postcards under "Works in Progress" on this website.


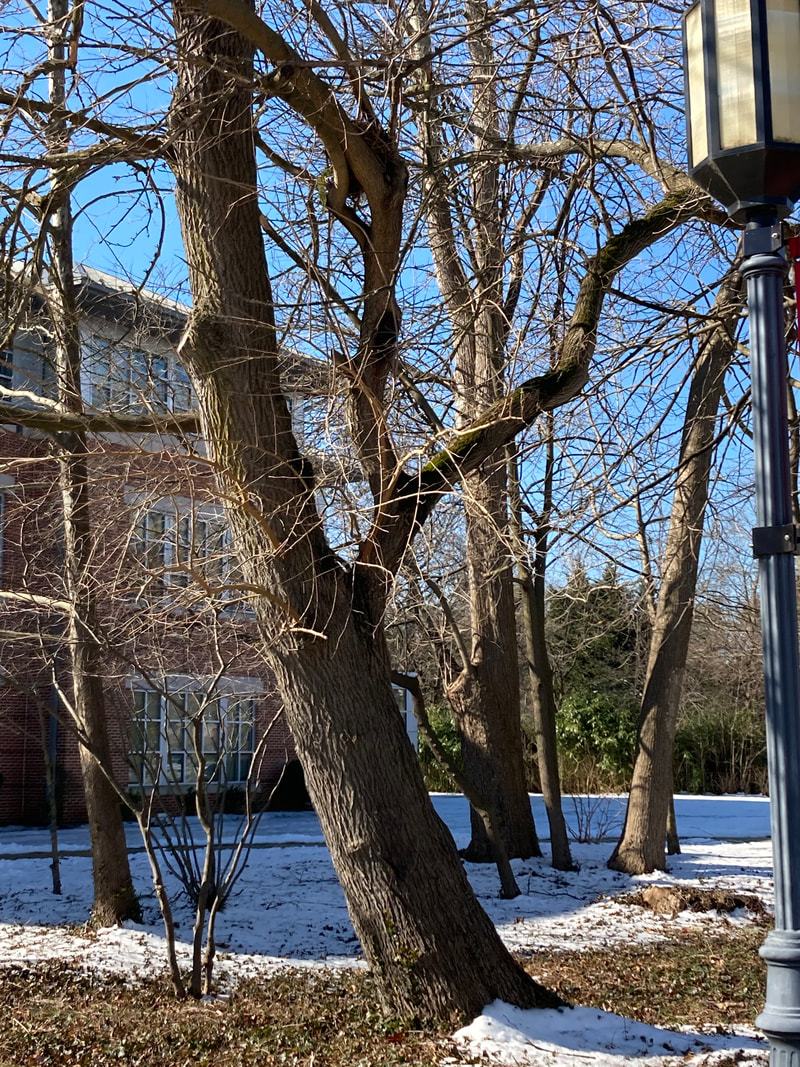
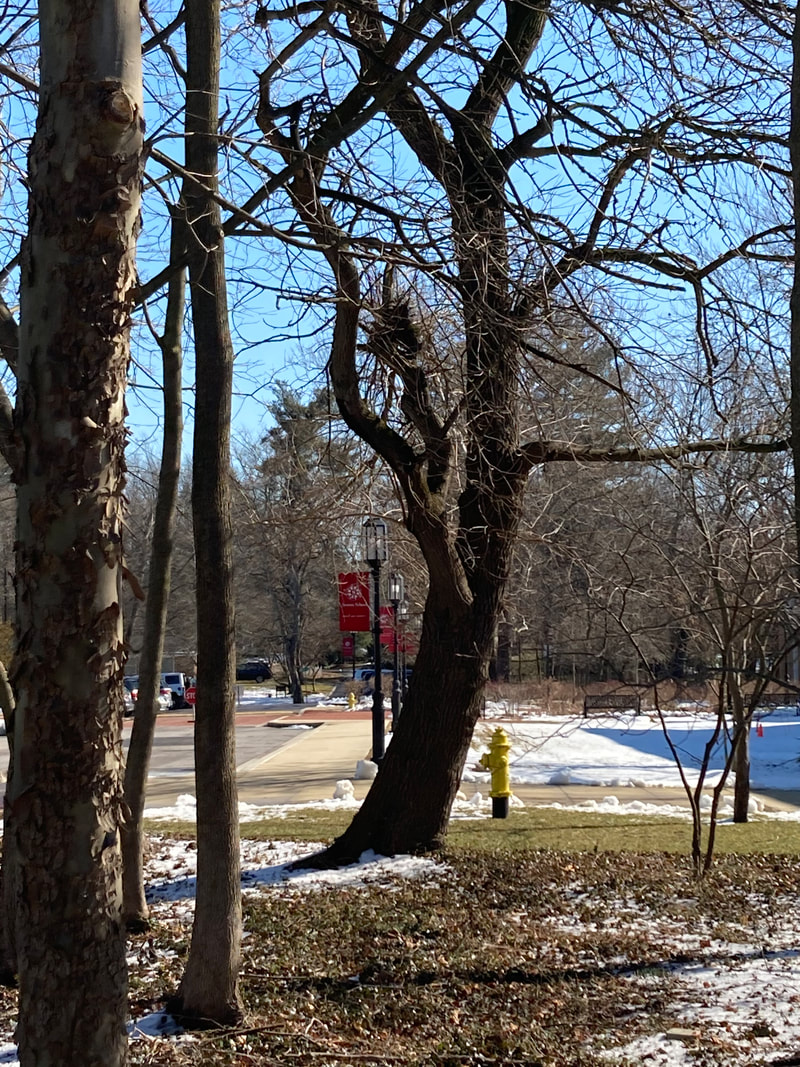
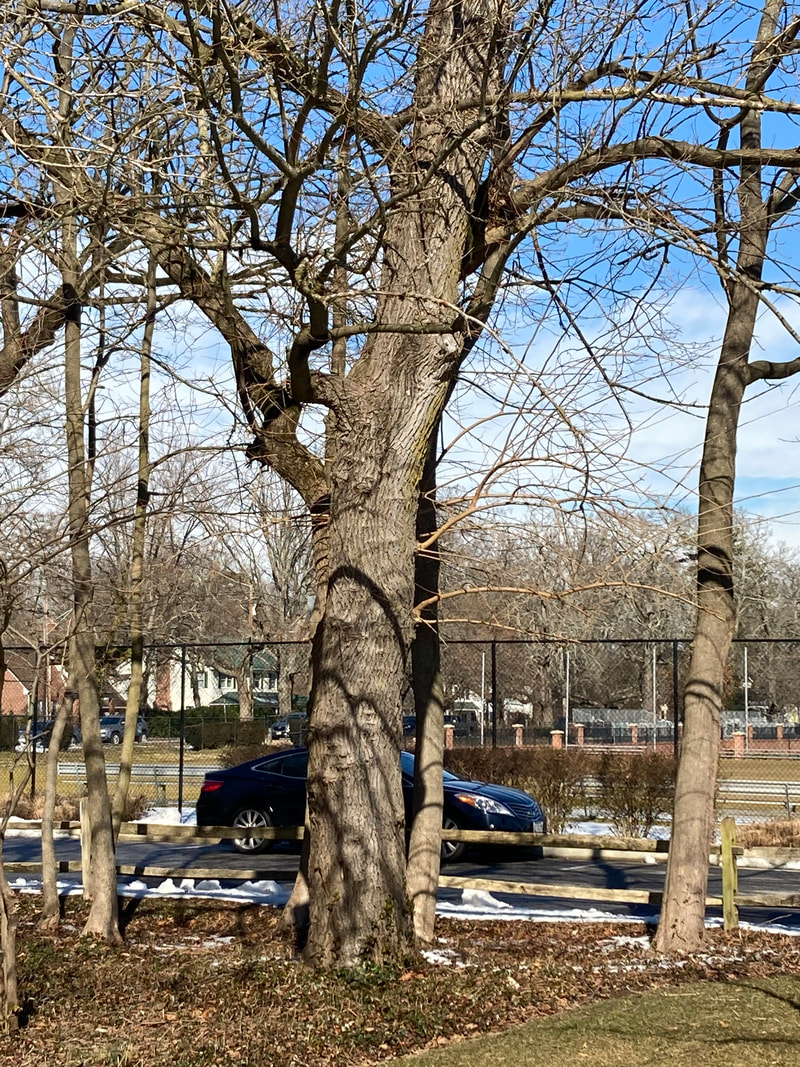
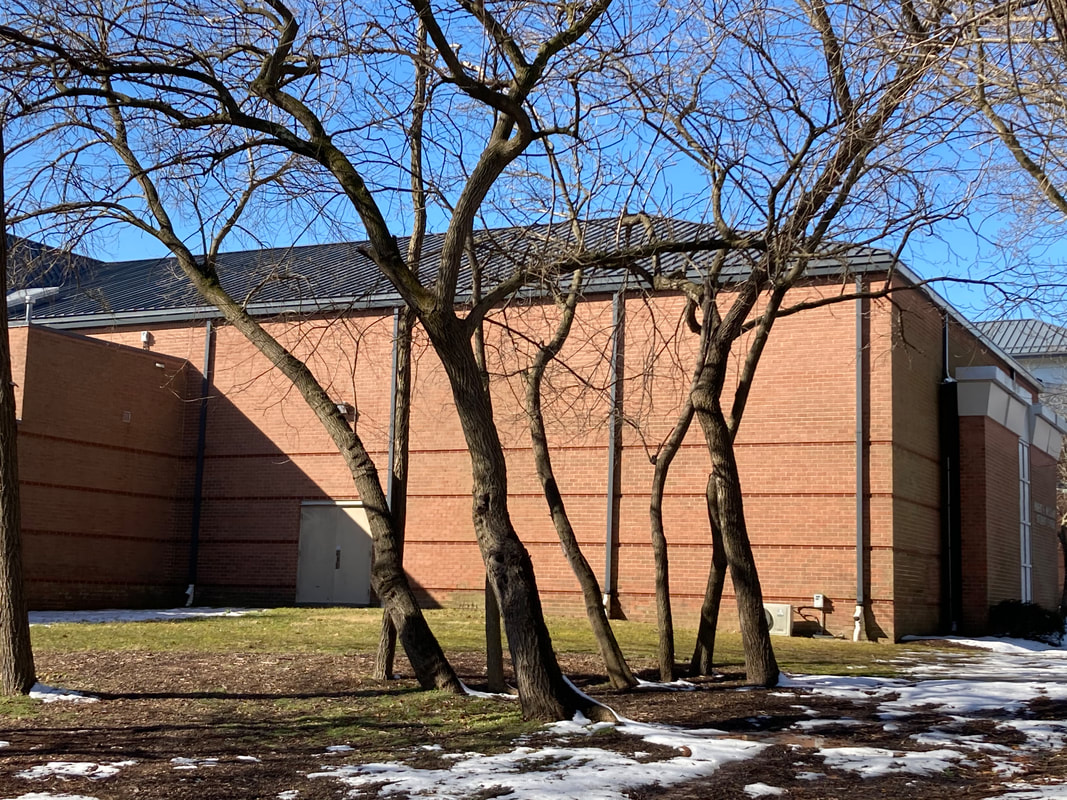
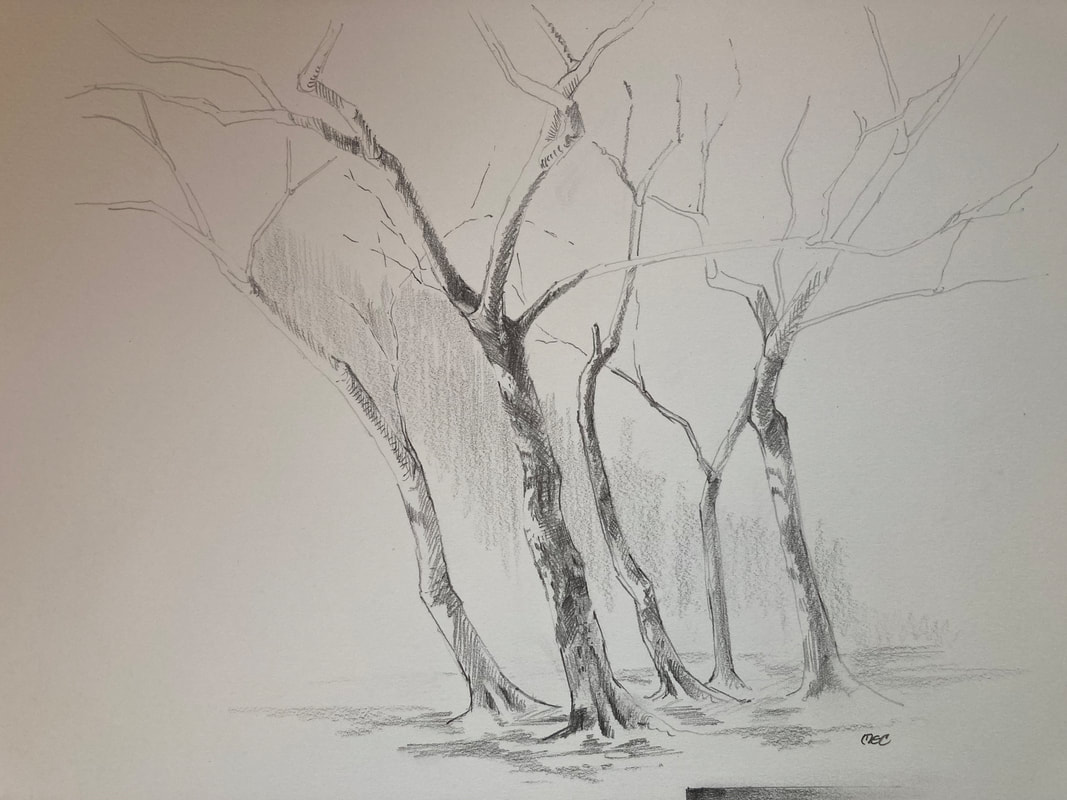
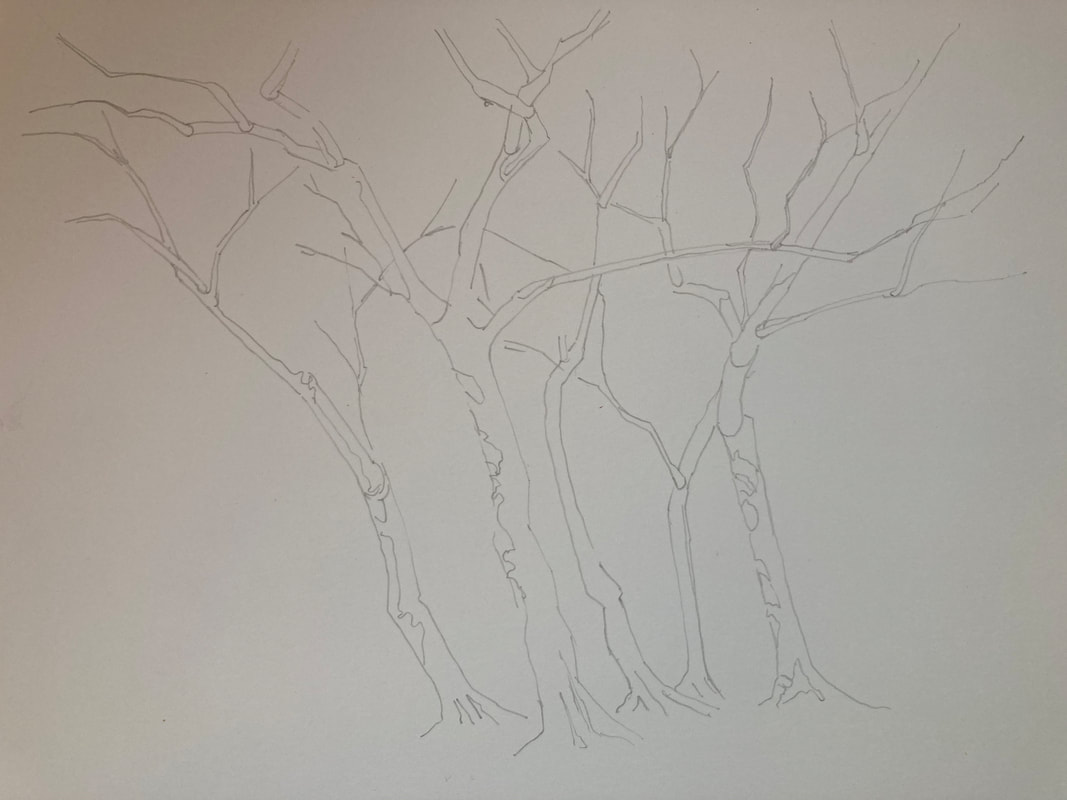
Reference Images of Catalpa Tree in Winter


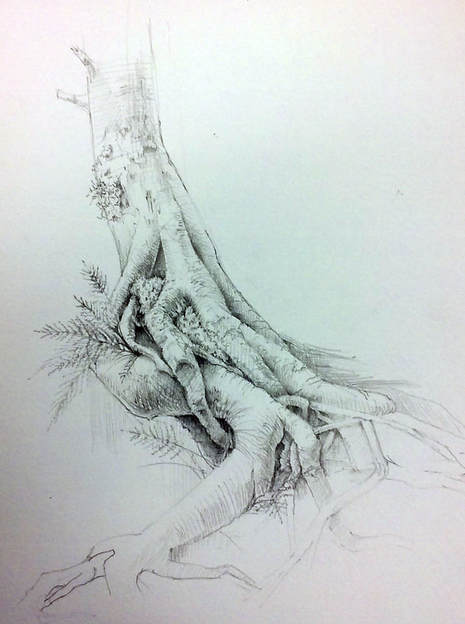
Step by Step Tree Drawing

Trees in Ink
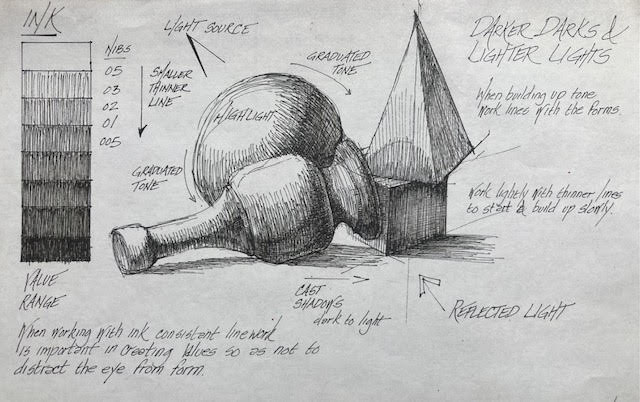
Ink can be an intimidating medium to get started with. I am always amazed by the Asian Painting tradition with sumi ink where the artist simply dives into sketching with black ink on to pristine white rice paper. It is true that practice truly helps increase not only your skill with a medium, but your comfort. What help me to become more comfortable with ink was the use of an under drawing.
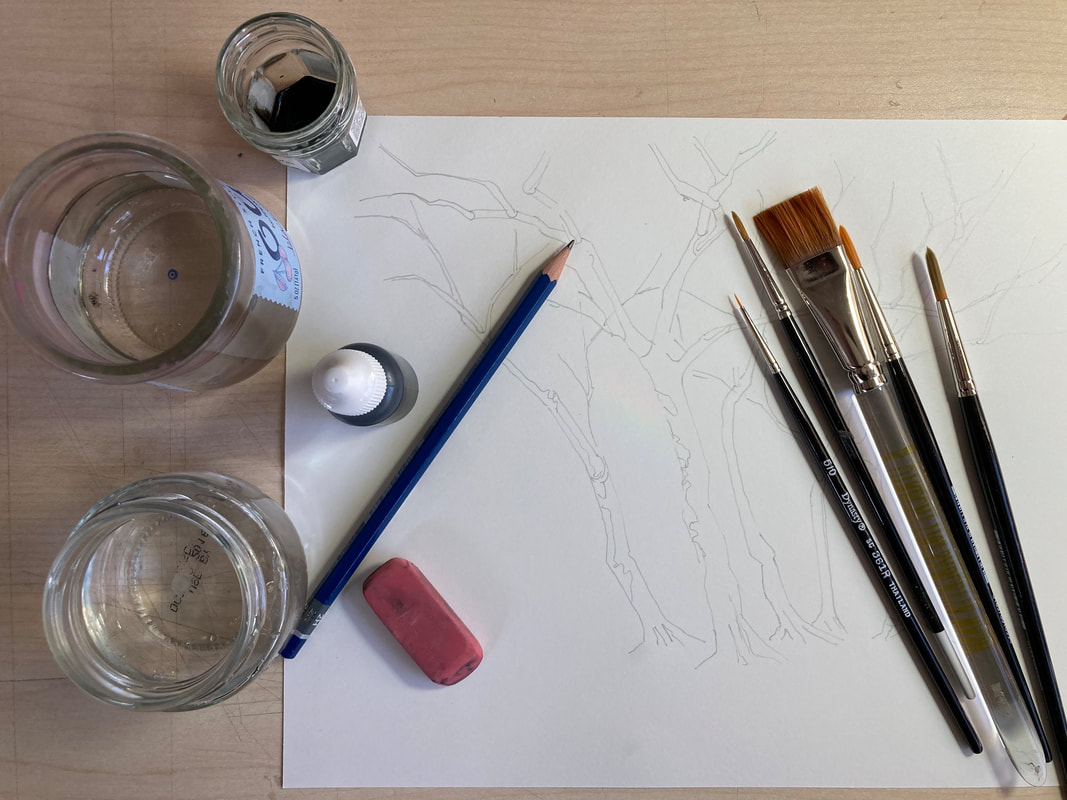
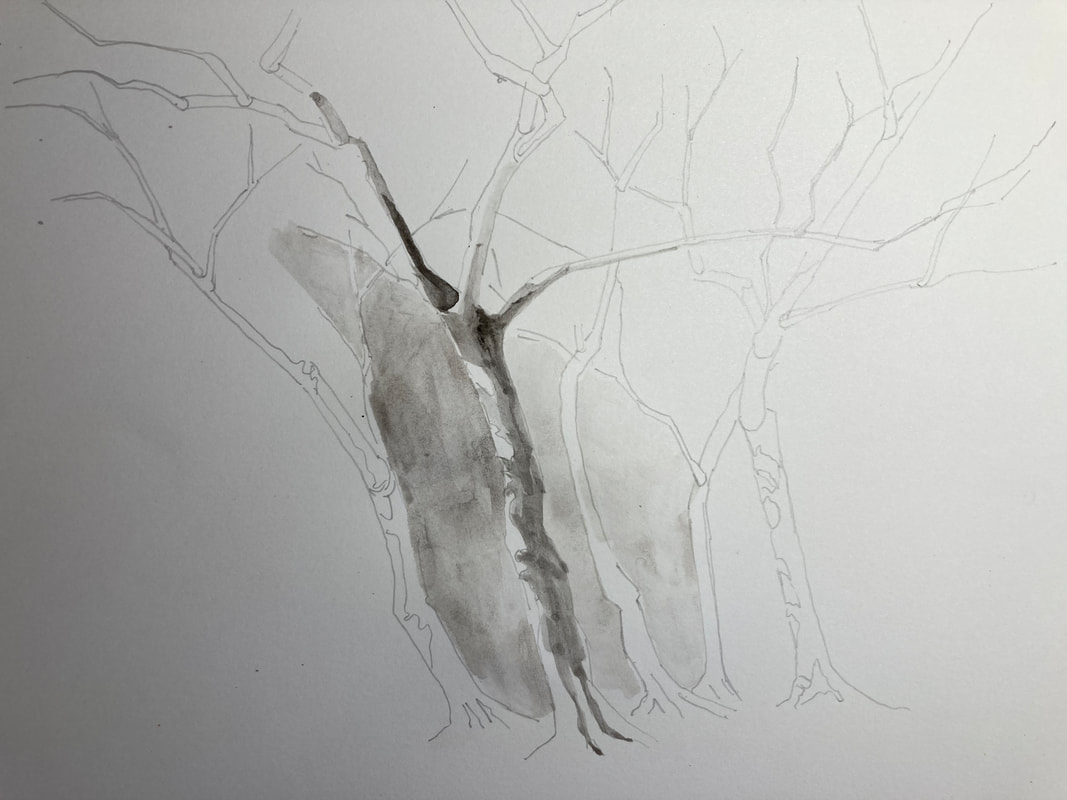
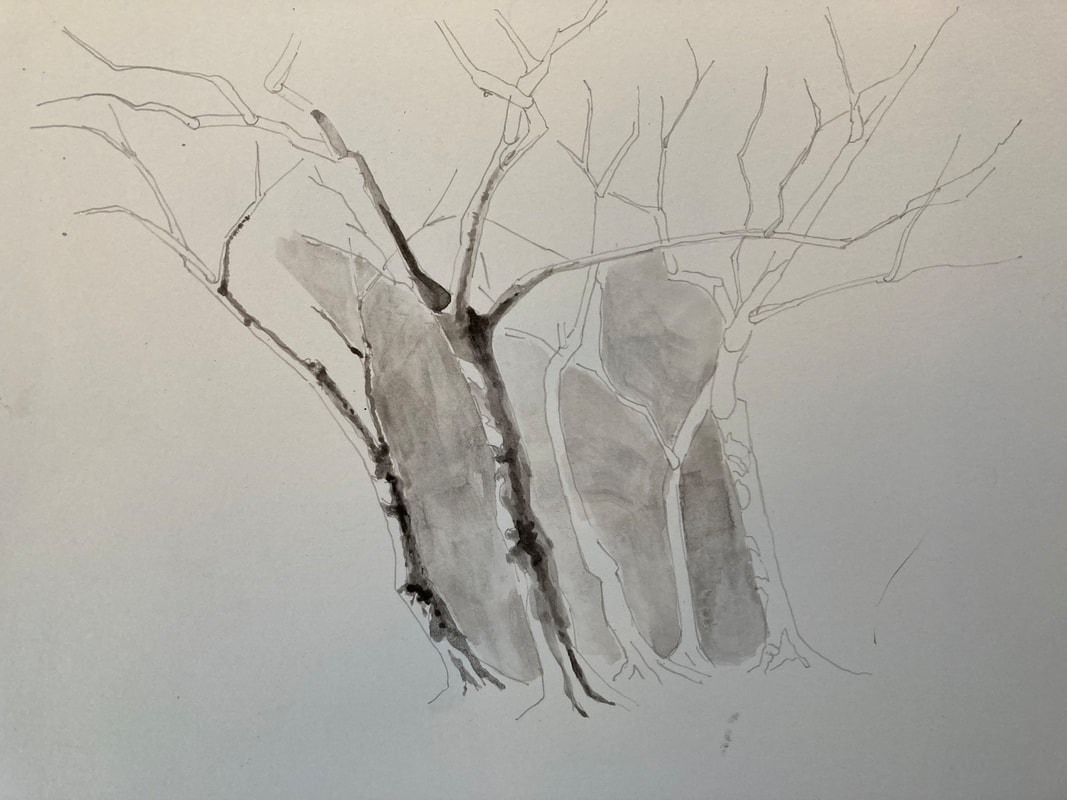
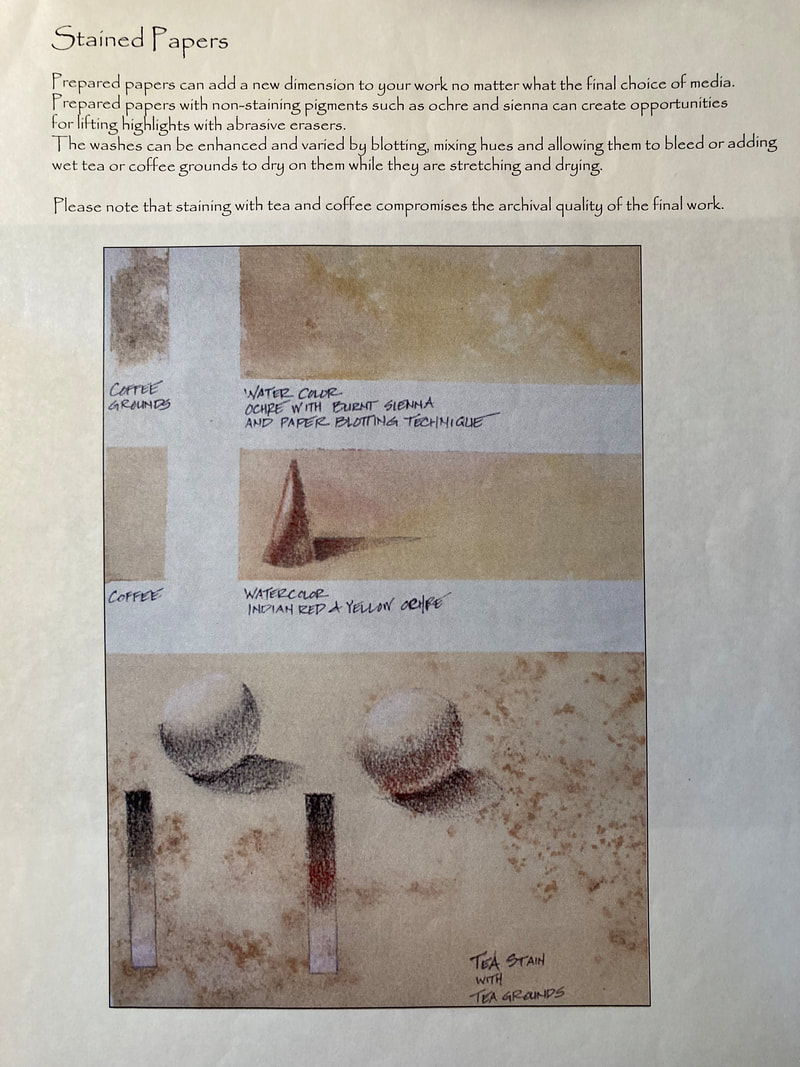
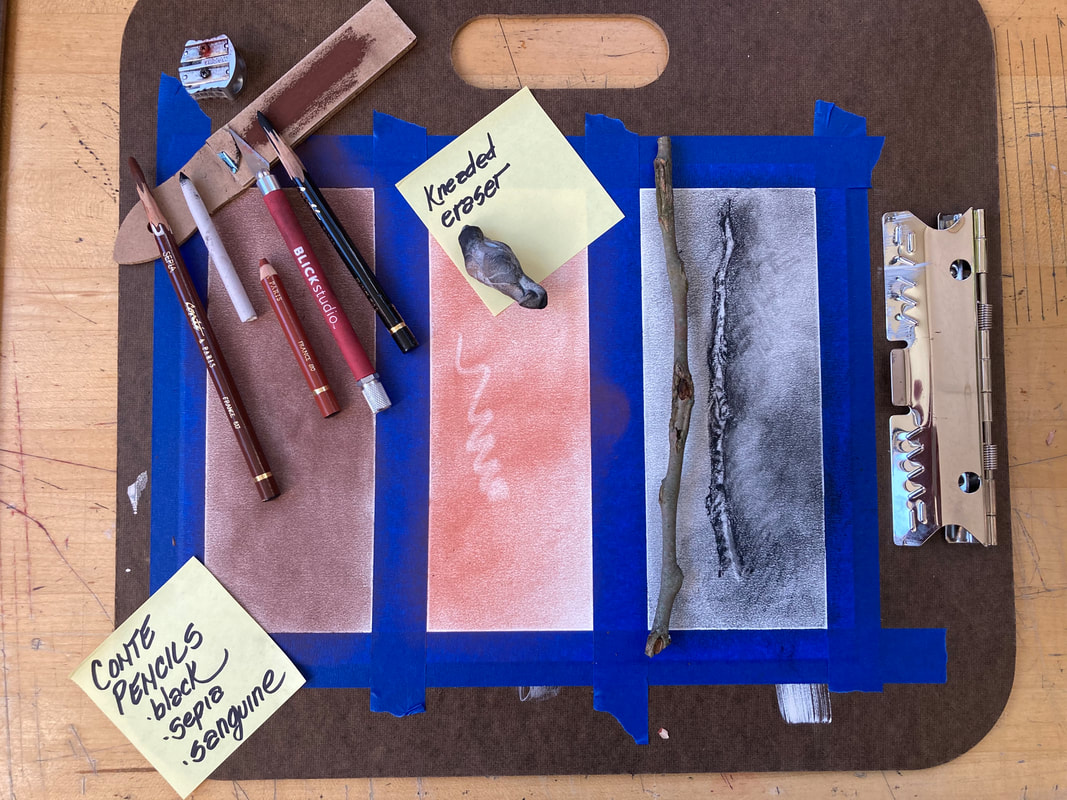
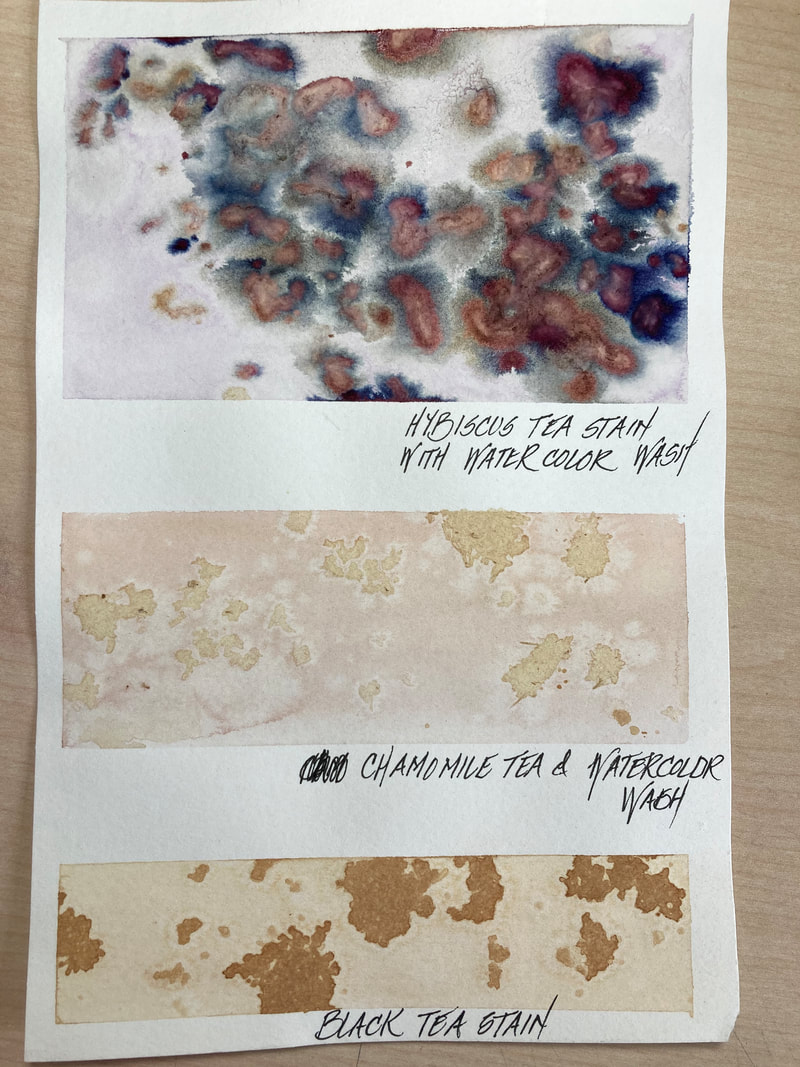
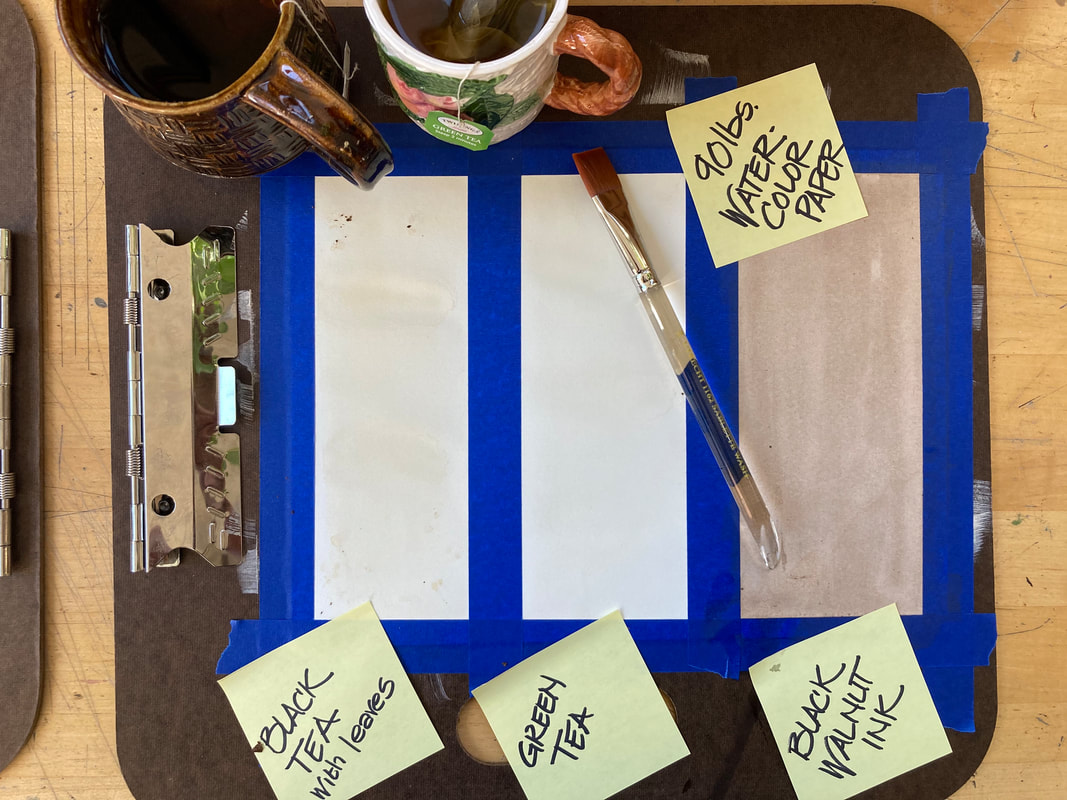
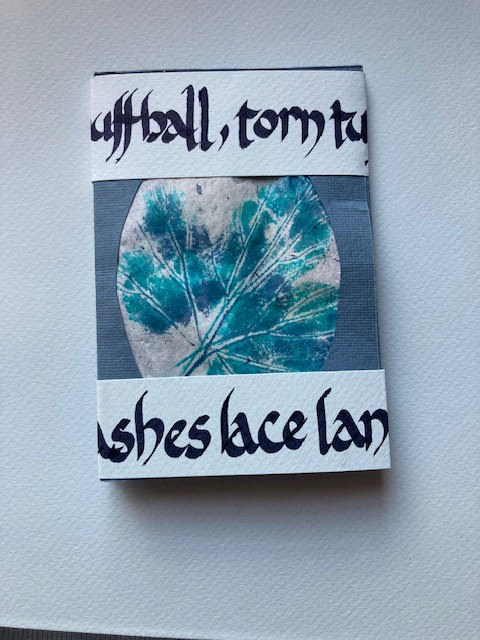
Black Walnut Ink and Stained Papers

Drawing and Painting Plants and Pollinators including Insects and Birds:
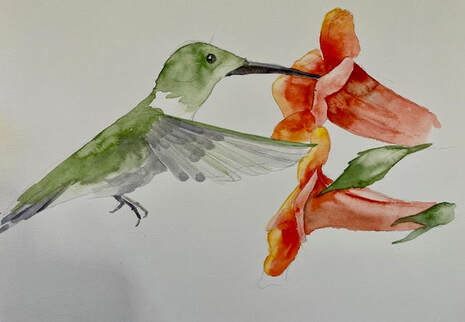
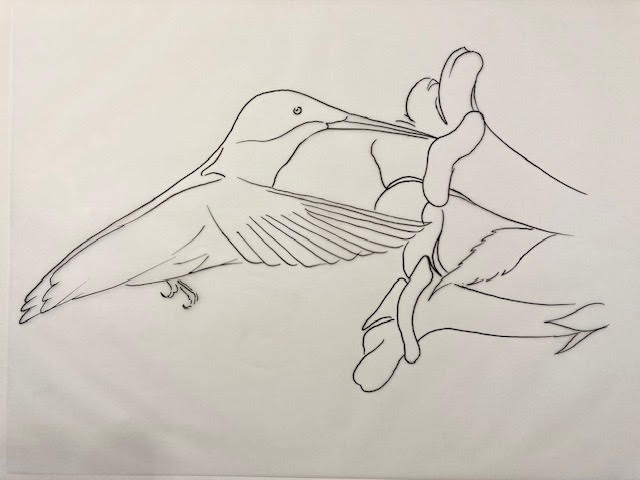
Includes Hummingbirds and Trumpet Flowers
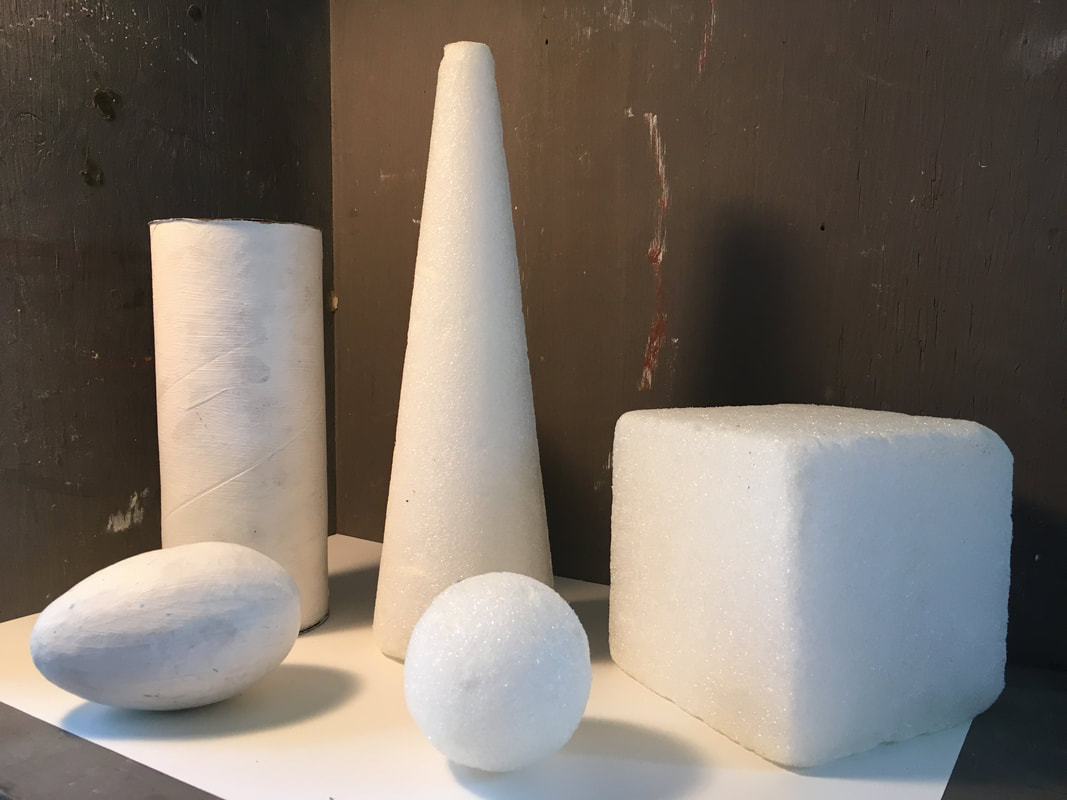
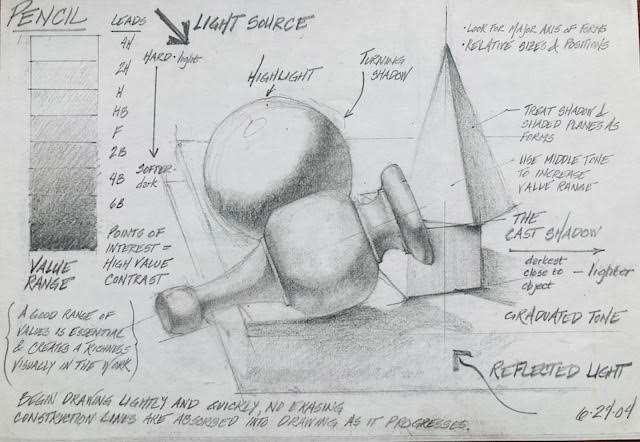
For the best possible experience during the workshop, please be sure to prepare an under drawing of the class painting. For the Bee and Butterflies with Zinnia your will want to prepare one pollinator (the bee or butterfly and the butterfly and zinnia together. For the Hummingbird and Trumpet flower their is only one template to prepare. Also for the hummingbird workshop, you may want to consider preparing an extra watercolor page laid out in a similar way is the practice sheet show with the hummingbird references. You will recognized this sheet by noting it is in pencil and has a small sphere, cone, and cylinder drawings on it.
|
|
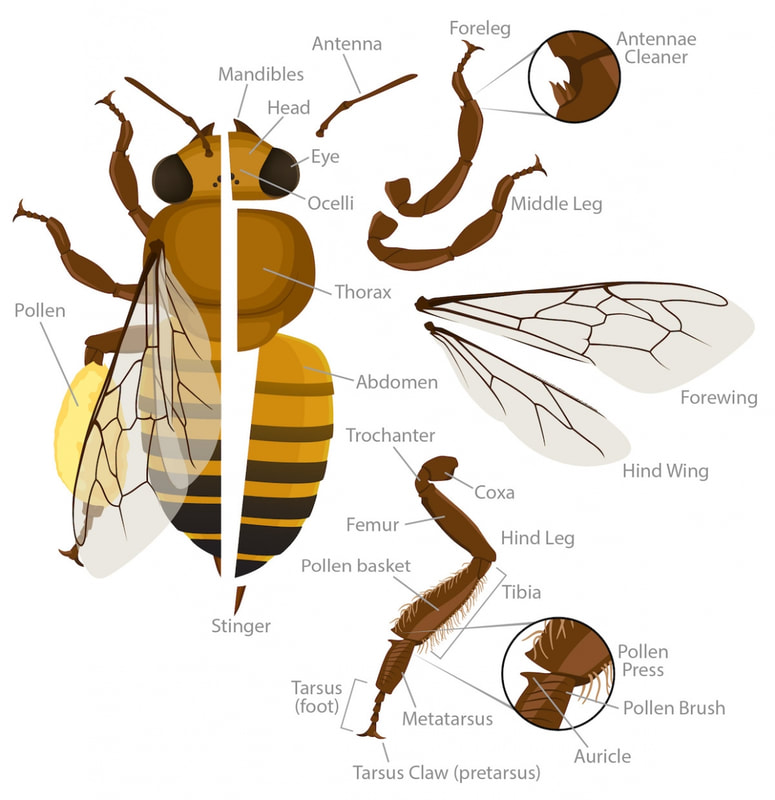
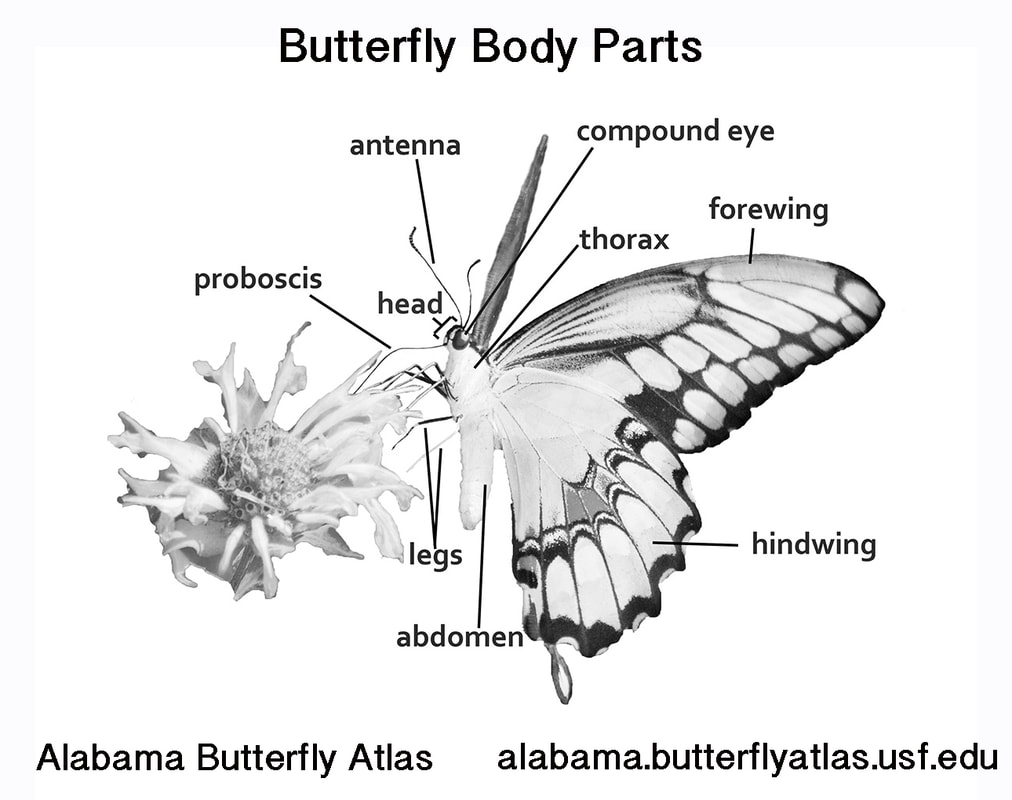
Don't worry! Drawing and painting the pollinators of flowers is the same approach as drawing the flowers themselves. We will use the same techniques as describe above in the Drawing Flowers and Basics of Watercolor. However, this section will provide you with a bit more subject specific information that I hope is helpful!
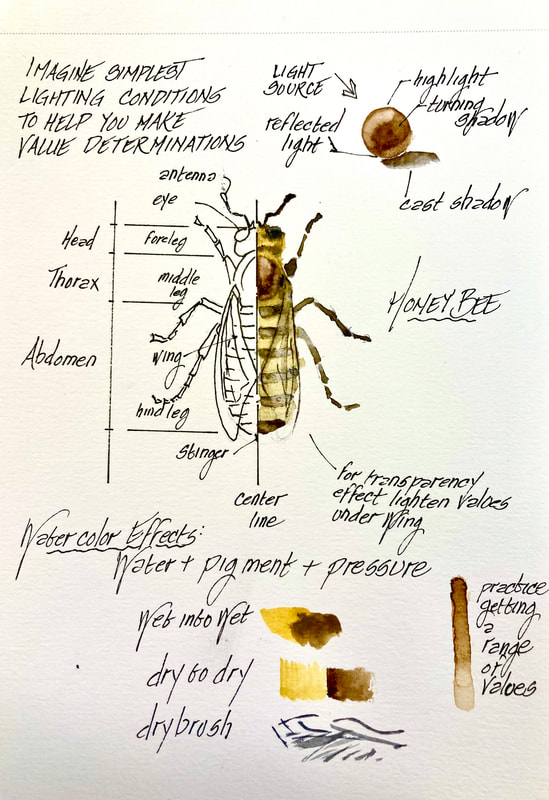
Understanding as much as possible about the basic anatomy and the constituent parts' functions of your subject will inform your drawing and help make your drawings more accurate, and believable as well as imbue them with "life."
Here is a little about two of the most common pollinators, bees and butterflies. This covers basic anatomy and their habits. It is from one of my favorite resources "How Stuff Works"

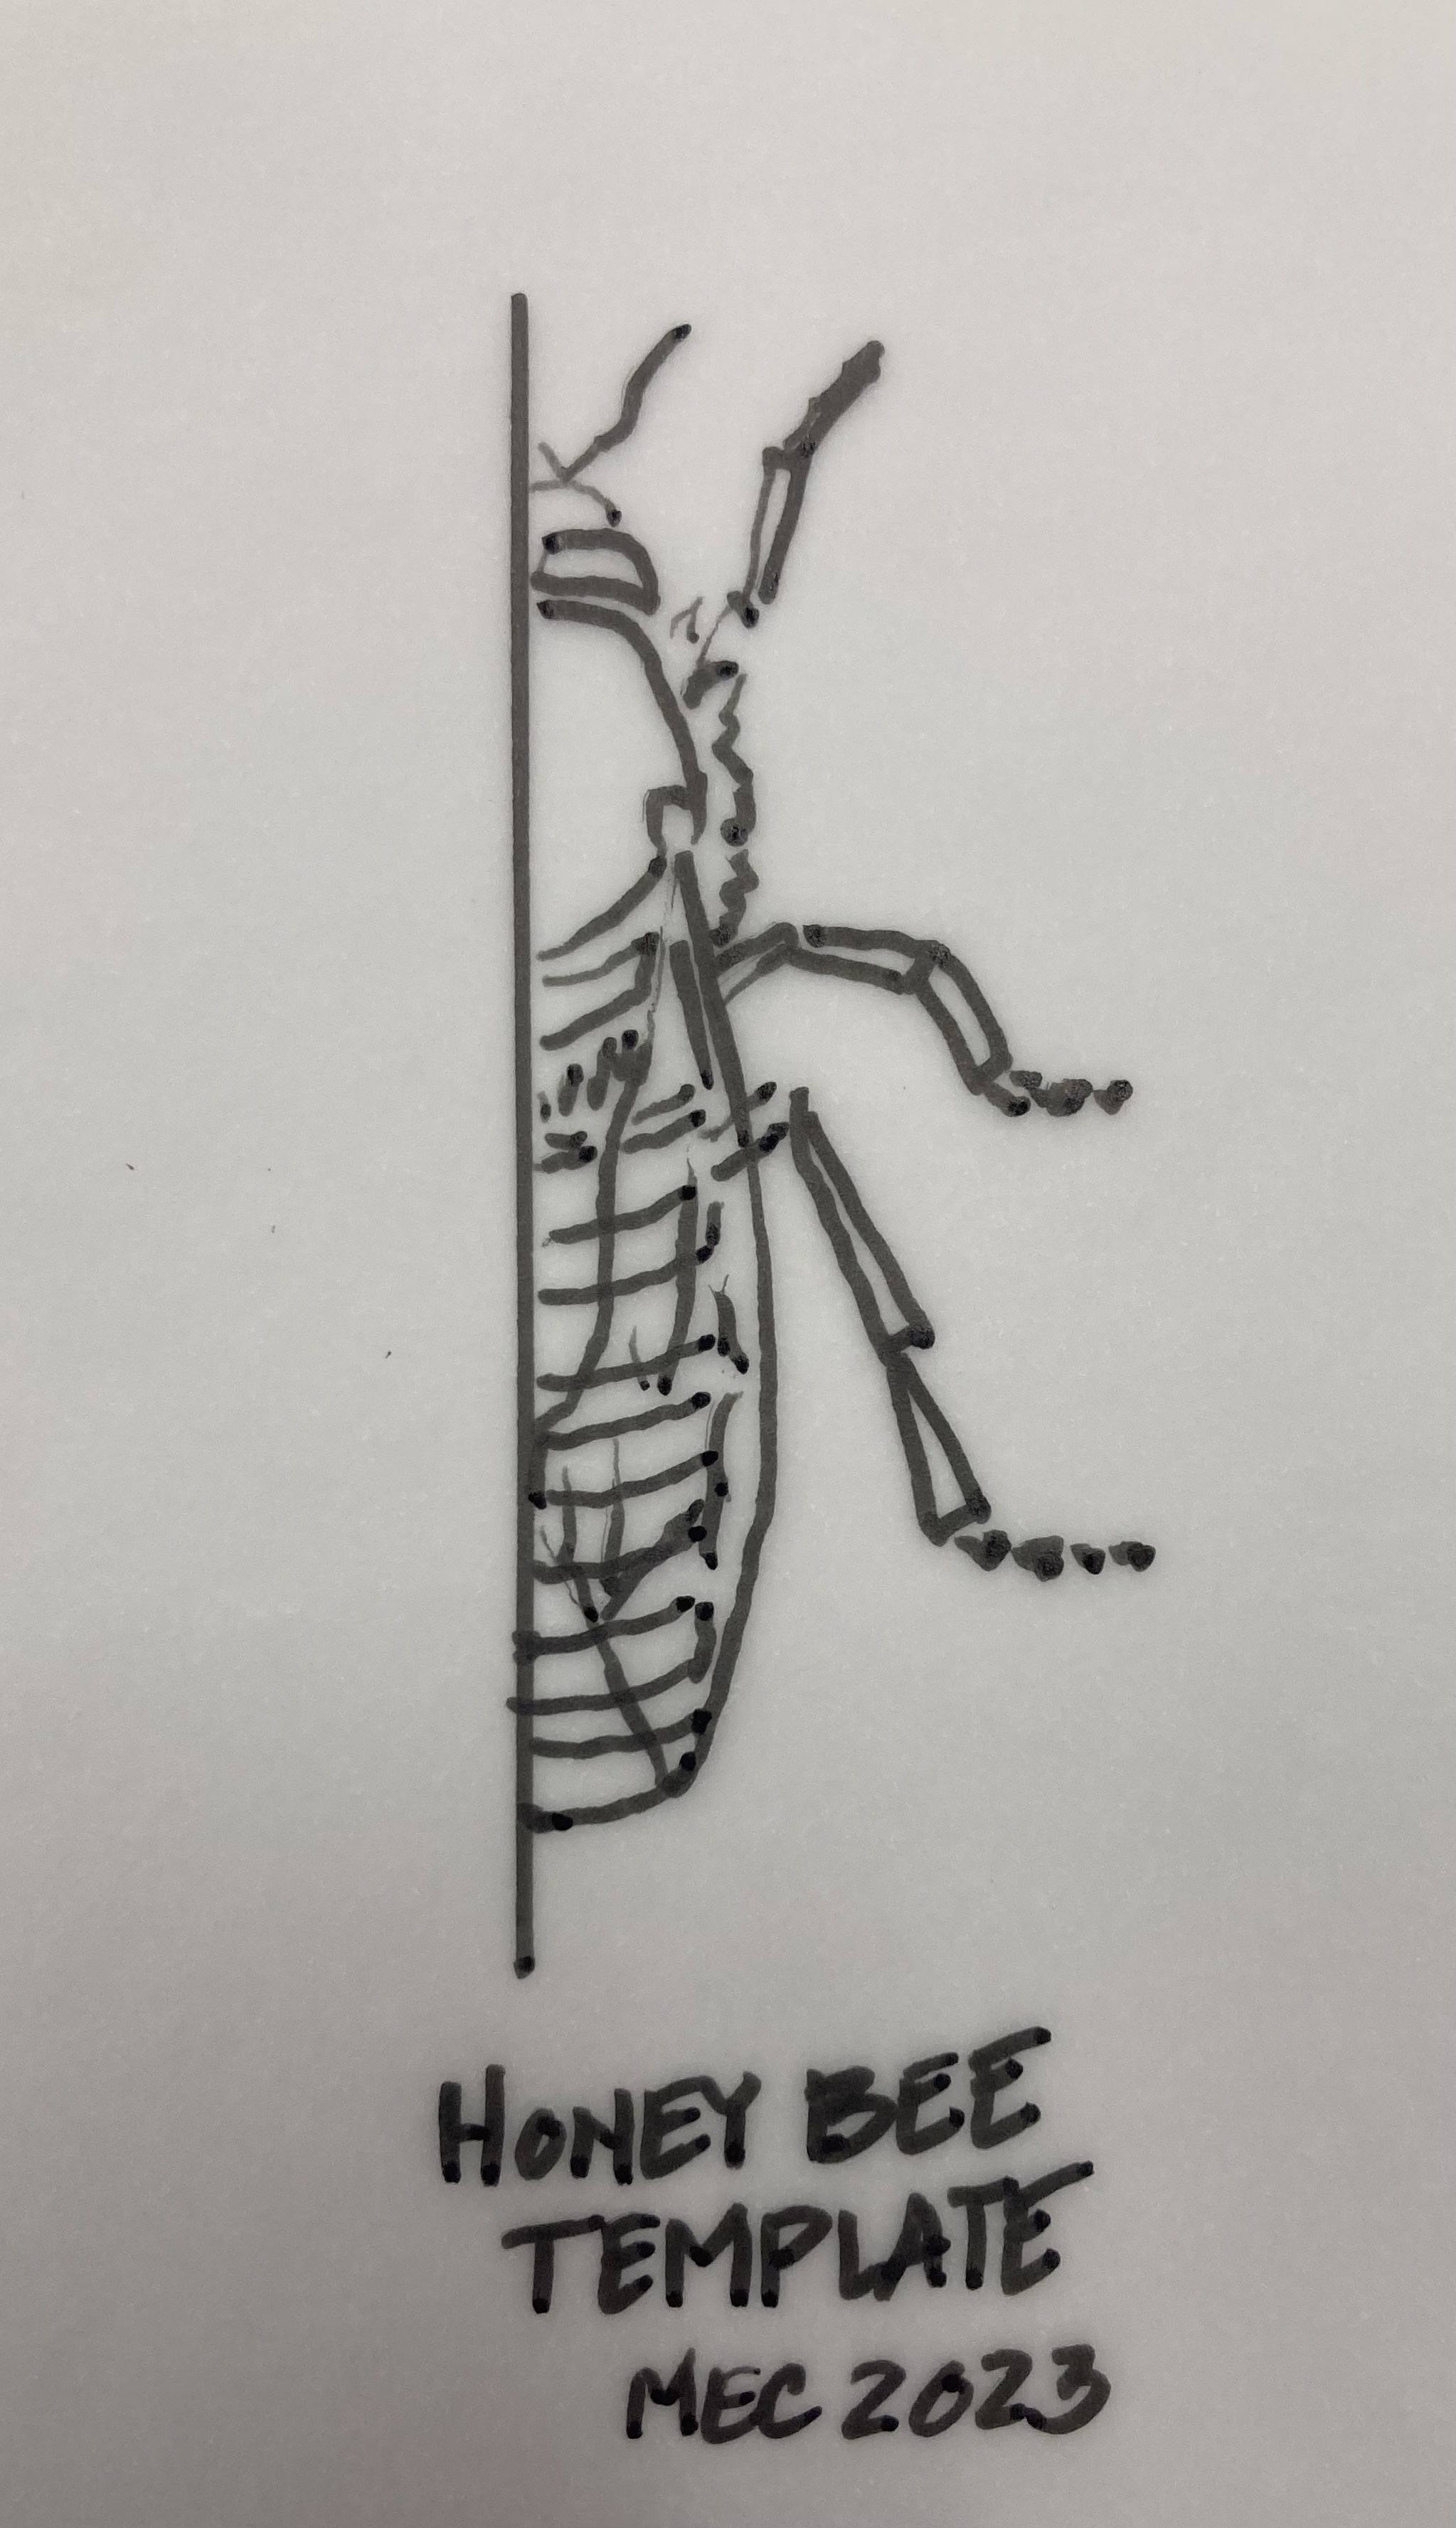
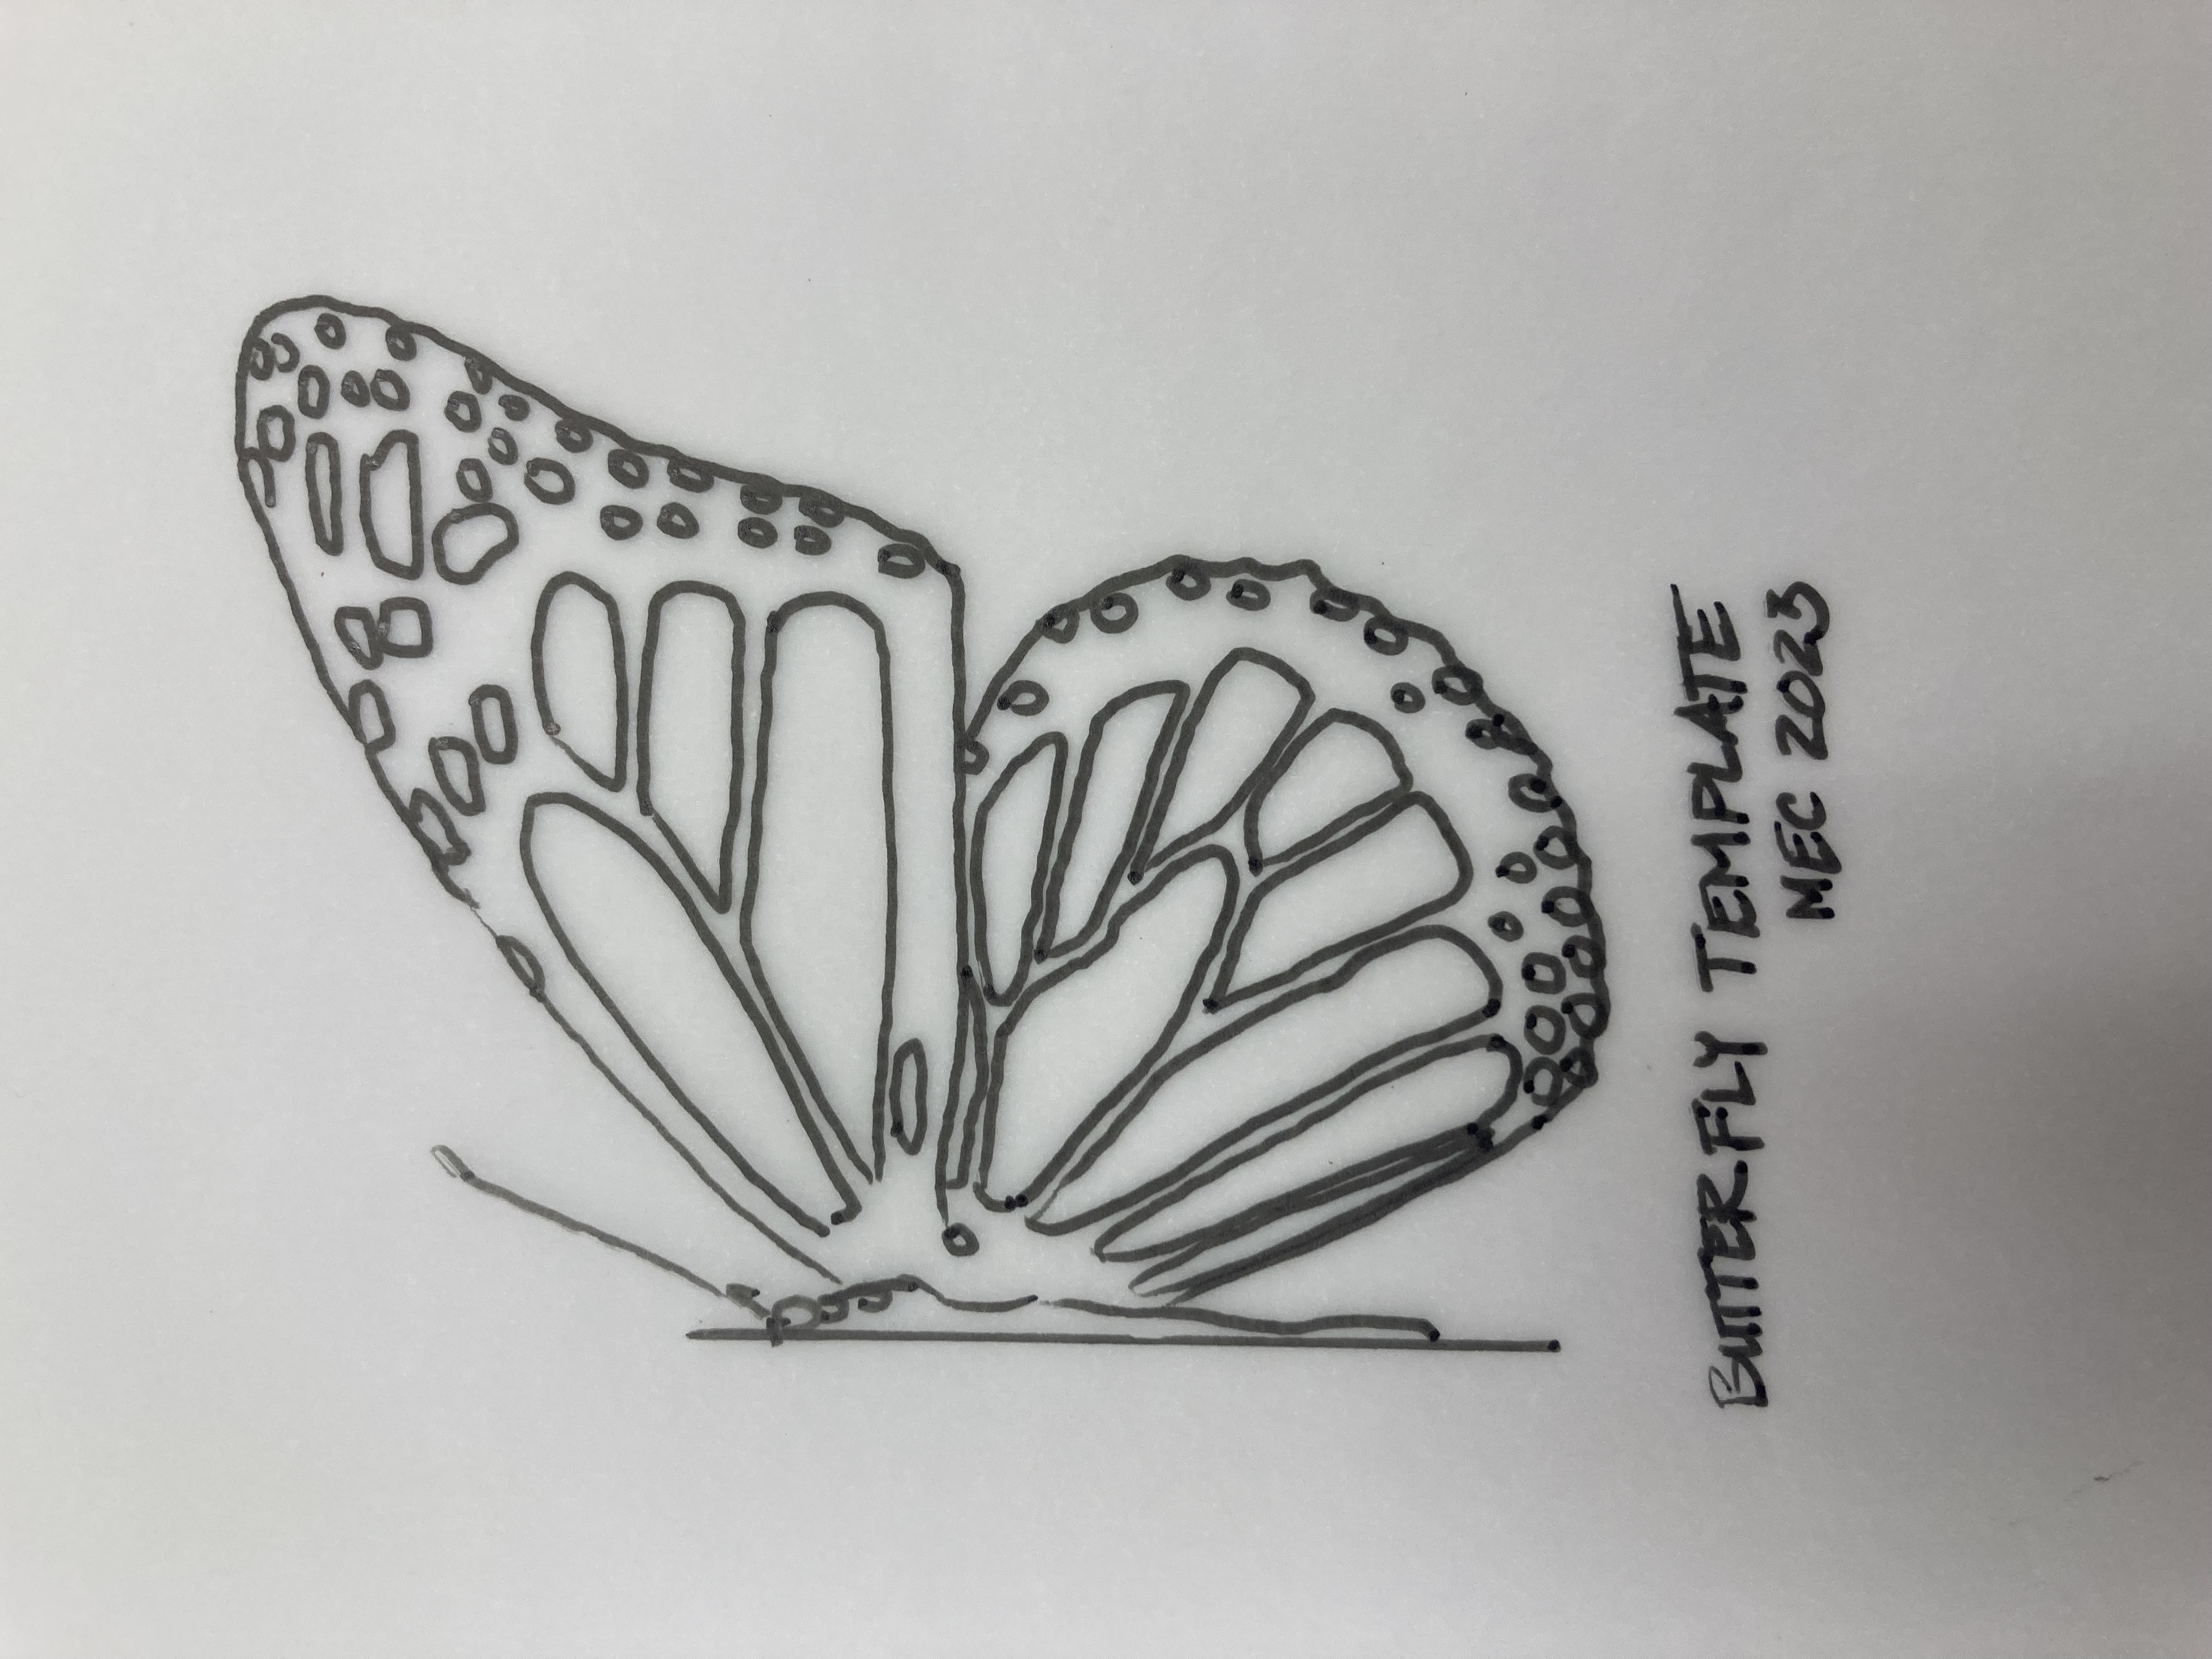
Downloadable Tracing Templates for Your Pollinator:
Honey Bee, Butterfly, or Hummingbird
Please download and trace the template of the pollinator you prefer on to watercolor paper.
|
|
| ||||||
What You Need for this Workshop
More detail about drawing and painting materials is provided in the fundamentals section above.
Watercolor or Multi-Media Pad/ Paper 90 lb. Paper 9”x 12” (minimum size, or whatever size you are comfortable working with)
2H pencil, also having a B lead pencil would be handy
1 small pocket pencil sharpener
1 “pink pearl” or white plastic eraser
Watercolor brushes recommended sizes: #2/#6/#8 rounds and one flat brush at least 1/4" wide
Basic watercolor Set (art student grade will be fine; please avoid "grade school" kits)
1-2 small ceramic or glass jars for water (repurposed jam jars are excellent for this)
Water-soluble wash pencils either graphite or colored (optional)
Class Notes for Drawing Plants and Pollinators
Don't worry about taking notes during the class. They are right here for you!


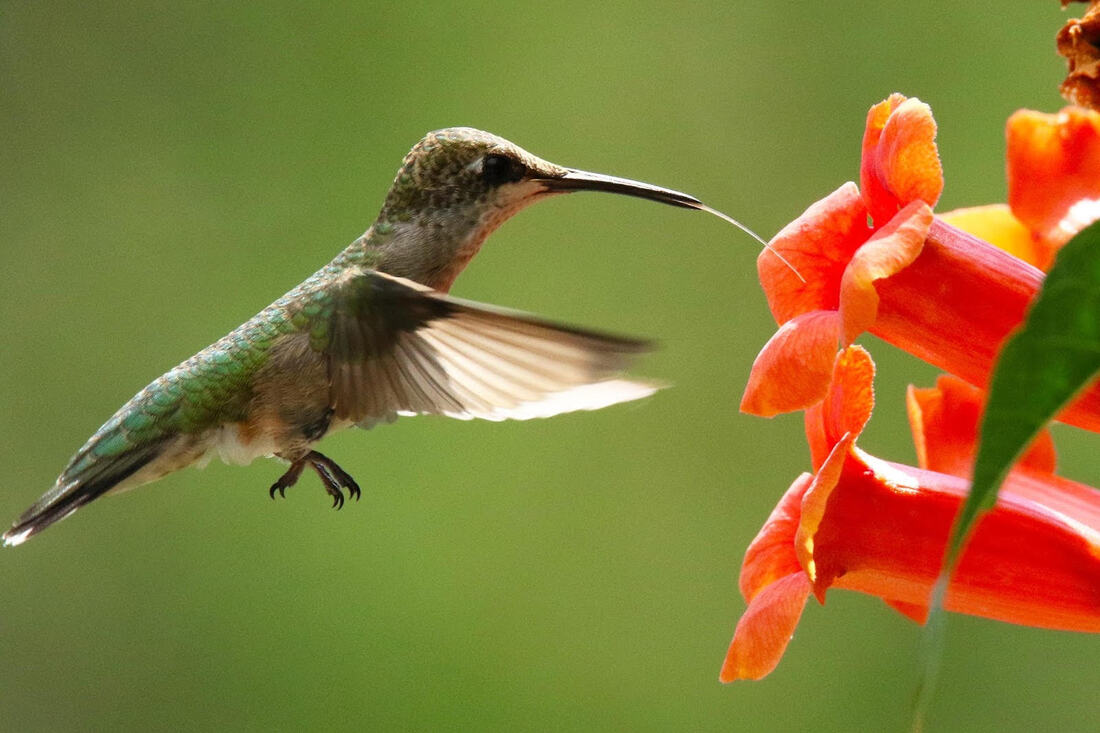
Time Lapse for Hummingbird and Trumpet Flower
|
The study of the Hummingbird and Trumpet Flower is an opportunity to practice how the values which define form, interact with hue.
|
|
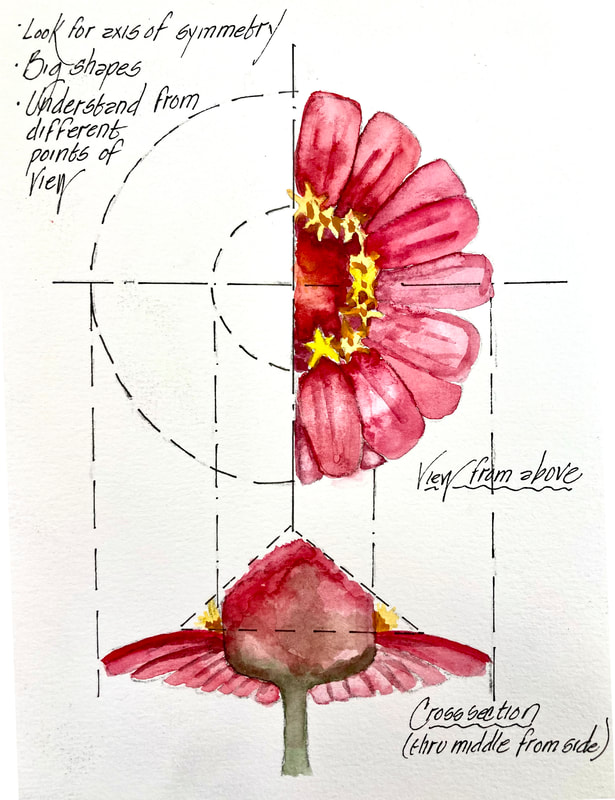
Working with Symmetry:
An Aid to Understanding Your Subject's Structure
and Creating Convincing Drawings
|
You can use the perfect symmetry of a subject to create studies that inform your understanding of the subject's structure and proportion by using tracing paper. By doing this, you can save time, effort, and avoid extensive corrections on fine papers. The short video here on the right can show you how.
Once you've finalized your image, it can easily be transferred to watercolor paper or fine drawing paper using the "How to Prepare an Under Drawing" method. |
|
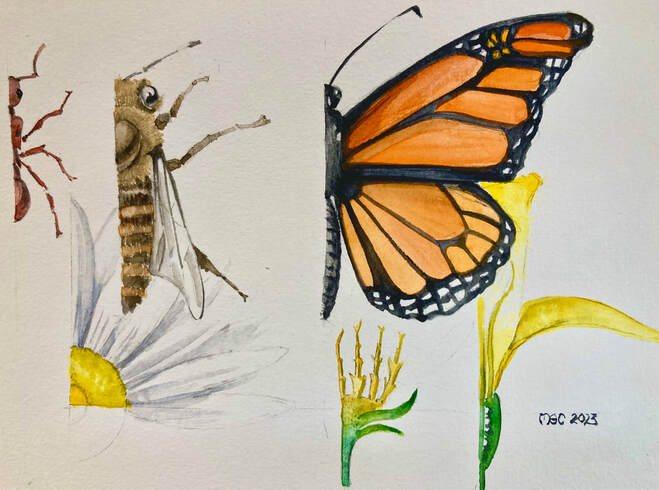
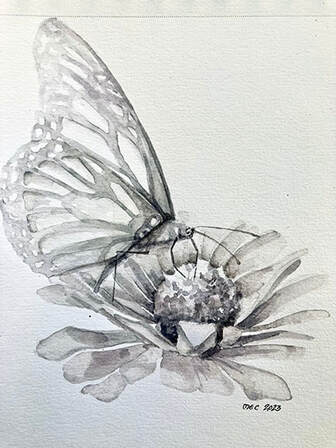
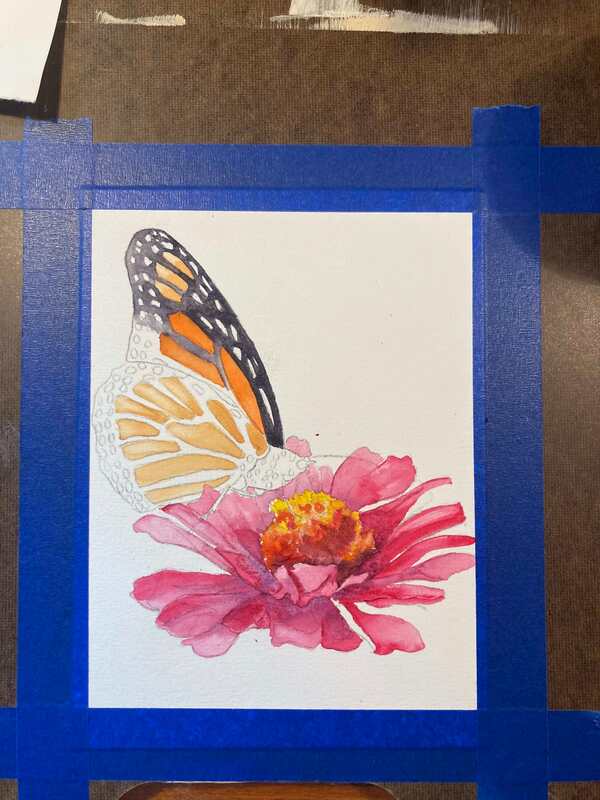
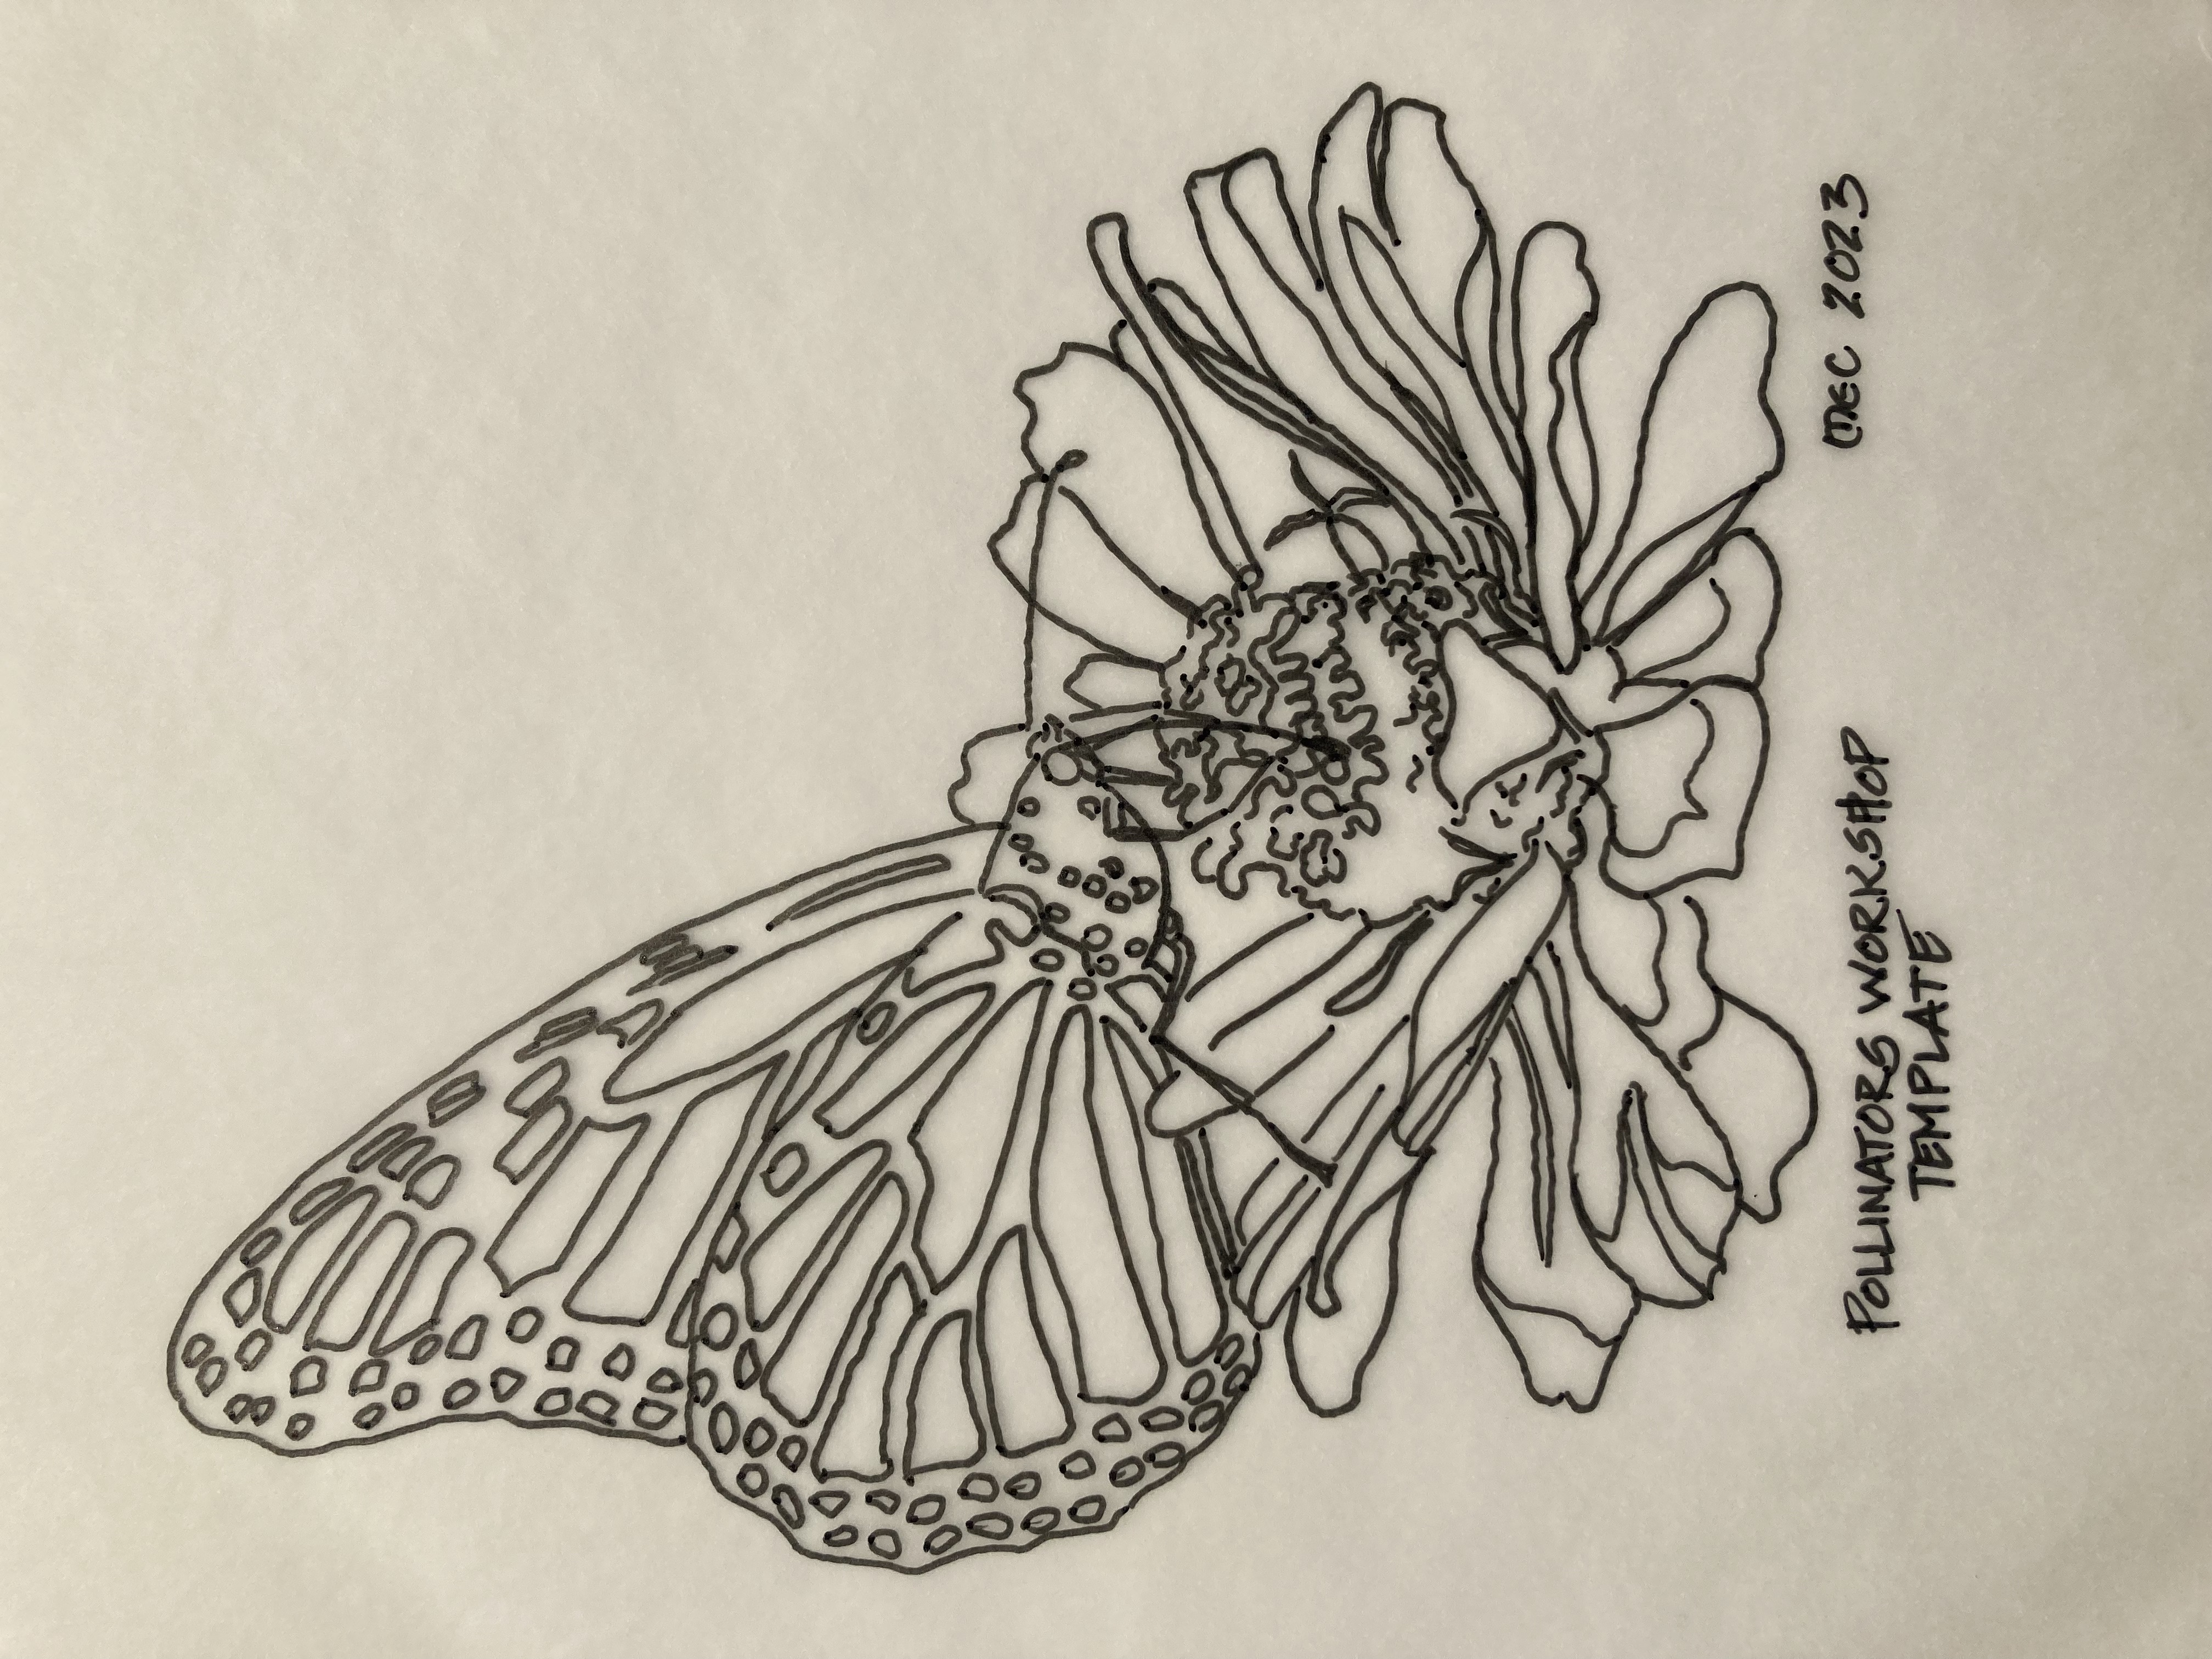
The Butterfly and Zinnia Study

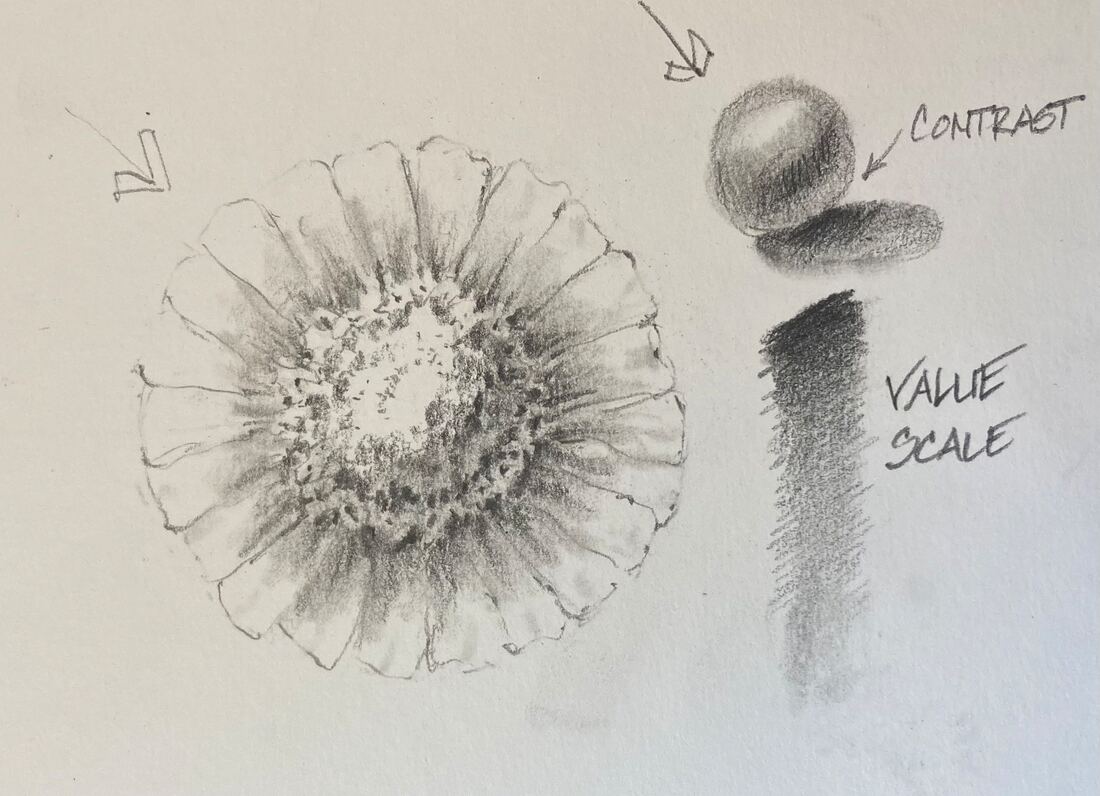
It's important to remember that value (the lightness and darkness of objects) and hue (color) work together in order to make convincing realistic images.
This is a monochrome painting of our subject. It is some times called and shadow study or grisaille. It is a wonderful exercise that will help you develop skill in creating a wide range of subtle values. The watercolor shadow mix is equal parts of French Ultramarine, Alizarin Crimson, and Burnt Umber. The combination of warms and cools make this a neutral hue. |
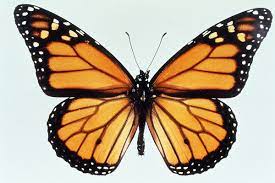
You may use this photograph as a reference. I recommend that you down load the template below, and lightly trace it on to watercolor paper before our workshop. Please note that in my demonstrations I use darker lines than I would if I were painting for myself. This is so the camera picks up the line work better. If you have not done this before, use the reference video above "How to Prepare an Under Drawing". This can be found in the Fundamentals of Watercolor Section under Getting Prepared to Paint. You can print out the image to whatever size you are comfortable working at.
Butterfly on Zinnia Template
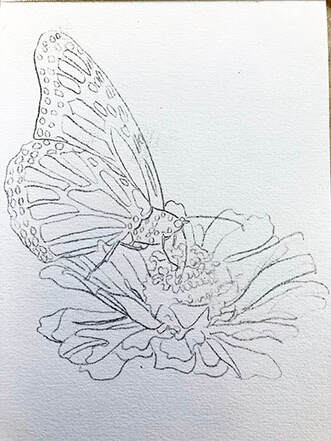
Here is an example of an underdrawing for this specific project. The graphite lines shown here are darker (in order that you can better see them) than what you would need for your own painting.
| ||
Butterfly and Zinnia in progress Example

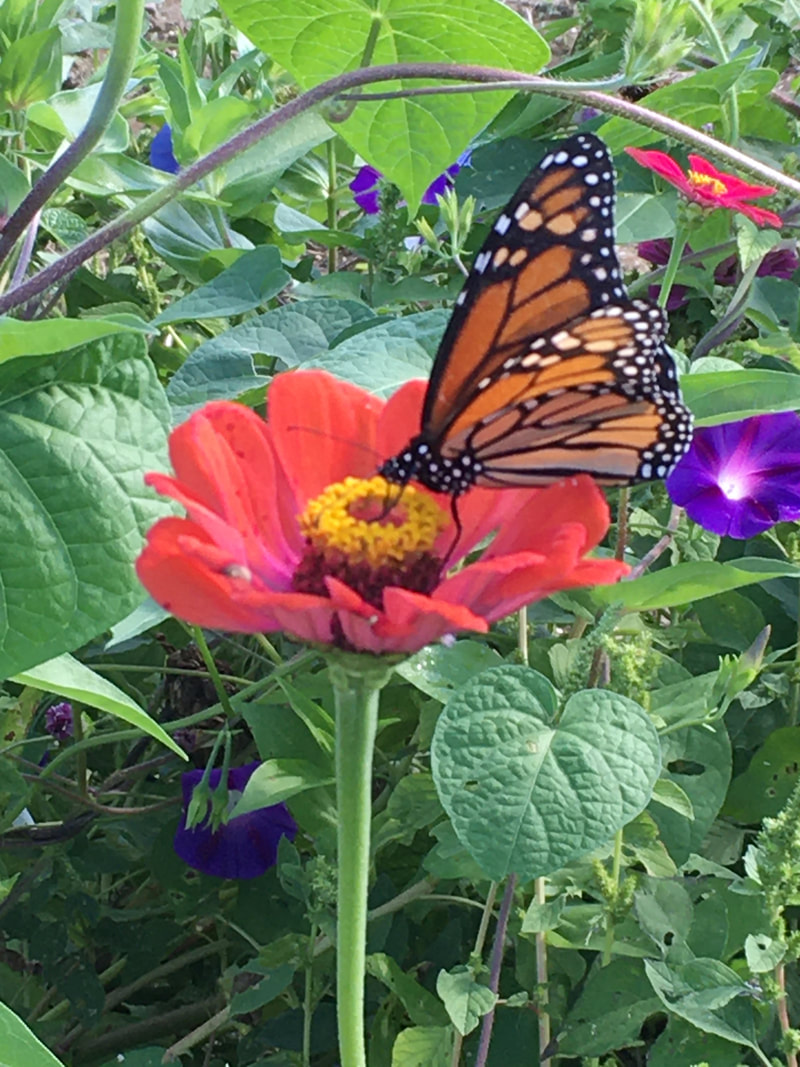
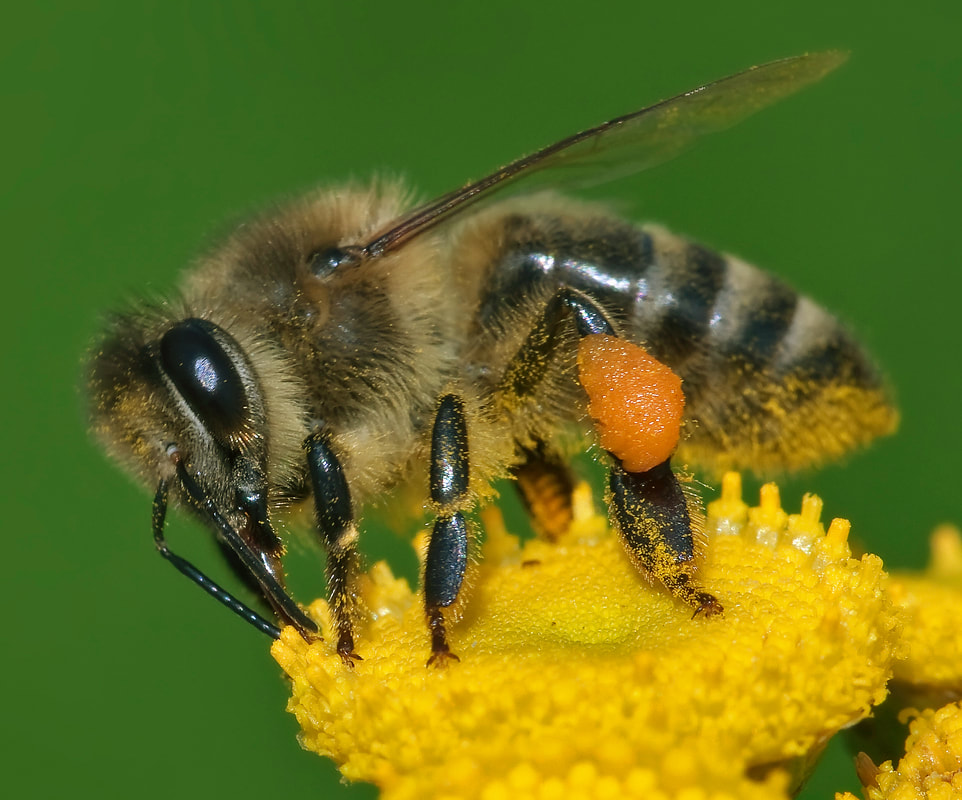
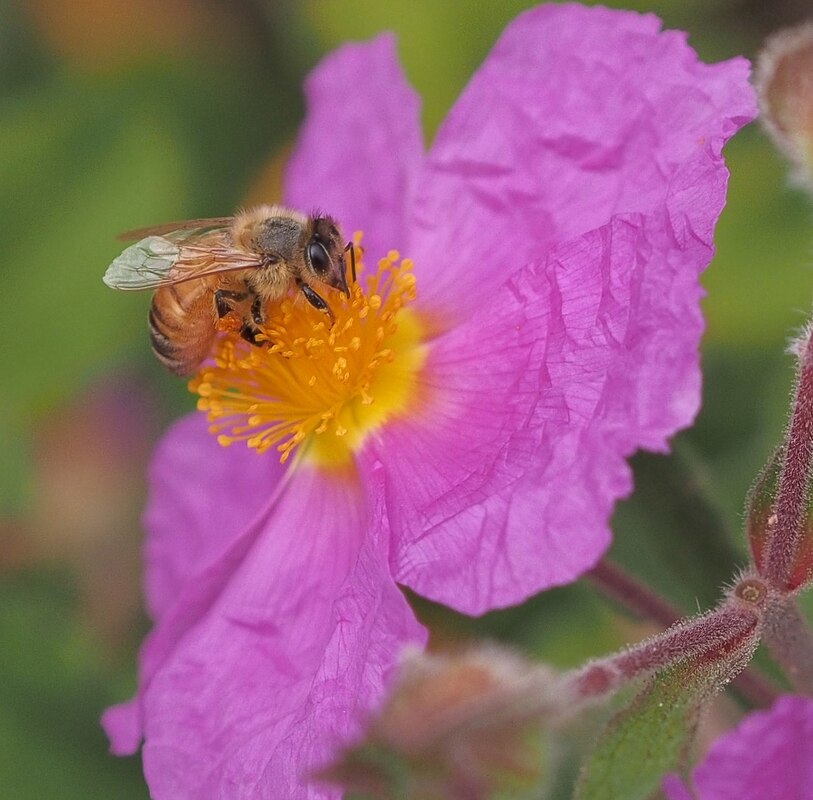
Honey Bee and Butterfly Reference Image Gallery
Drawing from life and observation from life are always the best teachers for any artist. However, since those opportunities are not always available, good photos of your subject in typical settings and situations can be the next best thing to helping you understand what is "natural" for them.
Images from Wikipedia and ME Carsley

One of the greatest compliments a teacher can receive is to witness their students' success and watch them inspire others!
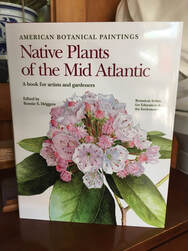
This text contains the work of five of my former students all of whom received their Certificate in Botanical Art and Illustration Program at the Corcoran College of Art + Design.
It's been my privilege and honor to teach at the United States Botanic Gardens and in this program for the last twenty years.
Geometry and Plants
Terrific Explanation of the Fibonacci Series in Plants from The Curiosity Show
History of Botanical Illustration
History of the Houseplant
Fundamentals of Garden Design
Foundations of Garden Design Throughout History and a History of Gardens
|
|
|
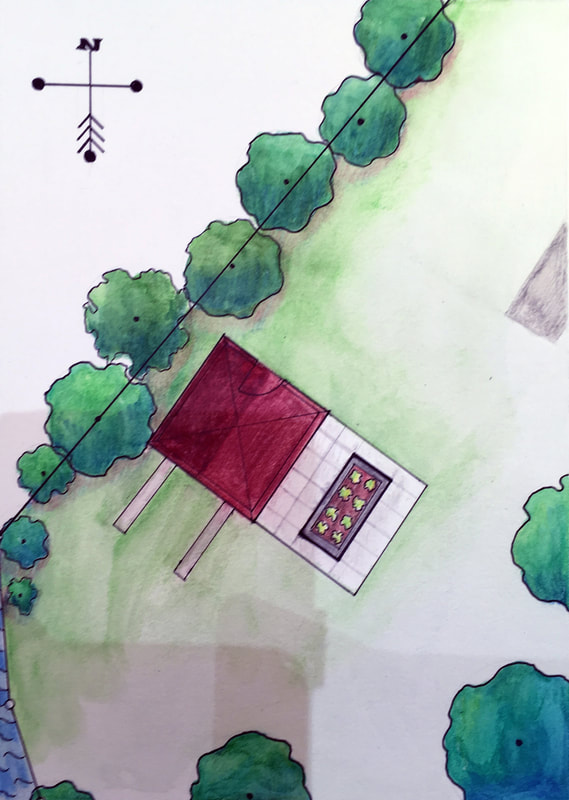
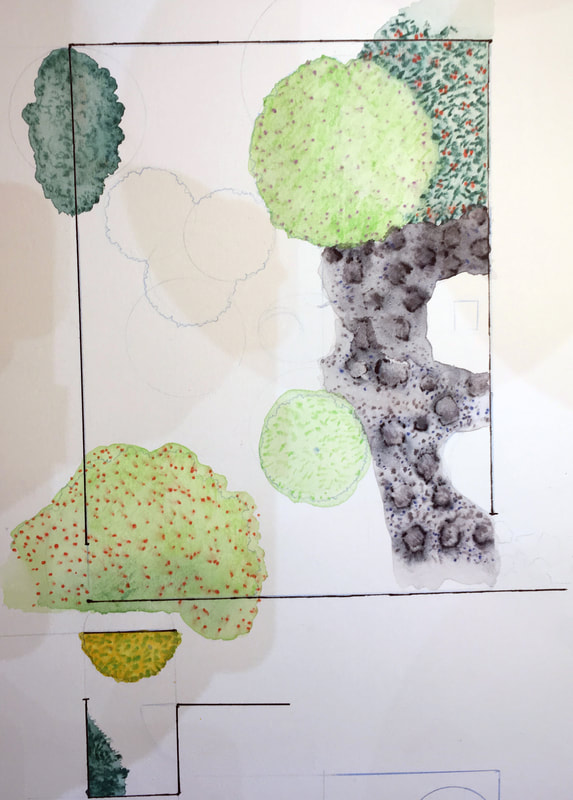
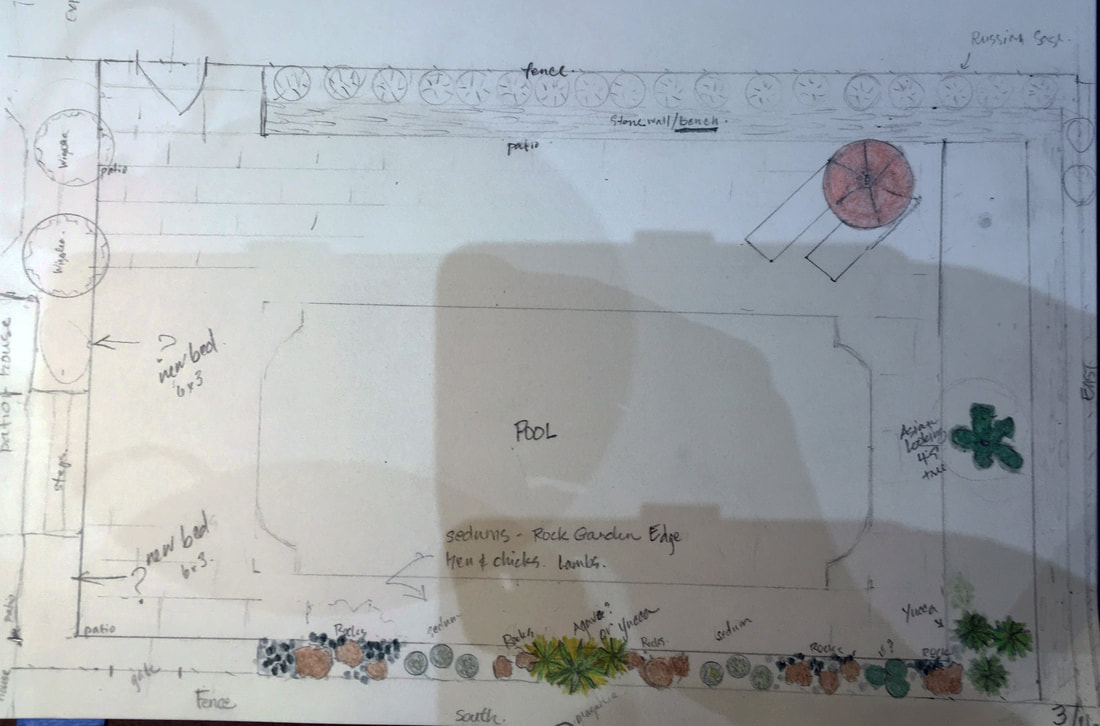
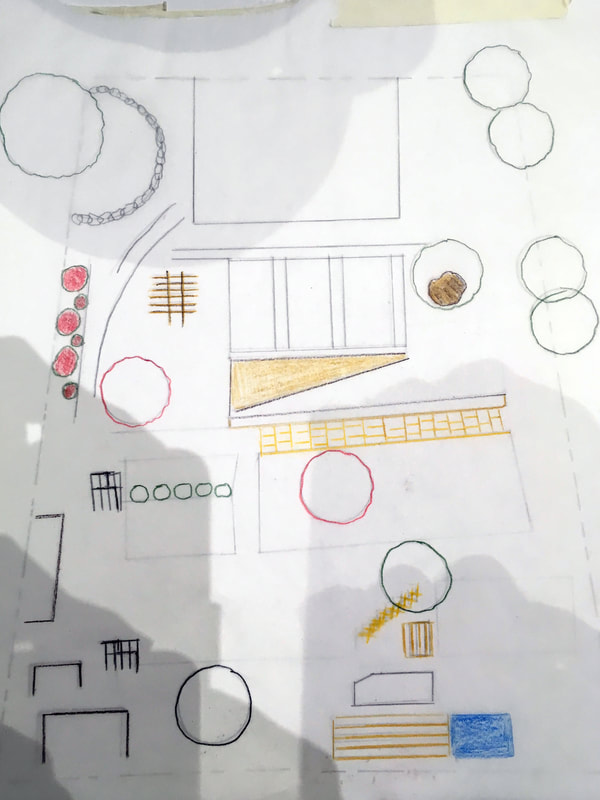
An Example of A "Cottage" Garden Design
Below is a gallery of student samples. All students were new to using architectural scale and drafting conventions. These are works in progress. Please forgive some of the shadows!
